Avatour User and Best Practices Guide
1. For All Avatour Users
If you are new to Avatour, the following resources provide a helpful introduction to the platform and its capabilities:
- Avatour How it Works video
A short overview of Avatour’s main features and how the platform enables immersive remote collaboration. - FAQs
Answers to frequently asked questions. - Glossary
Definitions of key Avatour terms and concepts frequently used. - Website
Have a look especially at Avatour Features along with the dedicated Use Cases and Industries sections to learn how Avatour can support your specific needs.
2. Avatour User Types
2.1 Meeting Attendees (No Account required)
Users can join the meeting without registering for an Avatour account. Exception: If the host has restricted the meeting to registered users — for example, to allow only internal employees to join via Single Sign-On (SSO) — the calendar invitation will indicate that participants must log in to authenticate.
Users access the meeting as follows:
- Receive a calendar invitation from the host.
- Use the meeting link in the invitation to join.
- Enter a meeting password if the host has enabled one.
- Participants can join without an Avatour account unless the meeting is restricted and requires login to authenticate.
2.1.1 Participant
- Can join and interact fully (webcam, microphone, chat, and Present functionality).
- Maximum of 20 interactive participants per meeting.
2.1.2 Spectator
- Can view the meeting and participate via chat only.
- Cannot share video, use a microphone, present, play/pause Assets, or capture Snapshots.
- Maximum of 10 Spectators per meeting.
- Together with Participants, a meeting can host up to 30 attendees.
2.2 Registered Users
Registered Users have an Avatour account. Accounts are created in one of the following ways:
- Admin-invited: During onboarding, Avatour sets up a dedicated tenant for the organization and creates one or more Admin accounts. Admins can then invite users within the organization and assign them to groups, which define their platform role (Guest, Host, or Admin). Invited users receive a signup link to complete account setup and set a password.
- Host-invited: Hosts can add users as Editor collaborators to a Workspace. This consumes a Host license and ensures the user has Host-level access.
- SSO auto-provisioning (Enterprise/Business tier only): Accounts can be automatically created by the IdP. By default, SSO-provisioned accounts are added to the Guest group, unless overridden via SAML group mappings. Admins can still invite users and assign group membership directly even when SSO is enabled.
Summary:
Registered users and their group membership can be managed in multiple ways:
- Admin management: An Admin in the Avatour console can create users and assign them to groups, which define their platform role (Guest, Host, or Admin).
- SSO provisioning: For Enterprise or Business tier customers with SSO enabled, the IdP can automatically provision accounts and assign group membership, which defines the user’s platform role.
- Host-invited users: Hosts can invite other users as Editor collaborators to specific Workspaces. Assigning the Editor collaborator role consumes a Host license.
Recommended Best Practice (Enterprise Customers):
For organizations expecting a large number of users who need access to Avatour, it is recommended to integrate Single Sign-On (SSO) and manage users and group memberships from the IdP. This approach streamlines account provisioning, group assignment, and license management, reducing administrative overhead and ensuring consistent access control.
2.2.1 Guest Users
- Added to the Guest group.
- Can view Assets within Workspaces where they have been added as Viewer collaborators.
- Cannot create workspaces, host meetings or upload content.
- SSO-provisioned Guest accounts authenticate via the IdP; no Avatour-managed password is required.
2.2.2 Licensed Users (Web Console Access)
Host Users (Group: Host)
- Can create/ manage Workspaces, invite collaborators to a workspace, host live meetings, upload Quick Captures.
- Has access to the Host Dashboard and Operator App on supported 360° cameras.
Admin Users (Group: Admin)
- Includes all Host capabilities plus full account administration.
Additional Admin privileges include:
Account Management
- Create new users and assign them to groups.
- Reset passwords when managed by Avatour (not applicable when SSO is enabled).
- Upgrade Guest users to Host.
- Deactivate users (Admin accounts must first be converted to Host before deletion).
- Transfer assets from one Host user to another during deletion.
Settings
- Configure organization-wide security settings for assets, workspaces and meetings hosted on the platform (e.g., whether a Host must be present to start a meeting, whether faces should be blurred on all videos uploaded to the platform).
- Enable or disable AI features or recording.
- Apply company branding consistently across the platform if a custom domain is configured.
Assets & Analytics
- View all Assets uploaded by any user in the organization.
- Review platform usage across the organization.
2.2.3 Workspace Collaborator Permissions
Workspace permissions define what a user can do within a specific Workspace. These are separate from platform-level group membership (Guest, Host, Admin).
-
Editor collaborator: Users with this permission can:
- Manage Assets (upload, remove, blur faces, generate summaries)
- Manage meeting settings (enable/disable recording, allow or remove participants)
- Schedule and host live meetings
- Generate reports based on predefined templates
- Add or remove collaborators from the Workspace
-
Viewer collaborator: Users with this permission have read-only access to Workspace Assets. They cannot modify Assets, manage meetings, or manage collaborators, but they can create Notes on Assets.
3. For Remote Meeting Participants and Workspace Visitors
Avatour allows users to collaborate in two primary ways:
-
Join an Avatour meeting (Synchronous Collaboration):
You may receive a calendar invitation to join an Avatour meeting. During the meeting, participants can conduct a live remote site visit or synchronously review assets together. -
Visit a Workspace (Asynchronous Collaboration):
You may also be invited as a collaborator to a Workspace to review assets asynchronously (on your own schedule).
3.1 How to Join an Avatour Meeting and Visit an Avatour Workspace
3.1.1 Any "Flat Screen" Device with a Web Browser
You can join an Avatour meeting from any desktop or laptop computer, smartphone, or tablet using a web browser.
Joining an Avatour Meeting
Note: Joining an Avatour meeting requires that you grant microphone permissions. Please accept any permission prompts from your browser.
-
Via calendar invitation (recommended):
- You will typically receive a calendar invitation with a direct join link (for example:
https://avatour.live/join?s=xxxxx). - Clicking the link will automatically populate the 5-character meeting code and take you to the meeting.
- Authentication required: Some meetings are restricted to registered users. In this case, the invitation will indicate that you need to log in to access the meeting.
- Password-protected meetings: Some meetings may require a password. In that case, the invitation will include the password you must enter to join.
- You will typically receive a calendar invitation with a direct join link (for example:
-
Via meeting code:
- If the host shares a 5-character meeting code separately, go to https://avatour.live/join, enter your name and the meeting code, and join the meeting.
- If the meeting is password-protected, enter the password provided by the host.
- If the meeting requires authentication, you will need to log in with your Avatour account before joining.
Tip 1: If your camera or microphone does not work, it may be in use by another application (for example Microsoft Teams or Zoom). Close any apps that might be using your camera or microphone, then leave and rejoin the Avatour meeting.
Tip 2: If you are still unable to join the meeting, run this test: https://avatour.live/test.
The test can identify whether your corporate firewall or network is blocking access, and will provide information to guide discussions with your IT team.Tip 3: Do not use the Avatour iOS or Android apps to join meetings. These apps are only required when streaming a live meeting from an Insta360 camera, since those cameras cannot run the Avatour 360° software directly and require a smartphone to assist.
Visiting an Avatour Workspace (without joining an Avatour Meeting)
You can access a Workspace in the following ways:
-
Public Workspace:
If the Workspace is public, the link can be accessed directly — no login required. -
Restricted Workspace:
If the Workspace is restricted, you must be added as a collaborator with either Editor or Viewer permissions.- When you are added as a collaborator, you will receive an email notification with a link to the Workspace.
- Click the link in the email to open the Workspace. If you are not already logged in, you will be prompted to log in or complete signup.
- Once logged in, the Workspace will open automatically.
Alternatively, you can log in at https://avatour.live/login and access the Workspace from your list of Workspaces.
3.1.2 VR Headset
You can join a meeting and visit a workspace from a range of compatible Meta and Pico headsets. To do this:
- Install our Avatour app from your respective VR store app: How to install Avatour VR app
- Load our app and input the meeting code or select a Workspace to join a meeting. For more information on how to use our VR app, see our Knowledge Base article here.
3.2 Meeting and Workspace Collaboration Tools
Avatour allows collaboration in two main contexts:
- Meetings (synchronous): Collaborate in real-time with other participants, including live site visits or reviewing recorded assets together.
- Workspaces (asynchronous): Review and interact with assets on your own schedule, 24/7.
The collaboration tools are mostly similar between meetings and workspaces, with some differences due to the synchronous vs asynchronous context.
3.2.1 Interface Layout
The Avatour interface is organized around three main areas:
- Left panel – Workspace assets and supporting tools
- Center canvas – Main viewing area for live video or assets
- Right panel – Contextual information, such as participants, meetings, or chat
Most interactions are initiated from the bottom menu.
Clicking a menu option opens a side panel on the left or right side of the screen, while the center canvas remains the primary viewing area.
3.2.2 Meeting View Example
Here is an example of a view in an Avatour Meeting:

Avatour Meeting with Assets Panel (left), Canvas (center), and Participants Panel (right)
3.2.3 Workspace View Example
Here is an example of a Workspace view:

Avatour Workspace with Assets Panel (left), Canvas (center), and Meetings Panel (right)
3.2.4 Bottom Menu Overview
The bottom menu provides access to the main interface controls and panels:
Meeting Bottom Menu

Avatour Meeting Bottom Menu
- Assets – Review workspace files, including recorded videos, images, snapshots, and PDFs.
- Chat – Send messages to all meeting participants.
- Camera – Turn your webcam on or off.
- Microphone – Mute or unmute yourself.
- Present – Present an asset, desktop, or webcam feed (see Present section below).
- Host Tools (hosts only):
- Lock Focus – Lock the view for all participants.
- Mute All – Mute all participants.
- Enable Full Screen – Make the meeting tab full screen.
- Exit Meeting – Leave the meeting.
- Start Recording – Use this button to start and stop recording manually during a meeting. Alternatively, meetings can be recorded automatically if auto-start recording is enabled in the workspace settings. In both cases, recordings are saved to the workspace assets.
- Map – Open or close the map panel for assets with a GPS track. Clicking a location jumps to the exact point in the video. The map updates live as the video plays.
- Participants – Open or close the participants panel.
- Meeting Info – View the meeting code, invite link, and access related tutorials.
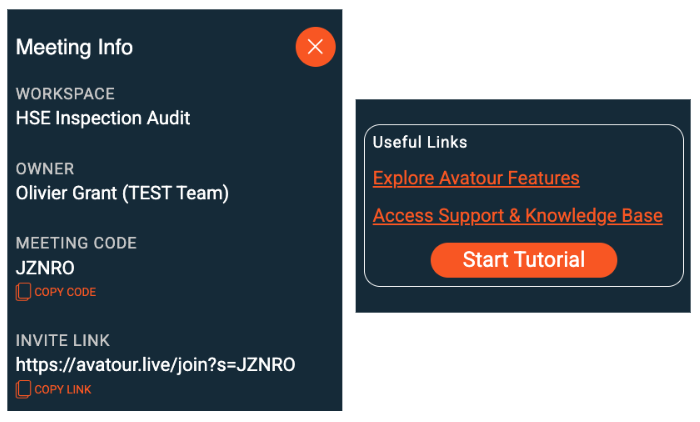
Avatour Meeting Info Side Pane
- Settings – Adjust language, audio, and video settings. For live 360° video meetings, use Show Bitrate to monitor connectivity stats.
Tip: Send the meeting link or add it to a calendar item to invite participants.
Present Menu
The Present option in the meeting bottom menu allows you to share content with all participants.
- Camera – Share your smartphone/tablet camera. This can also be used during a live 360° video meeting to overlay a secondary view for close-ups or specific details.
- Desktop – Share your desktop screen with all participants.
- Asset – Present an asset from the workspace. Selecting an asset opens the Asset toolbar, which provides playback controls and collaboration tools specific to the asset being presented.
Asset Toolbar (Meeting)
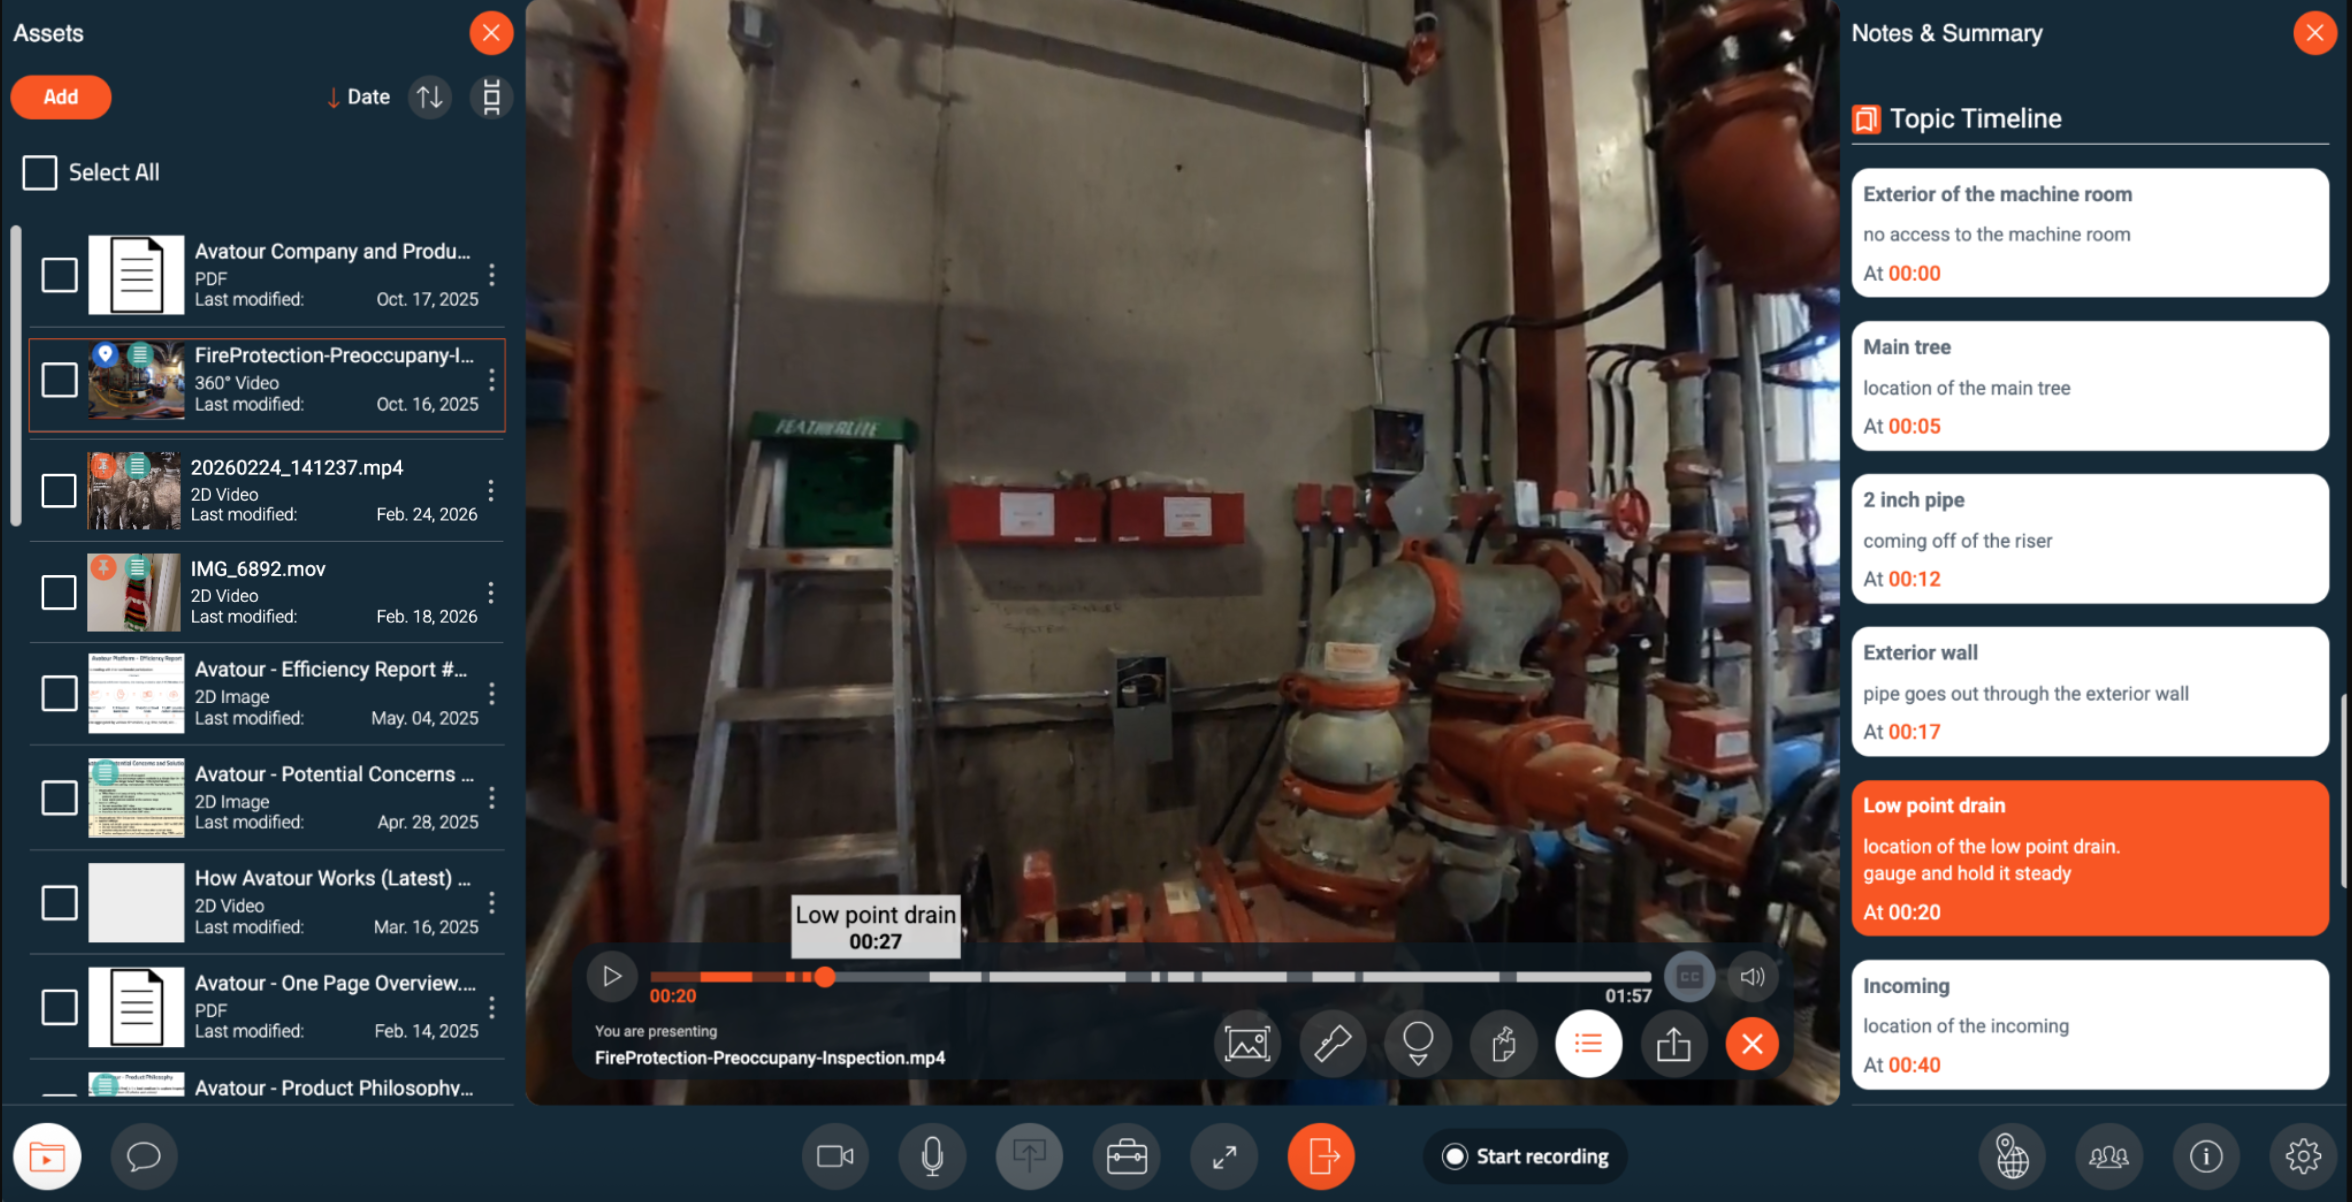
When presenting an asset in a meeting, the Asset Toolbar appears above the canvas. Here are the tools and menu items available when presenting an Asset in a Meeting - explained from left to right.
 Avatour Menu when presenting an Asset in a Meeting
- Video Timeline / Progress Bar – Shows video progress with notes and key topics extracted from audio. Click a note or topic to jump to that moment and open the note. Includes Play / Pause controls.
- Snapshot – Capture a 360° or 2D image from the asset.
- Spotlight – Highlight a specific area for all participants during live sessions.
- Show/Hide Point-of-View (POV) – Display where each participant is looking in the 360° video.
- Notes – Create notes anchored to specific moments in the asset. Notes can be categorized (Observation, Issue, Action, Recommendation), tracked by status (Open → In Progress → Resolved), and shared via direct links.
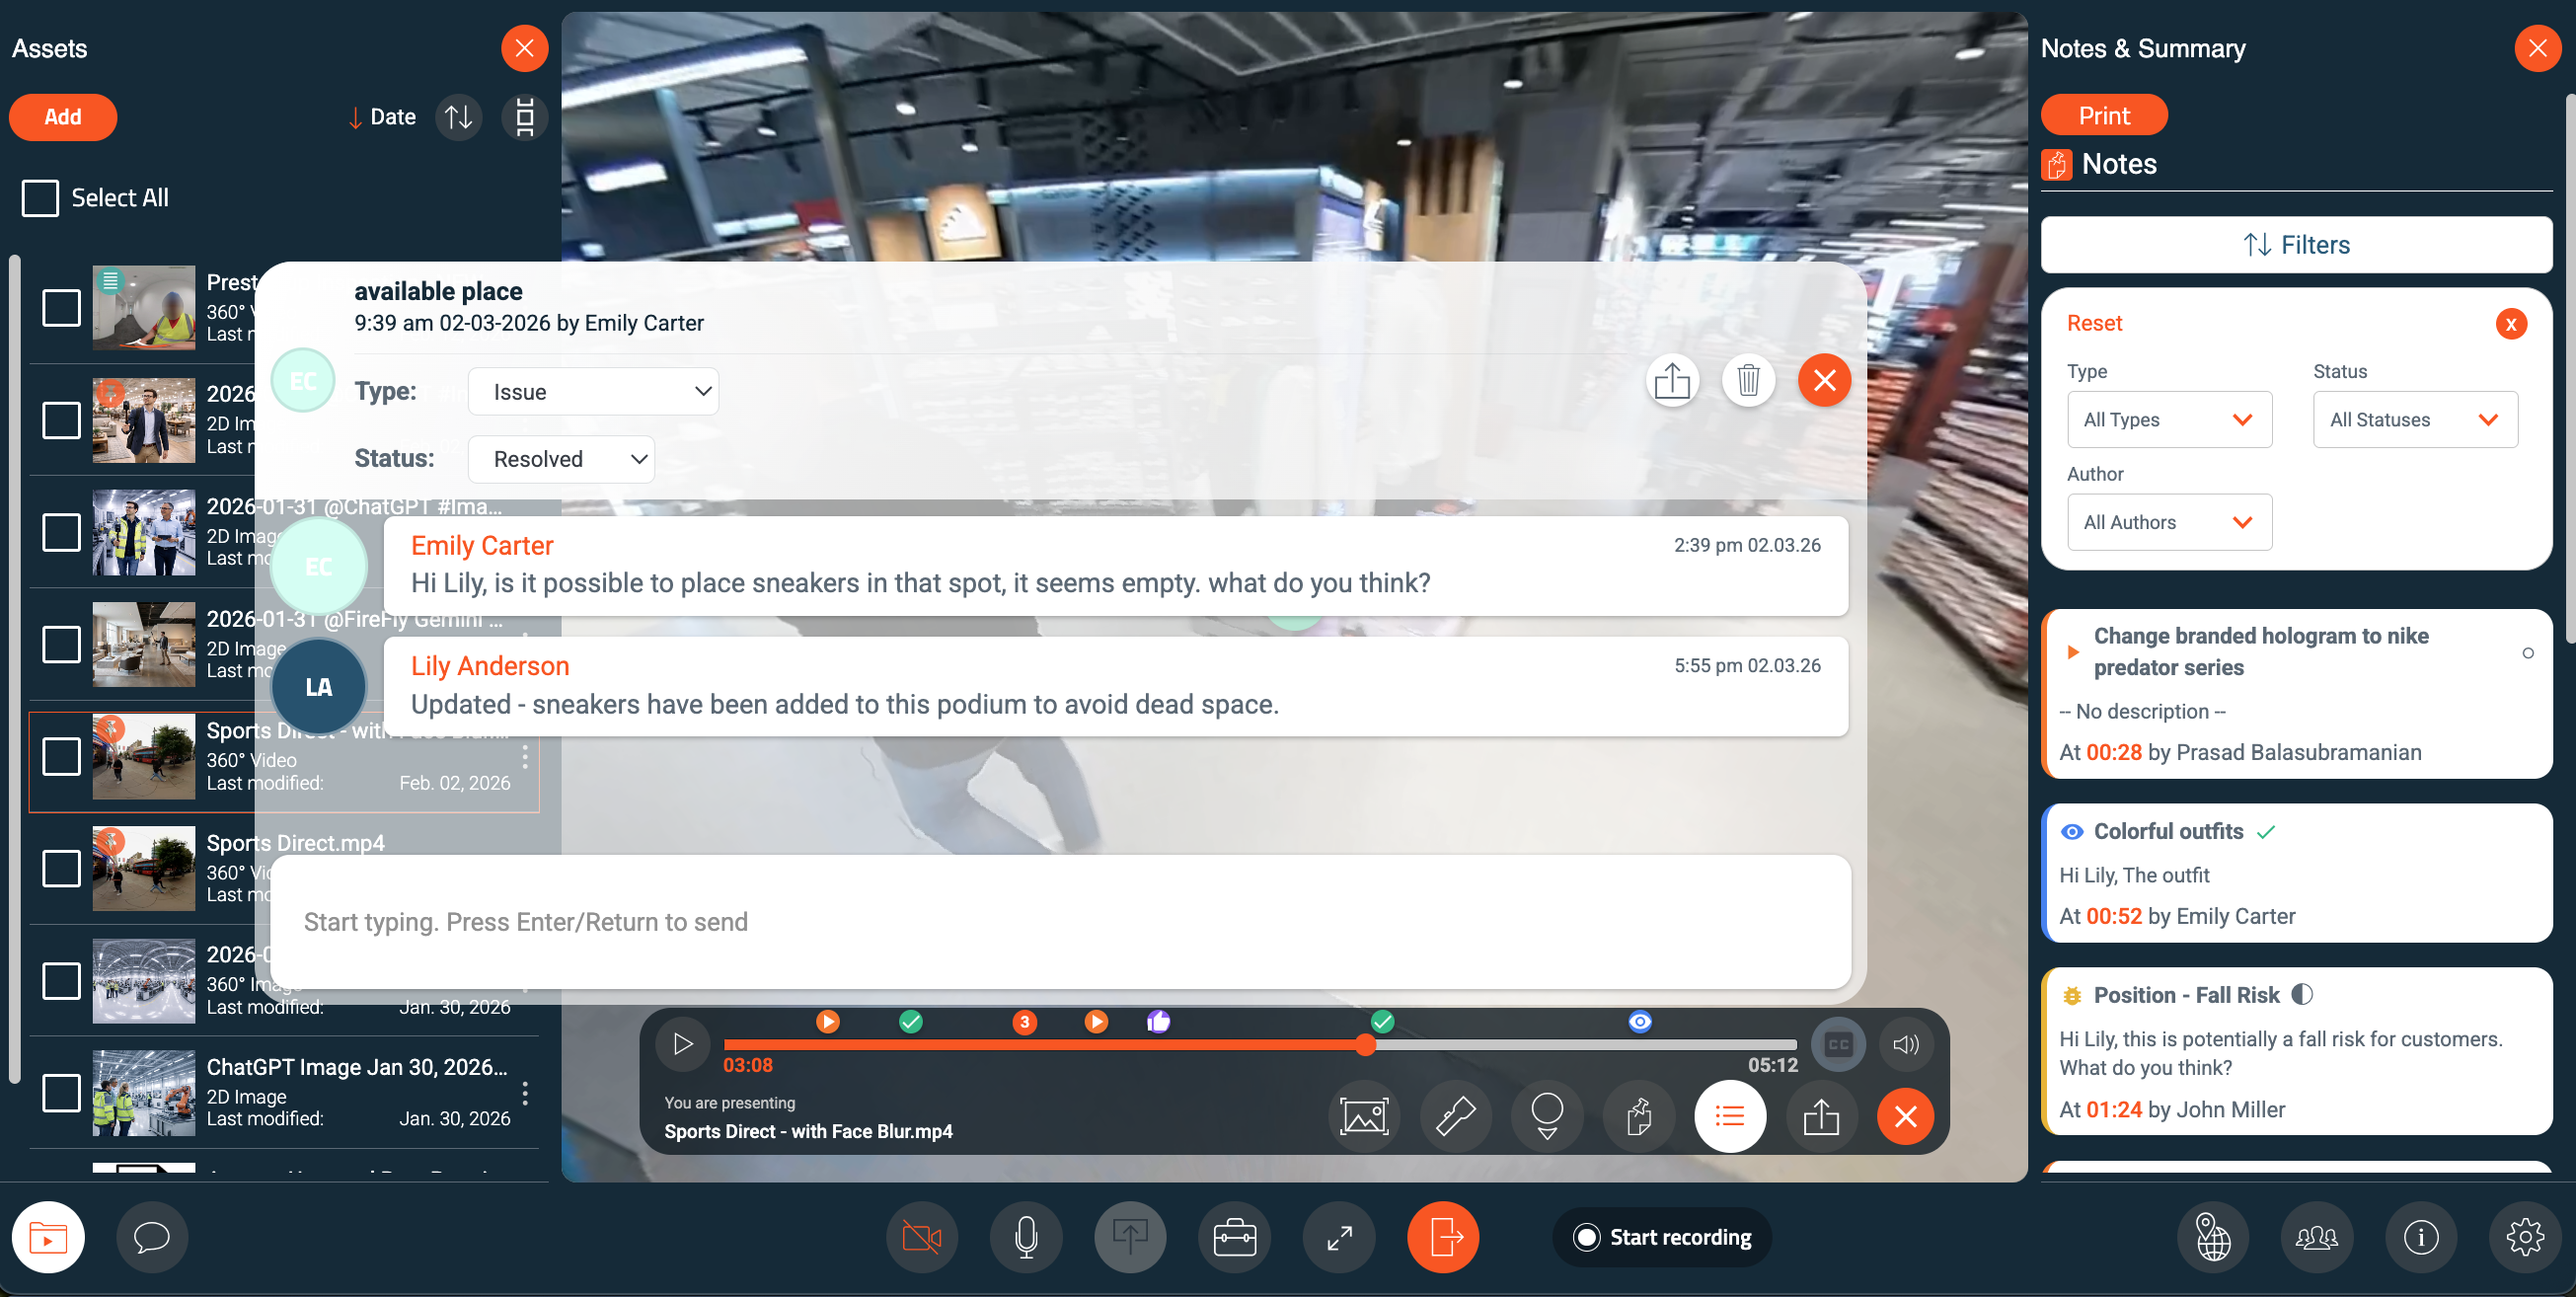 Avatour Note and Note Filters
- Voice Command Notes – These are automatically generated placeholders when the recording detects mentions like “insert note,” “take a note,” or “make a note.” These notes appear on the timeline and need to be positioned and finalized by the user.
 Avatour Notes - Voice Command Generated
- Notes and Summary Panel – Opens a side panel that displays all notes, key topics, and an executive summary for the asset. Clicking an item brings you to that moment in the video.
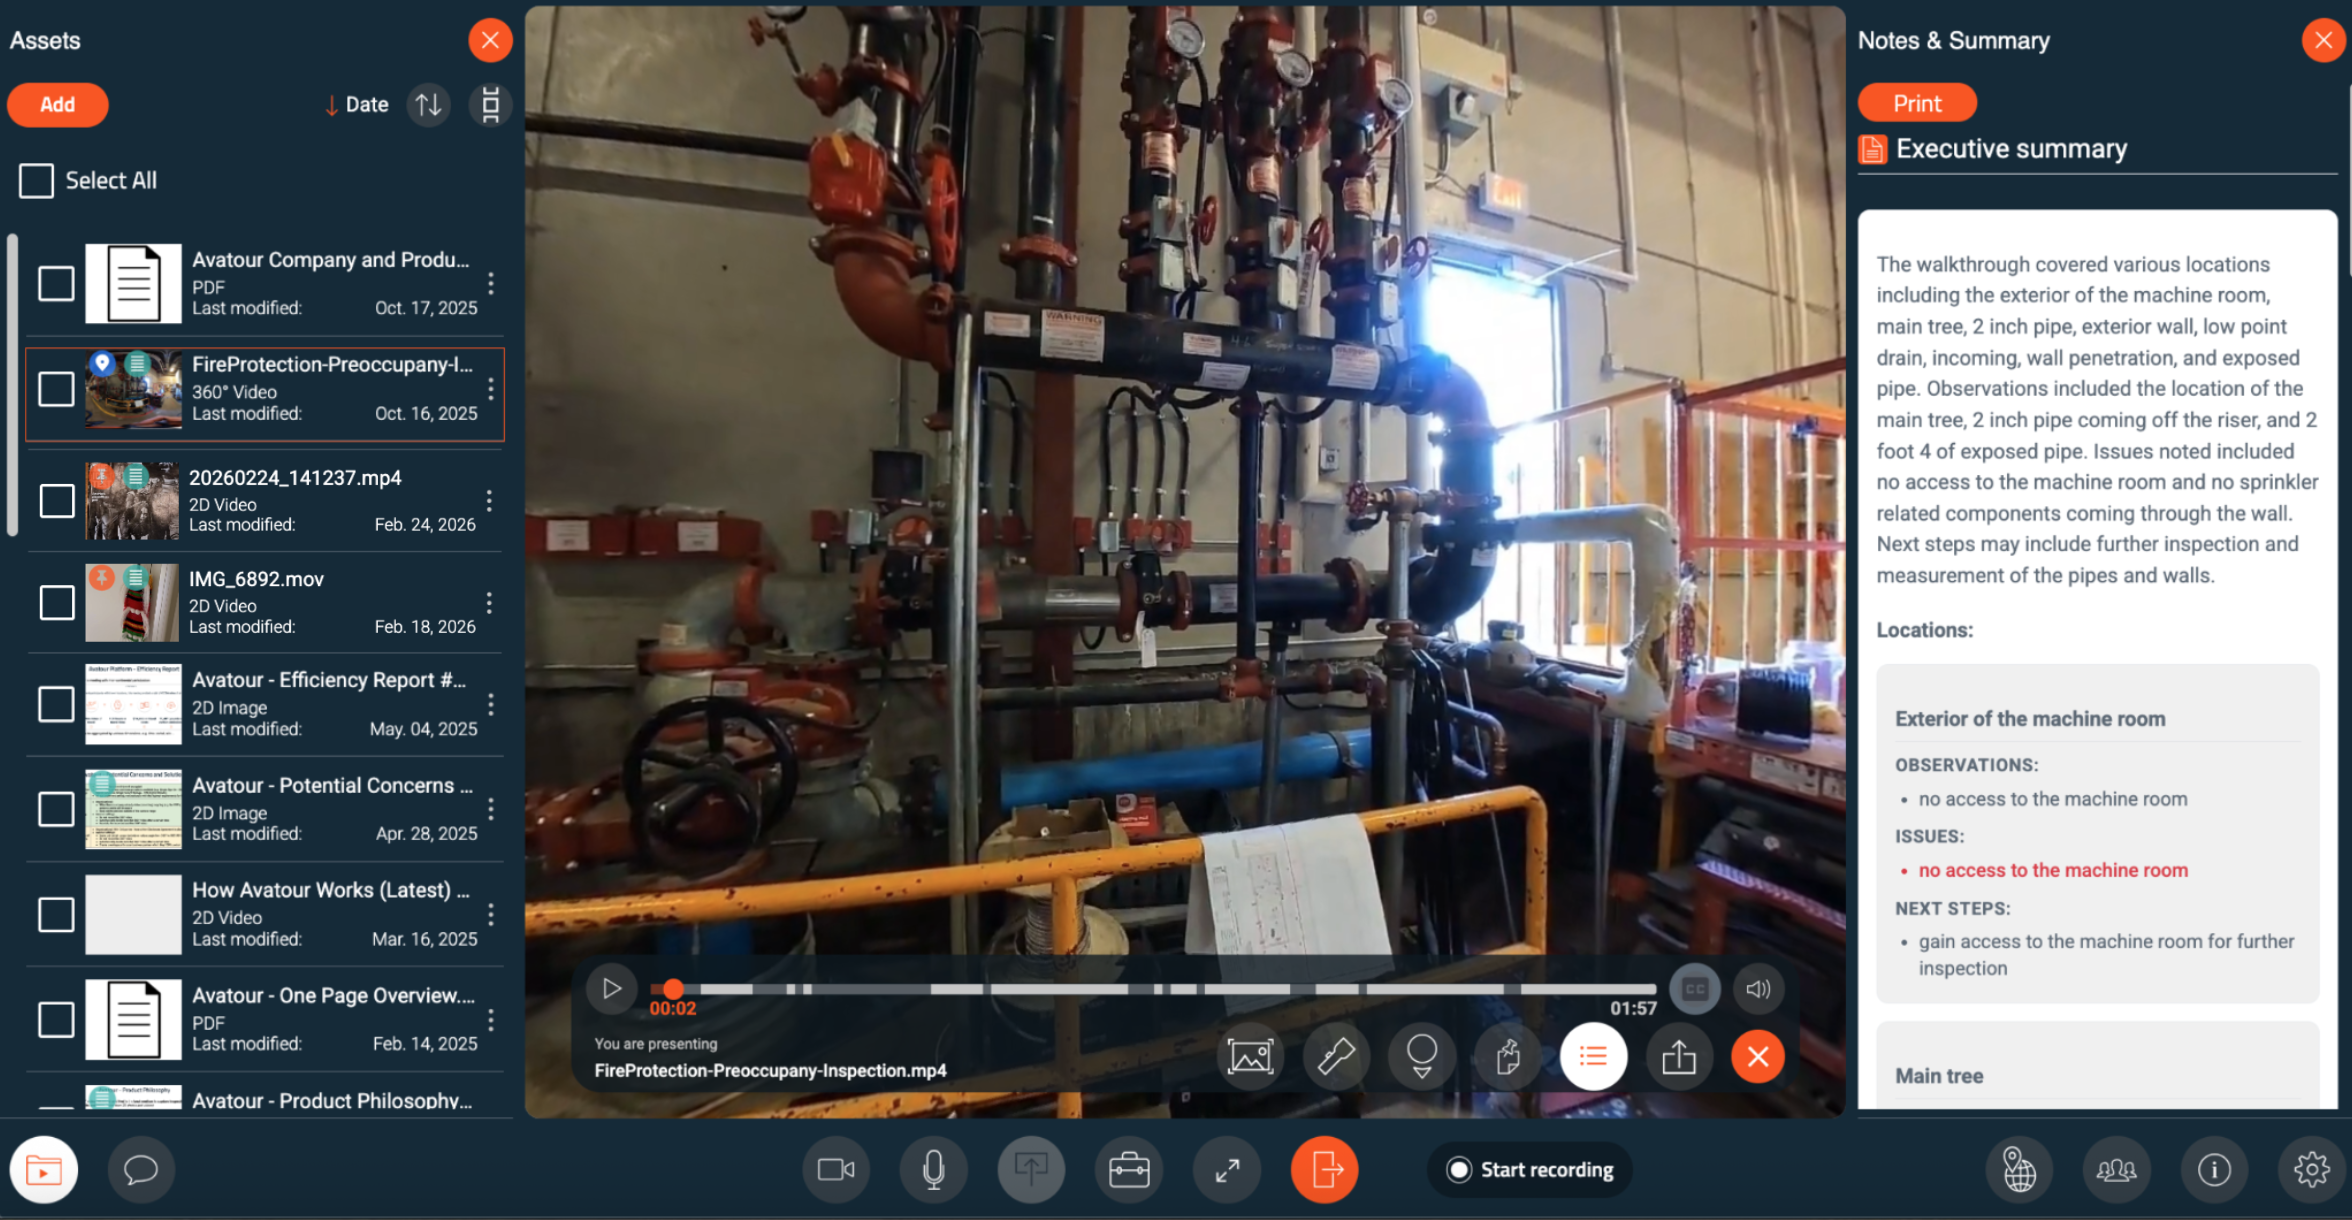 Avatour Executive Summary while presenting an Asset in a Meeting
 Avatour Topics while presenting an Asset in a Meeting
From the Side Panel, you can print an asset report or download it as TXT or CSV. Reports can include notes, AI-generated topics, and full transcriptions. You can also choose which elements to include before exporting.
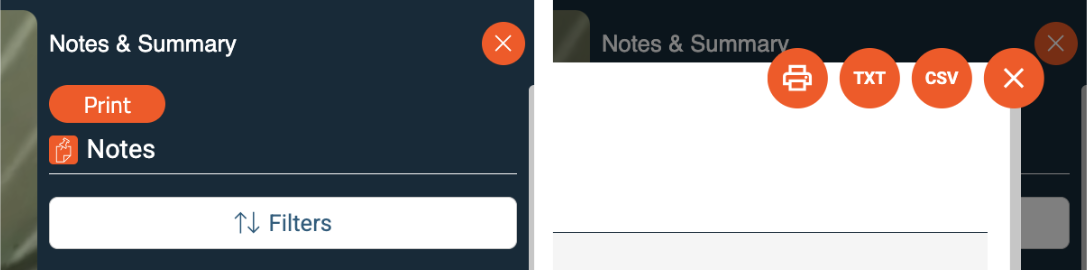
Avatour Asset Report Print / Download Menus

Avatour Asset Report Element Selection Menu
- Share Link – Share a link to a specific note or scene in the asset.
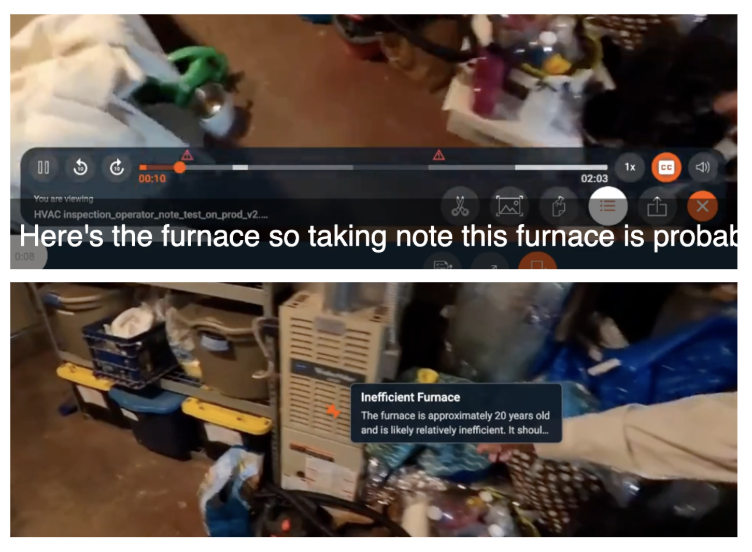
- Closed Captions (CC) – Display on-screen text transcription during video playback.
Asset Toolbar (Workspace)
When reviewing an asset in a workspace, the toolbar is similar but optimized for individual use:
 Avatour Menu when presenting an Asset in a Workspace
- Video Timeline / Progress Bar – Shows video progress with notes and key topics extracted from the audio track. Click anywhere on the timeline to scrub through the video. Click a note or topic to jump to that moment and open the note. Includes Play / Pause controls.
- Snapshot, Notes, Notes and Summary Panel Panel, Share Link, Closed Captions
- Not available: Spotlight, POV (these require live participants)
- Additional controls:
- 10-second steps – Skip forward/backward
- Playback Speed – Adjust speed (0.5×–2×)
- Trim Video – Trim beginning or end of the asset
4. For Host and Admin Users - Avatour Web Console
When you log in to your Avatour User Account, you will access the Web Console.
4.1 Web Console - Overview Main Menu
On the left side, you will see the following menu items:
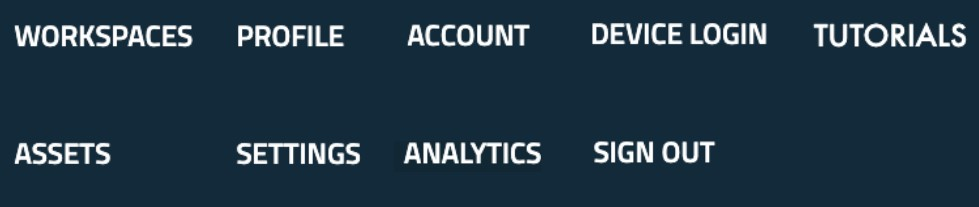 Avatour Web Console - Main Menu
- Workspaces – Organize your content efficiently. Each workspace contains Assets, Collaborators, Meetings, and Settings.
- Assets – Access and manage all your assets (videos, images, PDFs). Admins can view all account assets, and shared assets are visible to all users.
- Profile – Manage your language and password.
- Analytics – Track session activity, workspace usage, and ROI metrics.
- Settings (Admin only) – Configure workspace, meeting, and asset defaults across the organization. Admins can also customize branding (logo, colors, backgrounds).
- Account (Admin only) – Manage registered users and 360° cameras.
- Device Login – Enter the code displayed on your 360° camera to pair it with your account.
- Tutorials – Access guided tutorials.
- Sign out – Log out of the console.
Sections like Profile, Device Login, Tutorials, and Sign out are self-explanatory and do not have detailed subsections.
4.2 Web Console - Details by Menu Item (with images)
4.2.1 Workspaces
Workspaces are flexible organizational units that let you manage assets, collaborators, and meetings in one place. You can create a new workspace with the New Workspace button in the upper right corner.
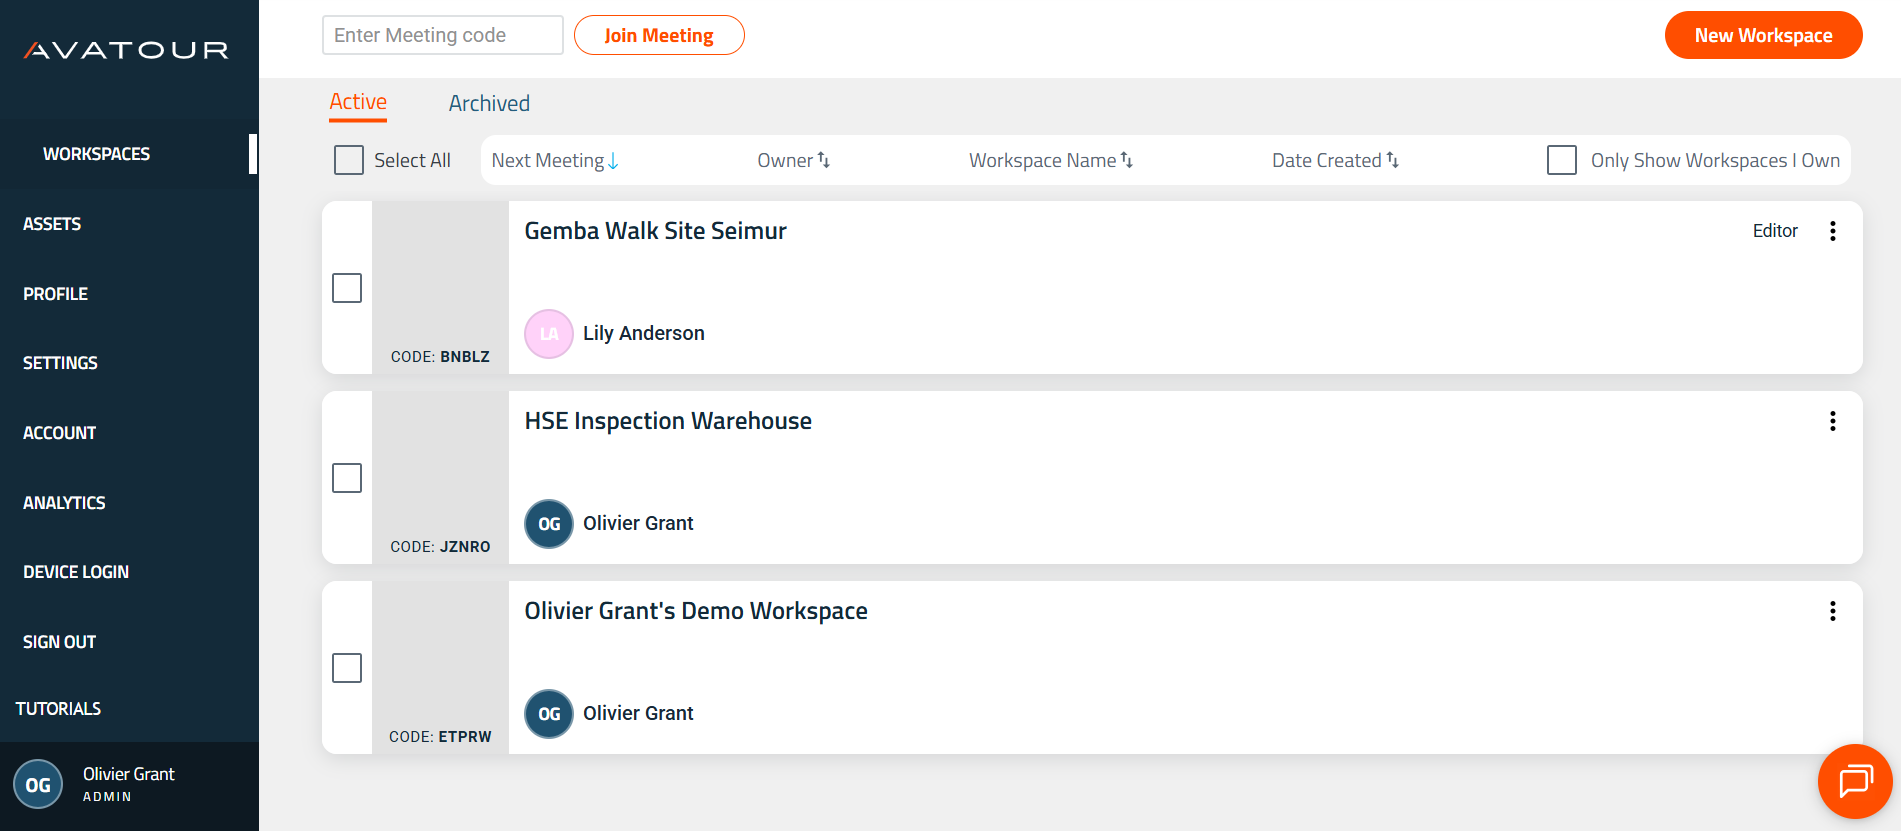 Avatour Web Console - Main Menu Item Workspaces
Click the bell icon to see a summary of workspace activity over the last 7 days.
 Workspace Recent Activities
Inside a workspace:
Workspace with Assets (left), Canvas (center), Meetings (right)
- Assets – Manage files allocated to this workspace.
- Collaborators –
Control access to workspaces by
- Viewer – Can view assets. Invitation creates a Guest user if needed.
- Editor – Full workspace control, same rights as Host. Invitation upgrades user to Host if needed.
Multiple users can access a workspace simultaneously without a meeting. Public workspaces and meeting access settings provide alternative access.
- Report – Generate a report using a checklist template on selected workspace assets.
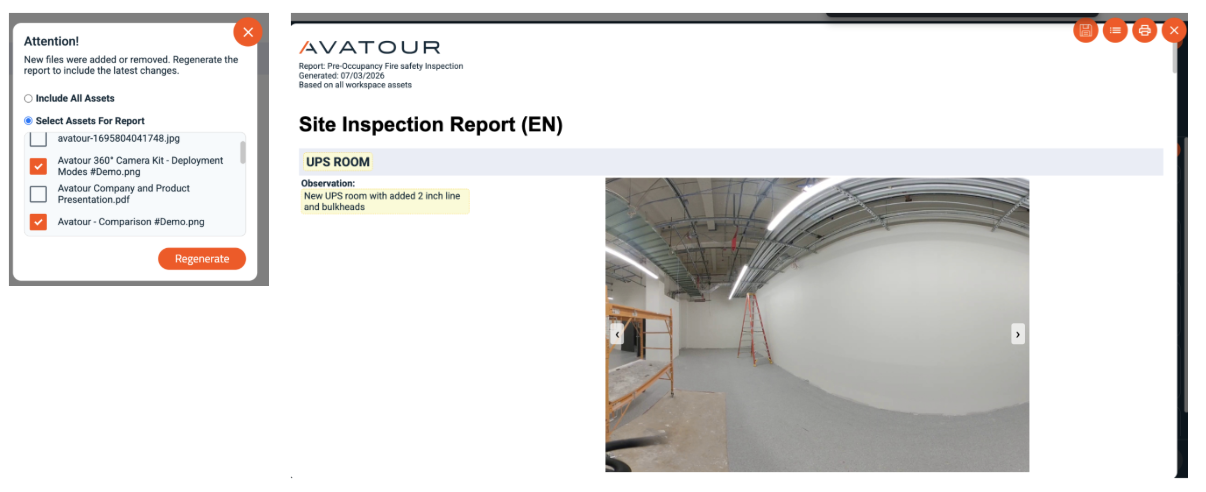 Workspace Report and Asset Selection
- Map – Display GPS-enabled asset locations on a map.
- Meetings – Organize meetings in the workspace.
- Settings – Configure workspace and meeting defaults:
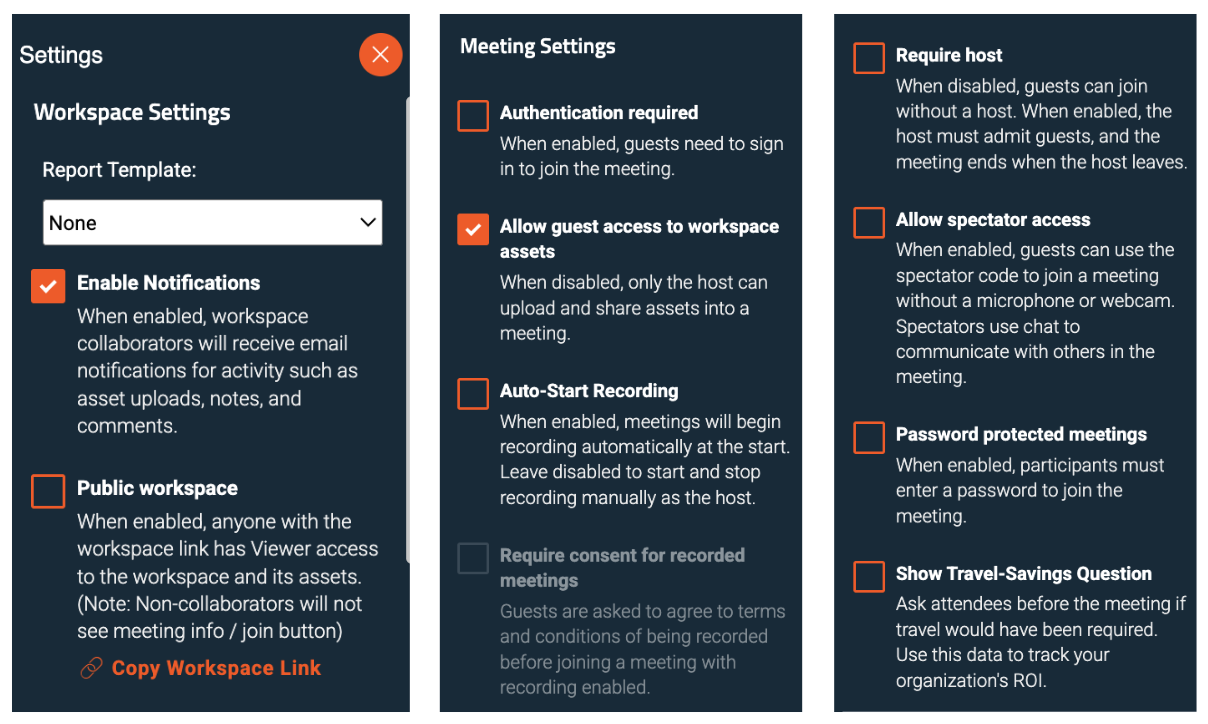 Workspace Settings
Workspace Settings
- Report Template – Select checklist template for AI reporting.
- Enable Notifications – Daily digest emails for note status changes.
 Email Notifications Example
- Public Workspace – Anyone with the link can view assets directly.
Meeting Settings
- Authentication required – Participants must sign in.
- Allow guest access – Permit non-registered users to view assets.
- Auto-Start Recording / Manual Start – Choose if meetings auto-record or are started manually.
- Require host – Host must admit participants; meeting ends when host leaves.
- Allow spectator access – Join without mic or camera; communicate via chat.
- Password protected meetings – Require a password for joining.
- Show Travel-Savings Question – Ask participants if the meeting reduced travel.
Settings can be combined (e.g., no host required but password protected).
4.2.2 Assets
Manage all 360°/2D videos, pictures, and PDFs. Upload/download assets, allocate to workspaces, share with other users, rename, print/download reports, activate face blur, and AI summarization.
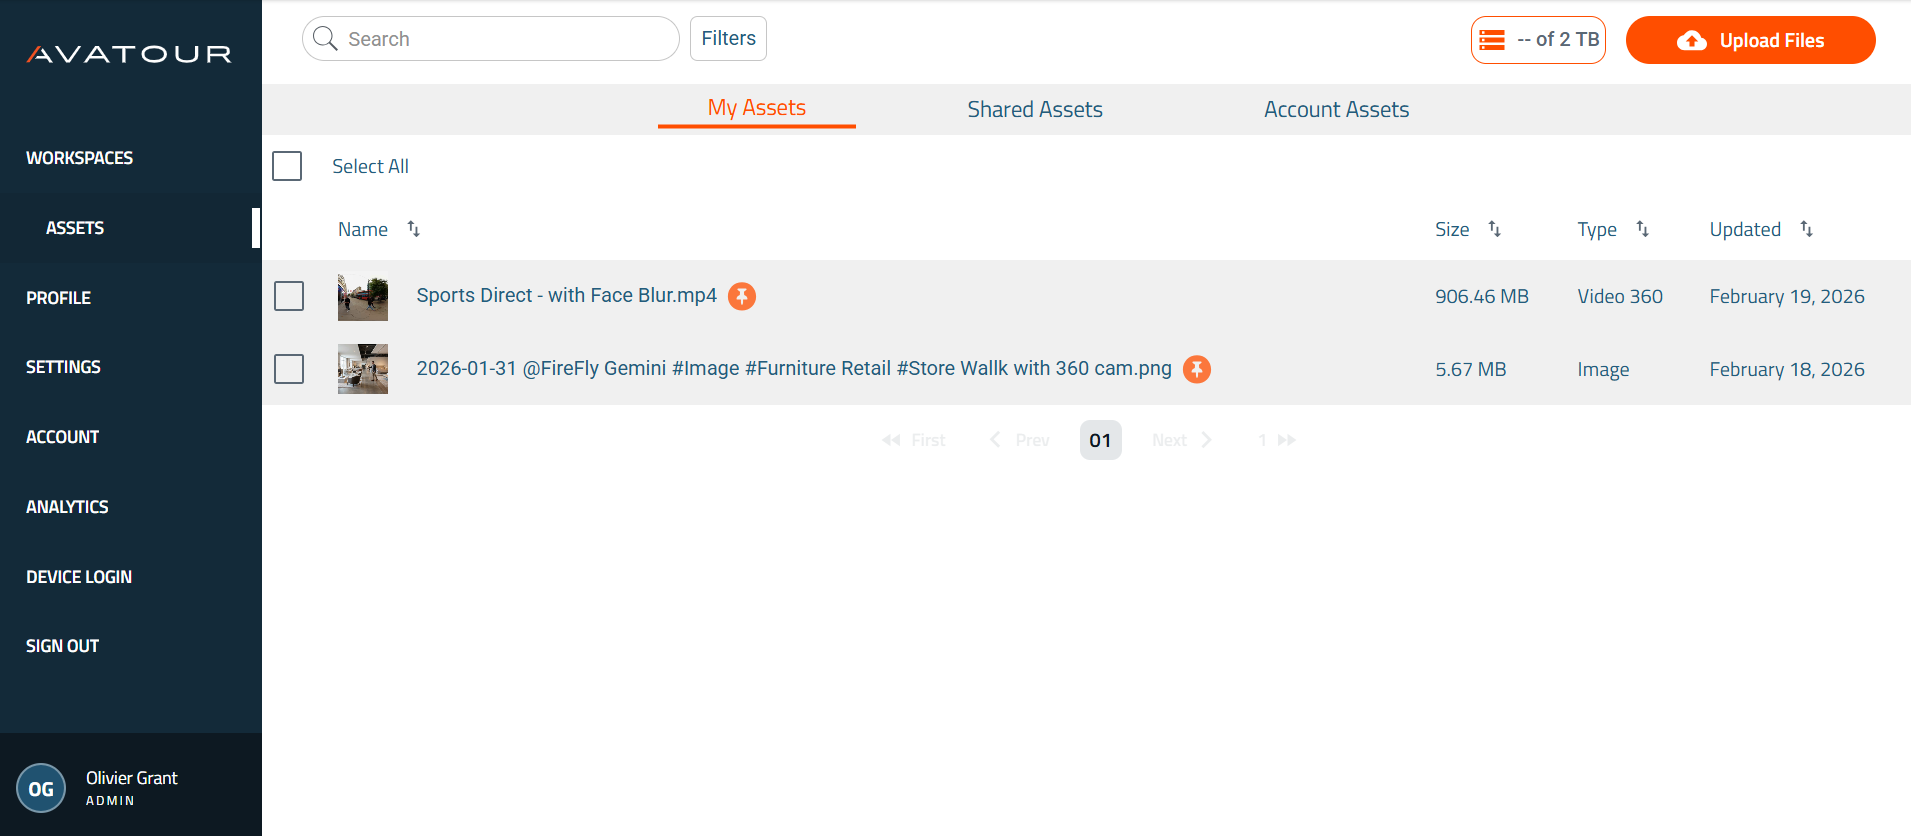 Main Menu Item Assets
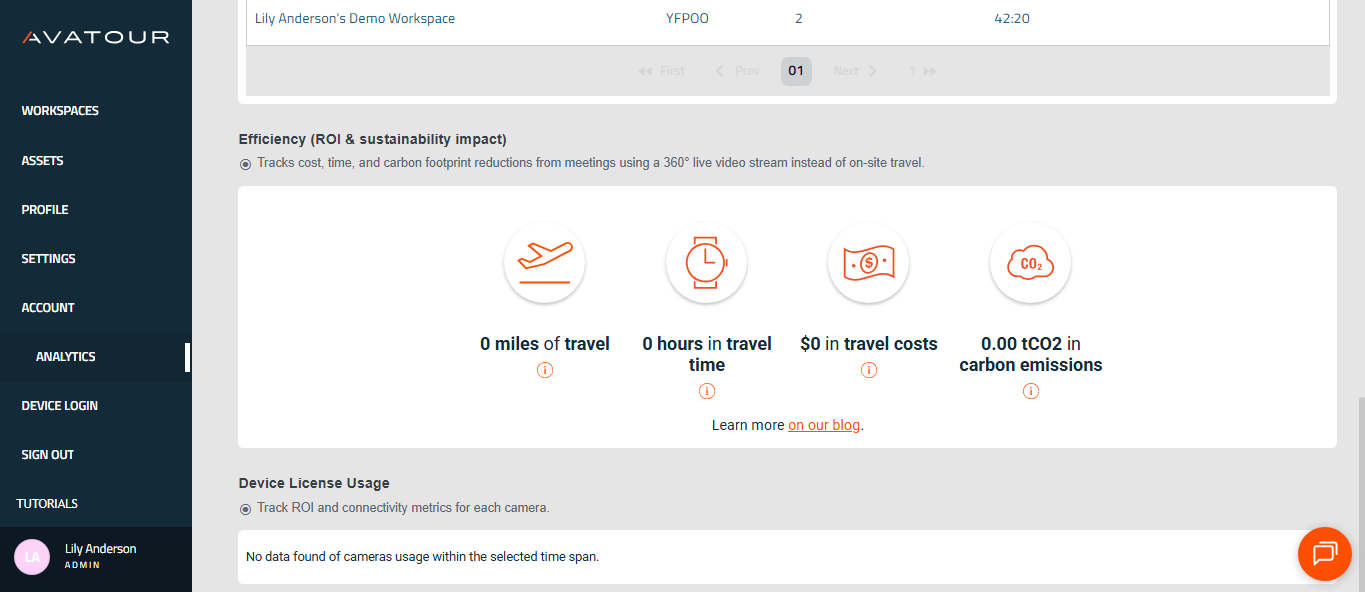
4.2.3 Analytics
Provides insights into meetings, workspace usage, and ROI metrics.
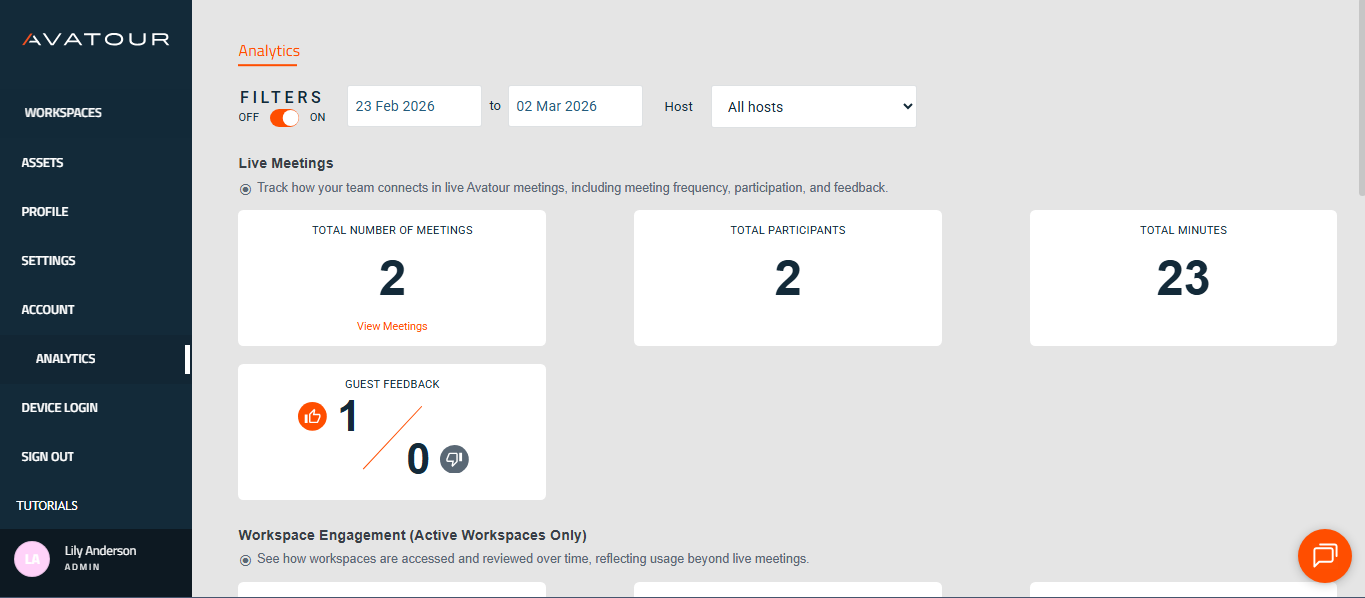 Analytics Overview
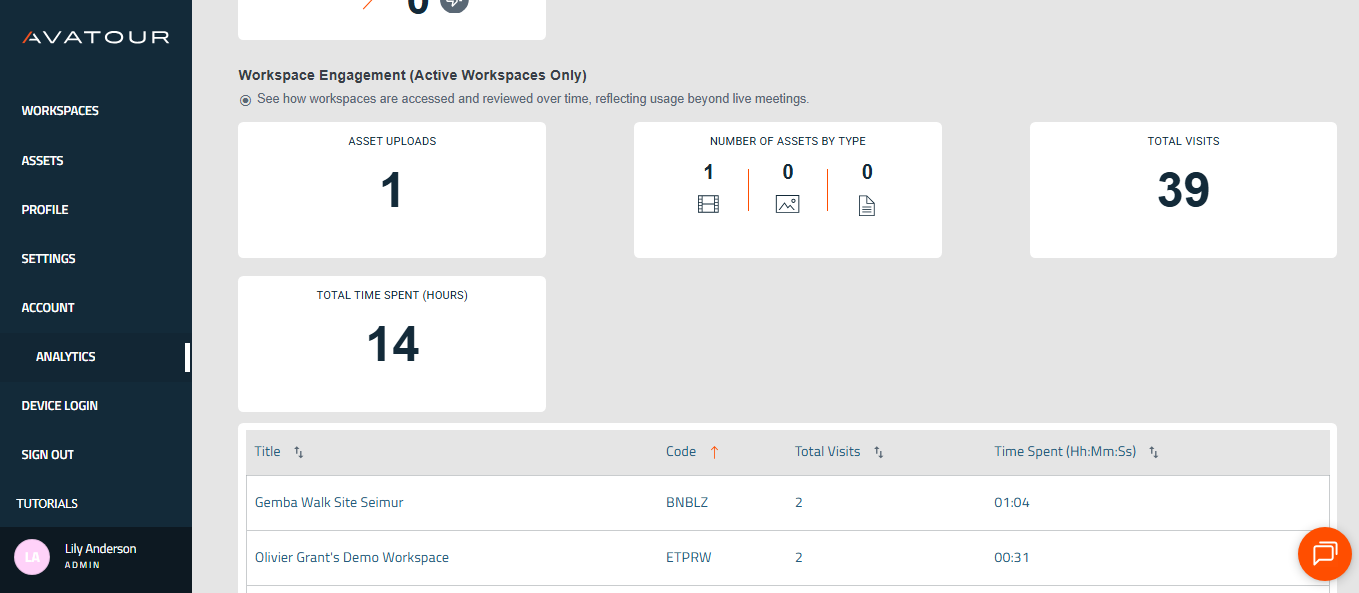 Meeting Activity & Workspace Usage
 Device License Usage & ROI
5. Onsite - How to Use the Avatour Turnkey Kit
5.1 Getting Started
Here you will find a very comprehensice online guide for your first steps with the Avatour Turnkey Kit: Quick Start Guide – Avatour Turnkey Kit 3.1 (Pilot PanoX V2 setup)
And here is also the picture with instructions you will find inside the lid of the 3.1 kit case.
 Picture inside the lid of the Avatour Kit case
Follow the guide and instructions to unpack, assemble, and power on your camera.
5.2 Useful Tips
External Battery – Longer Live Meetings & Improved Thermals
-
If your kit includes a Ulanzi battery: Attach it between the tripod base and the extendable stick, then connect the battery to the camera via USB-C.
-
If your kit includes a Telesin battery stick: Mount the camera directly onto the Telesin extendable battery stick and connect it via USB-C.
Using the external battery:
- Extends total battery life from ~40 minutes (camera battery only) to ~3 hours.
- Adds stability to the camera setup.
- Helps prevent potential overheating.
We recommend always using the external battery from the start, especially for live meetings.
Audio Considerations for Live Meetings and Recordings
-
Noisy environments: Use the Shokz headphones included in your kit for clear audio capture.
- Power On/Off: Hold the “+” button for 3 seconds (blue LED = on, red LED = off).
- Bluetooth Pairing Mode: While the headset is off, hold the “+” button for 5 seconds (LED flashes blue/red).
- Volume: Use the “+” and “-” buttons.
-
Quieter environments / multiple participants near camera: Use the NoxGear clip-on speaker. It’s not as high fidelity as conference speakers (e.g., Jabra Speak), but is easy to clip onto your shirt and captures nearby voices effectively.
- Power On/Off: Hold the Play/Pause button for 2 seconds.
- Bluetooth Pairing Mode: Automatically enters pairing mode when powered on (LED flashes blue/red; solid blue when paired).
- Volume: Use the “+” and “-” buttons.
-
Using your own device: If you prefer an alternative (e.g., a conference speaker or personal headset), you can pair it via the camera: Settings → Bluetooth.
Connectivity, Connectivity, Connectivity
Before you start: Ensure internet connection via:
- Local WiFi (preferred)
- Mobile Network (if outside WiFi range)
Recommended bandwidth: 10 Mbps uplink/downlink for full 360° streaming (~5 Mbps). Lower bandwidth (1–2 Mbps) only works when standing still.
Test Network Speed
- Single-location test: Any speed checker you normally use (e.g., Speedtest) to verify both upload bandwidth.
- Walking test across site: From the camera: Settings → Network → Connection Test. Walk through the entire space to confirm coverage and bandwidth.
Local WiFi
- Highly recommended for stable connections.
- If IT requires whitelisting, find MAC address: Settings → About → WiFi Address.
Mobile Network
Option A: Kit-provided hotspot & SIM
- Attach GlocalMe hotspot to Telesin battery stick (magnet).
- Ensures no interference and maintains connection if moving away from camera.
- Troubleshooting:
- Confirm pre-installed SIM (not Cloud SIM).
- Enable 5G in SIM Card Manager.
- Verify correct APN for your region (APN setup guide).
Option B: Personal hotspot / SIM - Use your own smartphone or dedicated hotspot.
Important Note:
Keep hotspot off while connected to WiFi; enable only when out of range. The camera's OS dynamically switches between WiFi networks based on signal strength and may inadvertently switch to the hotspot even when WiFi is available.
Mobile networks may throttle bandwidth unexpectedly. Check with your carrier on data plan limits, or contact Avatour support if using our hotspot and SIM.
Low Bandwidth Situations
- Pre-record location videos for later playback (recording guide).
- Share a smartphone camera stream to supplement low-bandwidth areas (0.1–0.3 Mbps upload).
No Connectivity
- Only pre-recorded video can be used (recording guide).
Other Onsite Participants – Best Practices
When multiple participants join a live Avatour meeting from the same location as the 360° camera, careful management of audio and bandwidth is crucial:
- Each smartphone, tablet, or laptop connected onsite consumes network bandwidth and can negatively impact the 360° camera feed.
- Multiple microphones and speakers in the same space can cause audio feedback, making the meeting experience unpleasant for all participants.
To address these challenges, follow these best practices:
- Use wired or wireless headphones: Preferably with noise-canceling to prevent echo and feedback.
- On-Site Mode: Join the meeting in On-Site mode when physically present near the 360° camera.
- This mode is optimized for onsite use:
- Mutes the participant’s mic and speaker by default.
- Does not send the participant’s camera feed.
- Does not display the 360° camera feed in the participant’s browser.
- Conserves network bandwidth, ensuring the 360° camera has maximum available upload for the live stream.
- Useful when a user wants to share specific details; you can share back your camera for targeted views.
- This mode is optimized for onsite use:
- Mute when not actively speaking: Prevents unwanted audio feedback and distractions.
- Use a separate network if possible: Have your smartphone connected to a different network than the camera’s network to reduce interference.
Following these guidelines ensures a smooth, high-quality live tour for both onsite and remote participants.
5.3 Avatour Camera App
Here are (1) the Top Level, (2) Settings and (3) Network Settings menus.
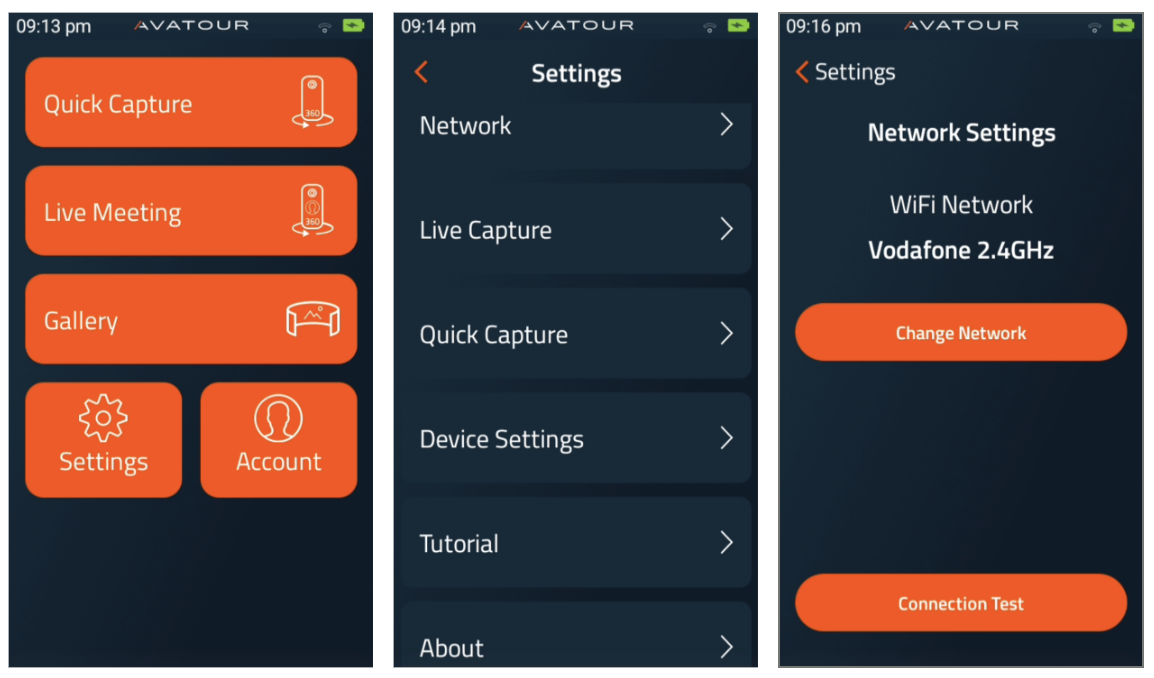 Avatour 360° Camera App - 3 Menus
Quick Capture - For offline 360° video recording. - For a detailed description see How do you record and upload 360 videos with the Avatour App?. We recommend using an external audio device (connected via bluetooth). N.B. You can also do standard 2D videos and pictures - simply change the mode between 360° and 2D in the bottom right corner once in the QC screen.
Live Meeting - For live 360° Video Conferencing. You will see your workspaces and clicking on one will initiate the live video stream from the 360° camera. Before you can join the meeting with your 360° cam you need to connect an audio device via bluetooth. For a detailed description see How to start a Live Capture meeting with your Pilot camera?
When hosting a Live Capture meeting with your 360 camera, you will have similar meeting tools available to you that mirror the web experience. Here is a link to our Knowledge Base article that explains these tools in more detail: Operator App Tools
Gallery - Find here all your 360° videos and pictures for upload to the Avatour Web Console.
Settings - Within Settings, you have the following options:
- Network: This option allows you to change which WiFi network the camera is connected to or run a network connection test to view your streaming throughput
-
Live Capture: Adjust your Live Capture settings depending on available bandwidth, guest’s VR sensitivity, or if your camera’s protective lenses are installed:
- Target Frame Rate: Adjust the frame rate for your Live Capture video between 15 fps, 24 fps, and 30 fps. Higher frame rates produce a smoother video, but will require more upload bandwidth. Default: 15 fps
- Target Bitrate: Enables you to increase or decrease the maximum streaming bitrate for your Live Capture. You can set your target bitrate between 1 Mbps and 10 Mbps. Higher bitrates will result in higher video resolution, but will require more upload bandwidth. Default: 5 Mbps
- Optimize Motion: This will decrease the video frame rate, generating less load on your network's upload bandwidth, and increase your streaming bitrate. In addition, this option helps to reduce motion sickness for VR participants. Default: Off
- Protective Lenses: This will affect how the 360° video is stitched depending if protective lenses have been installed on your camera. If you do not have protective lenses, set this to “No”. If you received a Kit 3.0, you have pre-installed protective lenses on and should set this to “Yes”. Default: Yes
-
Quick Capture: Adjust your Quick Capture settings depending on your preferred video frame rate, available bandwidth for recorded video uploads, or if your camera’s protective lenses are installed. Quick Capture has a set resolution of 4k which usually strikes a good balance between video quality and file size. (For higher resolutions you can use the native camera apps, also on the PanoX V2, for details see How do you record and upload 360 videos with the Avatour App?):
- Target Frame Rate: Adjust the frame rate for your Quick Capture video recordings between 15 fps, 24 fps, and 30 fps. Higher frame rates produce a smoother video, but will increase video file size and upload time. Recommended: 30 fps
- Target Bitrate: Set the target bitrate for Quick Capture uploads between 5 Mbps and 20 Mbps. Lower bitrates increase upload speeds, but will decrease video quality. Recommended: 20 Mbps
- Protective Lenses: See Protective Lenses section for Live Capture above
See also our Avatour 360° Video File Size Calculator for further advice on the above settings and video file sizes.
- About: View device serial number and software version
Account - For login with your Avatour host or admin account.
6. Best Practice Advice
6.1 First (informal) Uses and Getting Familiar
For your first uses and getting familiar with the Avatour Web Console and the Avatour Turnkey Kit we recommend the following steps:
- Take the kit home and play with it with family and friends using your home internet connection.
- Take the kit to the office and connect to a corporate network (corporate issues might evolve, e.g. corporate firewalls - but you know from step one that Avatour is working and this is a topic to sort out by your IT team with the help of Avatour).
- Start to use Avatour onsite (outside your office) at the meeting location to which remote participants would usually need to travel to. More connectivity topics might evolve. Avatour to help in cooperation with your IT team.
- Start using with internal and external remote participants.
6.2 Before a 360° Video Live Meeting
- We recommend to do a recorded 360° video tour before any live tour if time allows for three reasons: (1) Have a fallback solution for the live tour, (2) have something for documentation and later review (on top of the recorded live tour) and (3) start to create a library of 360° videos of all your sites which can be helpful for many use cases.
- All kit components charged for at least 90 minutes before the live meeting. We anyway recommend to have all devices on continuous charge when not in use. Like that all devices will always be ready, also for unplanned ad hoc meetings.
-
Have the kit fully assembled (1. tripod base + 2. Ulanzi battery + 3. extendable stick + 4. 360° cam).
-
Confirm a Workspace is created for hosting a live meeting and include all relevant Assets.
-
Invite all participants to the meeting through your Workspace. This creates an invite on all participants calendars, and includes the meeting invite link.
-
Pair and connect your bluetooth headphones or speaker you plan to use for your tour to the camera.
-
All onsite smartphone users should connect from a different network than the camera’s network. This will reduce the load on the camera’s network bandwidth.
-
If you are alone as a camera operator, take a smartphone with you in the case you want to smartphone camera-share and show fine details.
-
Confirm the 360 camera can connect to your local WiFi.
-
Prior to an Avatour meeting, plan out the route you will take through the facility. Do a test Avatour meeting with the camera, and check that all areas have bitrates above 1 Mbps bandwidth. This can be seen on the camera screen itself, or as a remote participant by going to Settings and activating Show Bitrate.
-
If you notice some areas have little to no bandwidth, it is best to take images or a recording. These can then be presented during the meeting for remote participants to review. You can follow the guide here that explains our Quick Capture for recording and uploading videos/images: How do you record and upload 360 videos with the Avatour App?
-
If you have remote participants joining the meeting who have not used Avatour before, provide them with a short summary of the platform, its functionality (360 live video, assets, snapshots, annotations, spotlight) and the meeting tools.
-
You can start in another video conferencing solution (e.g. Teams, Zoom, Google Meet) but before moving over to Avatour, completely close the other video conference application. In some cases, these other applications will prioritize your device’s microphone/speakers/webcam, causing them to be disabled for Avatour. Additionally, do NOT run Avatour AND another video conference at the same time as this will reduce available bandwidth.
-
If you are planning to use the 360 camera in a high temperature environment, it’s recommended to use the cooling module (Pilot Pano only). This will help reduce the chances of the camera overheating and shutting down automatically.
6.3 When Operating the Cam Onsite for a 360° Video Live Meeting
-
When operating the camera, make sure that you walk slowly and stop frequently setting the cam down on its tripot. This helps with (1) video quality as you produce less video data by not moving the camera around unnecessarily and (2) reduces any potential video downtime when the camera’s network connection switches between WiFi access points.
-
Hold the camera out in front of you, and above eye level. This allows all remote participants to see the majority of your surrounding area.
-
For instances where the camera needs to remain stable, use the tripod stand and extend the camera to the correct height, best to eye-level.
-
Always connect the camera to your local WiFi network where possible. For areas without WiFi access, use the provided hotspot. The hotspot has a SIM card that will connect to a reliable cell network near you. Always keep the hotspot switched off when not in use indoors as otherwise the 360° cam could connect to the hotspot which we do not want indoors. When outdoors, keep the hotspot near the 360° camera.
-
When the on camera bitrate starts to drop below 2 Mbps, walk slower or stop completely until the signal stabilizes again. This usually happens when you change from one WiFi Access Point to another.
-
If you know the connectivity and video will drop when moving to a specific location (Example: moving from an indoor production area to an outdoor area), let the remote participants know in advance.
-
If needing to show something in high detail or small writing, use your own or an onsite participant's smartphone to join the meeting and present your / their phone’s (back-facing) camera.
-
If possible we recommend that one additional person is onsite to help with the above described smartphone camera share as this often proves to be helpful / needed.
-
Ideally onsite smartphone users should join the meeting (1) in onsite mode and (2) on a different network from that the camera is using to not take away crucial upload bandwidth from the 360° cam.
-
All onsite participants joining from their smartphone should be muted, unless actively speaking.