Guida Utente e Best Practice di Avatour
1. Per tutti gli utenti di Avatour
Se non conosci ancora Avatour, le seguenti risorse offrono un'utile introduzione alla piattaforma e alle sue funzionalità:
- Video "Come funziona Avatour"
Una breve panoramica delle principali funzionalità di Avatour e di come la piattaforma consenta una collaborazione remota immersiva. - Domande frequenti
Risposte alle domande più frequenti. - Glossario
Definizioni dei termini chiave e dei concetti di Avatour utilizzati di frequente. - Sito web
Dai un'occhiata in particolare alle Funzionalità di Avatour insieme alle sezioni dedicate ai Casi d'uso e ai Settori per scoprire come Avatour può supportare le tue esigenze specifiche.
2. Tipi di utenti di Avatour
2.1 Partecipanti alla riunione (non è richiesto alcun account)
Gli utenti possono partecipare alla riunione senza registrarsi per creare un account Avatour. Eccezione: se l'organizzatore ha limitato la riunione agli utenti registrati — ad esempio, per consentire solo ai dipendenti interni di partecipare tramite Single Sign-On (SSO) — l'invito del calendario indicherà che i partecipanti devono effettuare l'accesso per autenticarsi.
Gli utenti accedono alla riunione come segue:
- Ricevono un invito dal calendario dall'organizzatore.
- Utilizzano il link della riunione presente nell'invito per partecipare.
- Inseriscono una password della riunione se l'organizzatore ne ha abilitata una.
- I partecipanti possono partecipare senza un account Avatour a meno che la riunione non sia limitata e richieda l'accesso per l'autenticazione.
2.1.1 Partecipante
- Può partecipare e interagire pienamente (webcam, microfono, chat e funzionalità Present).
- Massimo di 20 partecipanti interattivi per riunione.
2.1.2 Spettatore
- Può visualizzare la riunione e partecipare solo tramite chat.
- Non può condividere video, utilizzare un microfono, presentare, riprodurre/mettere in pausa risorse o acquisire istantanee.
- Massimo di 10 spettatori per riunione.
- Insieme ai partecipanti, una riunione può ospitare fino a 30 persone.
2.2 Utenti registrati
Gli utenti registrati dispongono di un account Avatour. Gli account vengono creati in uno dei seguenti modi:
- Invitati dall'amministratore: durante l'onboarding, Avatour configura un tenant dedicato per l'organizzazione e crea uno o più account amministratore. Gli amministratori possono quindi invitare utenti all'interno dell'organizzazione e assegnarli a gruppi, che definiscono il loro ruolo sulla piattaforma (Ospite, Host o Amministratore). Gli utenti invitati ricevono un link di registrazione per completare la configurazione dell'account e impostare una password.
- Invitati dall'host: gli host possono aggiungere utenti come collaboratori editor a un'area di lavoro. Ciò consuma una licenza Host e garantisce all'utente un accesso di livello Host.
- Provisioning automatico SSO (solo livelli Enterprise/Business): Gli account possono essere creati automaticamente dall'IdP. Per impostazione predefinita, gli account forniti tramite SSO vengono aggiunti al gruppo Ospite, a meno che non venga sovrascritto tramite mappature di gruppo SAML. Gli amministratori possono comunque invitare utenti e assegnare l'appartenenza a un gruppo direttamente anche quando l'SSO è abilitato.
Riepilogo:
Gli utenti registrati e la loro appartenenza ai gruppi possono essere gestiti in diversi modi:
- Gestione da parte dell'amministratore: un amministratore nella console di Avatour può creare utenti e assegnarli a gruppi, che definiscono il loro ruolo sulla piattaforma (Ospite, Host o Amministratore).
- Provisioning SSO: Per i clienti dei livelli Enterprise o Business con SSO abilitato, l'IdP può effettuare automaticamente il provisioning degli account e assegnare l'appartenenza al gruppo, che definisce il ruolo dell'utente sulla piattaforma.
- Utenti invitati dall'Host: Gli Host possono invitare altri utenti come collaboratori Editor in specifici Workspace. L'assegnazione del ruolo di collaboratore Editor consuma una licenza Host.
Best practice consigliata (clienti Enterprise):
Per le organizzazioni che prevedono un numero elevato di utenti che necessitano di accedere ad Avatour, si consiglia di integrare il Single Sign-On (SSO) e gestire gli utenti e le appartenenze ai gruppi dall'IdP. Questo approccio semplifica il provisioning degli account, l'assegnazione ai gruppi e la gestione delle licenze, riducendo il carico amministrativo e garantendo un controllo degli accessi coerente.
2.2.1 Utenti ospiti
- Aggiunti al gruppo Ospiti.
- Possono visualizzare le risorse all'interno degli spazi di lavoro in cui sono stati aggiunti come collaboratori con ruolo di Visualizzatore.
- Non possono creare spazi di lavoro, ospitare riunioni o caricare contenuti.
- Gli account Ospite forniti tramite SSO si autenticano tramite l'IdP; non è richiesta alcuna password gestita da Avatour.
2.2.2 Utenti con licenza (accesso alla console web)
Utenti Host (Gruppo: Host)
- Possono creare/gestire spazi di lavoro, invitare collaboratori a uno spazio di lavoro, ospitare riunioni in diretta, caricare Quick Captures.
- Hanno accesso alla dashboard dell'host e all'app dell'operatore sulle telecamere a 360° supportate.
Utenti amministratori (Gruppo: Admin)
- Include tutte le funzionalità dell'host più l'amministrazione completa dell'account.
Ulteriori privilegi di amministratore includono:
Gestione account
- Creare nuovi utenti e assegnarli a gruppi.
- Reimpostare le password quando gestite da Avatour (non applicabile quando è abilitato l'SSO).
- Elevare gli utenti ospiti a Host.
- Disattivare gli utenti (gli account amministratore devono essere prima convertiti in Host prima della cancellazione).
- Trasferire le risorse da un utente Host a un altro durante l'eliminazione.
Impostazioni
- Configurare le impostazioni di sicurezza a livello di organizzazione per le risorse, gli spazi di lavoro e le riunioni ospitate sulla piattaforma (ad esempio, se un Host deve essere presente per avviare una riunione, se i volti devono essere sfocati su tutti i video caricati sulla piattaforma).
- Abilitare o disabilitare le funzionalità AI o la registrazione.
- Applicare il branding aziendale in modo coerente su tutta la piattaforma se è configurato un dominio personalizzato.
Risorse e analisi
- Visualizza tutte le risorse caricate da qualsiasi utente dell'organizzazione.
- Esamina l'utilizzo della piattaforma all'interno dell'organizzazione.
2.2.3 Autorizzazioni dei collaboratori dello spazio di lavoro
Le autorizzazioni dello spazio di lavoro definiscono ciò che un utente può fare all'interno di uno specifico spazio di lavoro. Queste sono separate dall'appartenenza al gruppo a livello di piattaforma (Ospite, Host, Amministratore).
-
Collaboratore con ruolo di editore: gli utenti con questa autorizzazione possono:
- Gestire le risorse (caricare, rimuovere, sfocare i volti, generare riepiloghi)
- Gestire le impostazioni delle riunioni (abilitare/disabilitare la registrazione, consentire o rimuovere partecipanti)
- Pianificare e ospitare riunioni in diretta
- Generare report basati su modelli predefiniti
- Aggiungere o rimuovere collaboratori dall'area di lavoro
-
Collaboratore con ruolo di visualizzatore: gli utenti con questa autorizzazione hanno accesso in sola lettura alle risorse dell'area di lavoro. Non possono modificare le risorse, gestire le riunioni o gestire i collaboratori, ma possono creare note sulle risorse.
3. Per i partecipanti alle riunioni da remoto e i visitatori dell'area di lavoro
Avatour consente agli utenti di collaborare in due modi principali:
-
Partecipare a una riunione Avatour (collaborazione sincrona):
Potresti ricevere un invito tramite calendario per partecipare a una riunione Avatour. Durante la riunione, i partecipanti possono effettuare una visita in loco in diretta da remoto o esaminare insieme le risorse in modo sincrono. -
Visitare un Workspace (collaborazione asincrona):
Potresti anche essere invitato come collaboratore in uno spazio di lavoro per esaminare le risorse in modo asincrono (secondo i tuoi tempi).
3.1 Come partecipare a una riunione Avatour e visitare uno spazio di lavoro Avatour
3.1.1 Qualsiasi dispositivo "a schermo piatto" con un browser web
Puoi partecipare a una riunione Avatour da qualsiasi computer desktop o portatile, smartphone o tablet utilizzando un browser web.
Partecipare a una riunione Avatour
Nota: per partecipare a una riunione Avatour è necessario concedere le autorizzazioni al microfono. Si prega di accettare eventuali richieste di autorizzazione da parte del browser.
-
Tramite invito del calendario (consigliato): - In genere riceverai un invito del calendario con un link di accesso diretto (ad esempio:
https://avatour.live/join?s=xxxxx). - Cliccando sul link, il codice della riunione di 5 caratteri verrà inserito automaticamente e verrai reindirizzato alla riunione.- Autenticazione richiesta: Alcune riunioni sono riservate agli utenti registrati. In questo caso, l'invito indicherà che è necessario effettuare l'accesso per partecipare alla riunione.
- Riunioni protette da password: Alcune riunioni potrebbero richiedere una password. In tal caso, l'invito includerà la password che dovrai inserire per partecipare.
-
Tramite codice della riunione: - Se l'organizzatore condivide separatamente un codice della riunione di 5 caratteri, vai su https://avatour.live/join, inserisci il tuo nome e il codice della riunione, quindi partecipa alla riunione. - Se la riunione è protetta da password, inserisci la password fornita dall'organizzatore.
- Se la riunione richiede l'autenticazione, dovrai accedere con il tuo account Avatour prima di partecipare.
Suggerimento 1: Se la tua videocamera o il tuo microfono non funzionano, potrebbero essere in uso da parte di un'altra applicazione (ad esempio Microsoft Teams o Zoom). Chiudi tutte le app che potrebbero utilizzare la tua videocamera o il tuo microfono, quindi esci e rientra nella riunione Avatour.
Suggerimento 2: Se non riesci ancora a partecipare alla riunione, esegui questo test: https://avatour.live/test.
Il test può identificare se il tuo firewall aziendale o la tua rete stanno bloccando l'accesso e fornirà informazioni utili per discutere con il tuo team IT.Suggerimento 3: Non utilizzare le app Avatour per iOS o Android per partecipare alle riunioni. Queste app sono necessarie solo quando si trasmette in streaming una riunione dal vivo da una videocamera Insta360, poiché tali videocamere non possono eseguire direttamente il software Avatour 360° e richiedono uno smartphone come supporto.
Visitare uno spazio di lavoro Avatour (senza partecipare a una riunione Avatour)
Puoi accedere a uno spazio di lavoro nei seguenti modi:
-
Spazio di lavoro pubblico:
Se lo spazio di lavoro è pubblico, è possibile accedere direttamente al link — non è richiesto alcun login. -
Spazio di lavoro con restrizioni:
Se lo spazio di lavoro è con restrizioni, devi essere aggiunto come collaboratore con autorizzazioni di Editor o Visualizzatore.- Una volta aggiunto come collaboratore, riceverai una notifica via e-mail con un link allo spazio di lavoro.
- Clicca sul link contenuto nell'e-mail per aprire lo spazio di lavoro. Se non hai ancora effettuato l'accesso, ti verrà richiesto di effettuare l'accesso o completare la registrazione.
- Una volta effettuato l'accesso, lo spazio di lavoro si aprirà automaticamente.
In alternativa, puoi effettuare l'accesso su https://avatour.live/login e accedere all'area di lavoro dal tuo elenco di aree di lavoro.
3.1.2 Visore VR
Puoi partecipare a una riunione e visitare un'area di lavoro da una vasta gamma di visori Meta e Pico compatibili. Per farlo:
- Installa la nostra app Avatour dal tuo negozio di app VR: Come installare l'app Avatour VR
- Avvia la nostra app e inserisci il codice della riunione oppure seleziona uno spazio di lavoro per partecipare a una riunione. Per ulteriori informazioni su come utilizzare la nostra app VR, consulta l'articolo della nostra Knowledge Base qui.
3.2 Strumenti di collaborazione per riunioni e spazi di lavoro
Avatour consente la collaborazione in due contesti principali:
- Riunioni (sincrone): collabora in tempo reale con altri partecipanti, incluse visite in loco dal vivo o la revisione congiunta di risorse registrate.
- Spazi di lavoro (asincroni): esamina e interagisci con le risorse secondo i tuoi tempi, 24 ore su 24, 7 giorni su 7.
Gli strumenti di collaborazione sono per lo più simili tra riunioni e spazi di lavoro, con alcune differenze dovute al contesto sincrono rispetto a quello asincrono.
3.2.1 Layout dell'interfaccia
L'interfaccia di Avatour è organizzata attorno a tre aree principali:
- Pannello di sinistra – Risorse dell'area di lavoro e strumenti di supporto
- Area centrale – Area di visualizzazione principale per video in diretta o risorse
- Pannello di destra – Informazioni contestuali, come partecipanti, riunioni o chat
La maggior parte delle interazioni viene avviata dal menu in basso.
Cliccando su un'opzione del menu si apre un pannello laterale sul lato sinistro o destro dello schermo, mentre l'area centrale rimane l'area di visualizzazione principale.
3.2.2 Esempio di vista di una riunione
Ecco un esempio di una vista in una riunione Avatour:

Avatour Meeting con pannello Risorse (a sinistra), area di lavoro (al centro) e pannello Partecipanti (a destra)
3.2.3 Esempio di vista Workspace
Ecco un esempio di vista Workspace:

Area di lavoro di Avatour con pannello Risorse (a sinistra), Tela (al centro) e pannello Riunioni (a destra)
3.2.4 Panoramica del menu inferiore
Il menu inferiore consente di accedere ai controlli e ai pannelli dell'interfaccia principale:
Menu inferiore della riunione

Menu inferiore della riunione Avatour
- Risorse – Visualizza i file dell'area di lavoro, inclusi video registrati, immagini, istantanee e PDF.
- Chat – Invia messaggi a tutti i partecipanti alla riunione.
- Telecamera – Attiva o disattiva la tua webcam.
- Microfono – Disattiva o riattiva l'audio.
- Presenta – Presenta una risorsa, il desktop o il feed della webcam (vedi la sezione Presenta qui sotto).
- Strumenti host (solo per gli host):
- Blocca focus – Blocca la visualizzazione per tutti i partecipanti.
- Disattiva audio per tutti – Disattiva l'audio di tutti i partecipanti.
- Attiva schermo intero – Visualizza la scheda della riunione a schermo intero.
- Esci dalla riunione – Esci dalla riunione.
- Avvia registrazione – Usa questo pulsante per avviare e interrompere manualmente la registrazione durante una riunione. In alternativa, le riunioni possono essere registrate automaticamente se l’opzione Avvia registrazione automatica è abilitata nelle impostazioni dell’area di lavoro. In entrambi i casi, le registrazioni vengono salvate tra le risorse dell’area di lavoro.
- Mappa – Apri o chiudi il pannello della mappa per le risorse con tracciato GPS. Cliccando su una posizione si salta al punto esatto nel video. La mappa si aggiorna in tempo reale durante la riproduzione del video.
- Partecipanti – Apri o chiudi il pannello dei partecipanti.
- Informazioni sulla riunione – Visualizza il codice della riunione, il link di invito e accedi ai tutorial correlati.
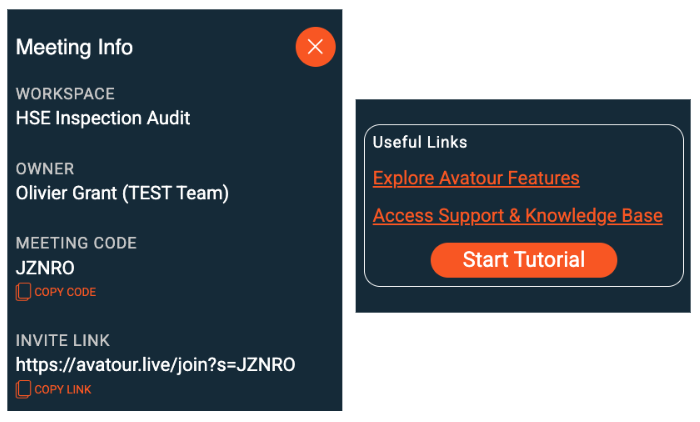
Pannello laterale Informazioni sulla riunione di Avatour
- Impostazioni – Regola le impostazioni di lingua, audio e video. Per le riunioni video live a 360°, usa Mostra bitrate per monitorare le statistiche di connettività.
Suggerimento: invia il link della riunione o aggiungilo a un evento del calendario per invitare i partecipanti.
Menu Presentazione
L'opzione Presentazione nel menu in basso della riunione consente di condividere contenuti con tutti i partecipanti.
- Fotocamera – Condividi la fotocamera del tuo smartphone/tablet. Questa opzione può essere utilizzata anche durante una riunione video live a 360° per sovrapporre una vista secondaria per primi piani o dettagli specifici.
- Desktop – Condividi lo schermo del tuo desktop con tutti i partecipanti.
- Risorsa – Presenta una risorsa dall'area di lavoro. Selezionando una risorsa si apre la barra degli strumenti Risorsa, che fornisce controlli di riproduzione e strumenti di collaborazione specifici per la risorsa presentata.
Barra degli strumenti Risorse (Riunione)
Quando si presenta una risorsa in una riunione, la Barra degli strumenti Risorse appare sopra l'area di lavoro. Ecco gli strumenti e le voci di menu disponibili quando si presenta una risorsa in una riunione - spiegati da sinistra a destra.
 Menu Avatour durante la presentazione di una risorsa in una riunione
- Timeline video / Barra di avanzamento – Mostra l'avanzamento del video con note e argomenti chiave estratti dall'audio. Clicca su una nota o su un argomento per passare a quel momento e aprire la nota. Include i controlli Riproduci / Pausa.
- Istantanea – Cattura un'immagine a 360° o 2D dalla risorsa.
- Spotlight – Evidenzia un'area specifica per tutti i partecipanti durante le sessioni live.
- Mostra/Nascondi punto di vista (POV) – Visualizza dove sta guardando ogni partecipante nel video a 360°.
- Note – Crea note ancorate a momenti specifici dell'Asset. Le note possono essere classificate (Osservazione, Problema, Azione, Raccomandazione), monitorate in base allo stato (Aperta → In corso → Risolta) e condivise tramite link diretti.
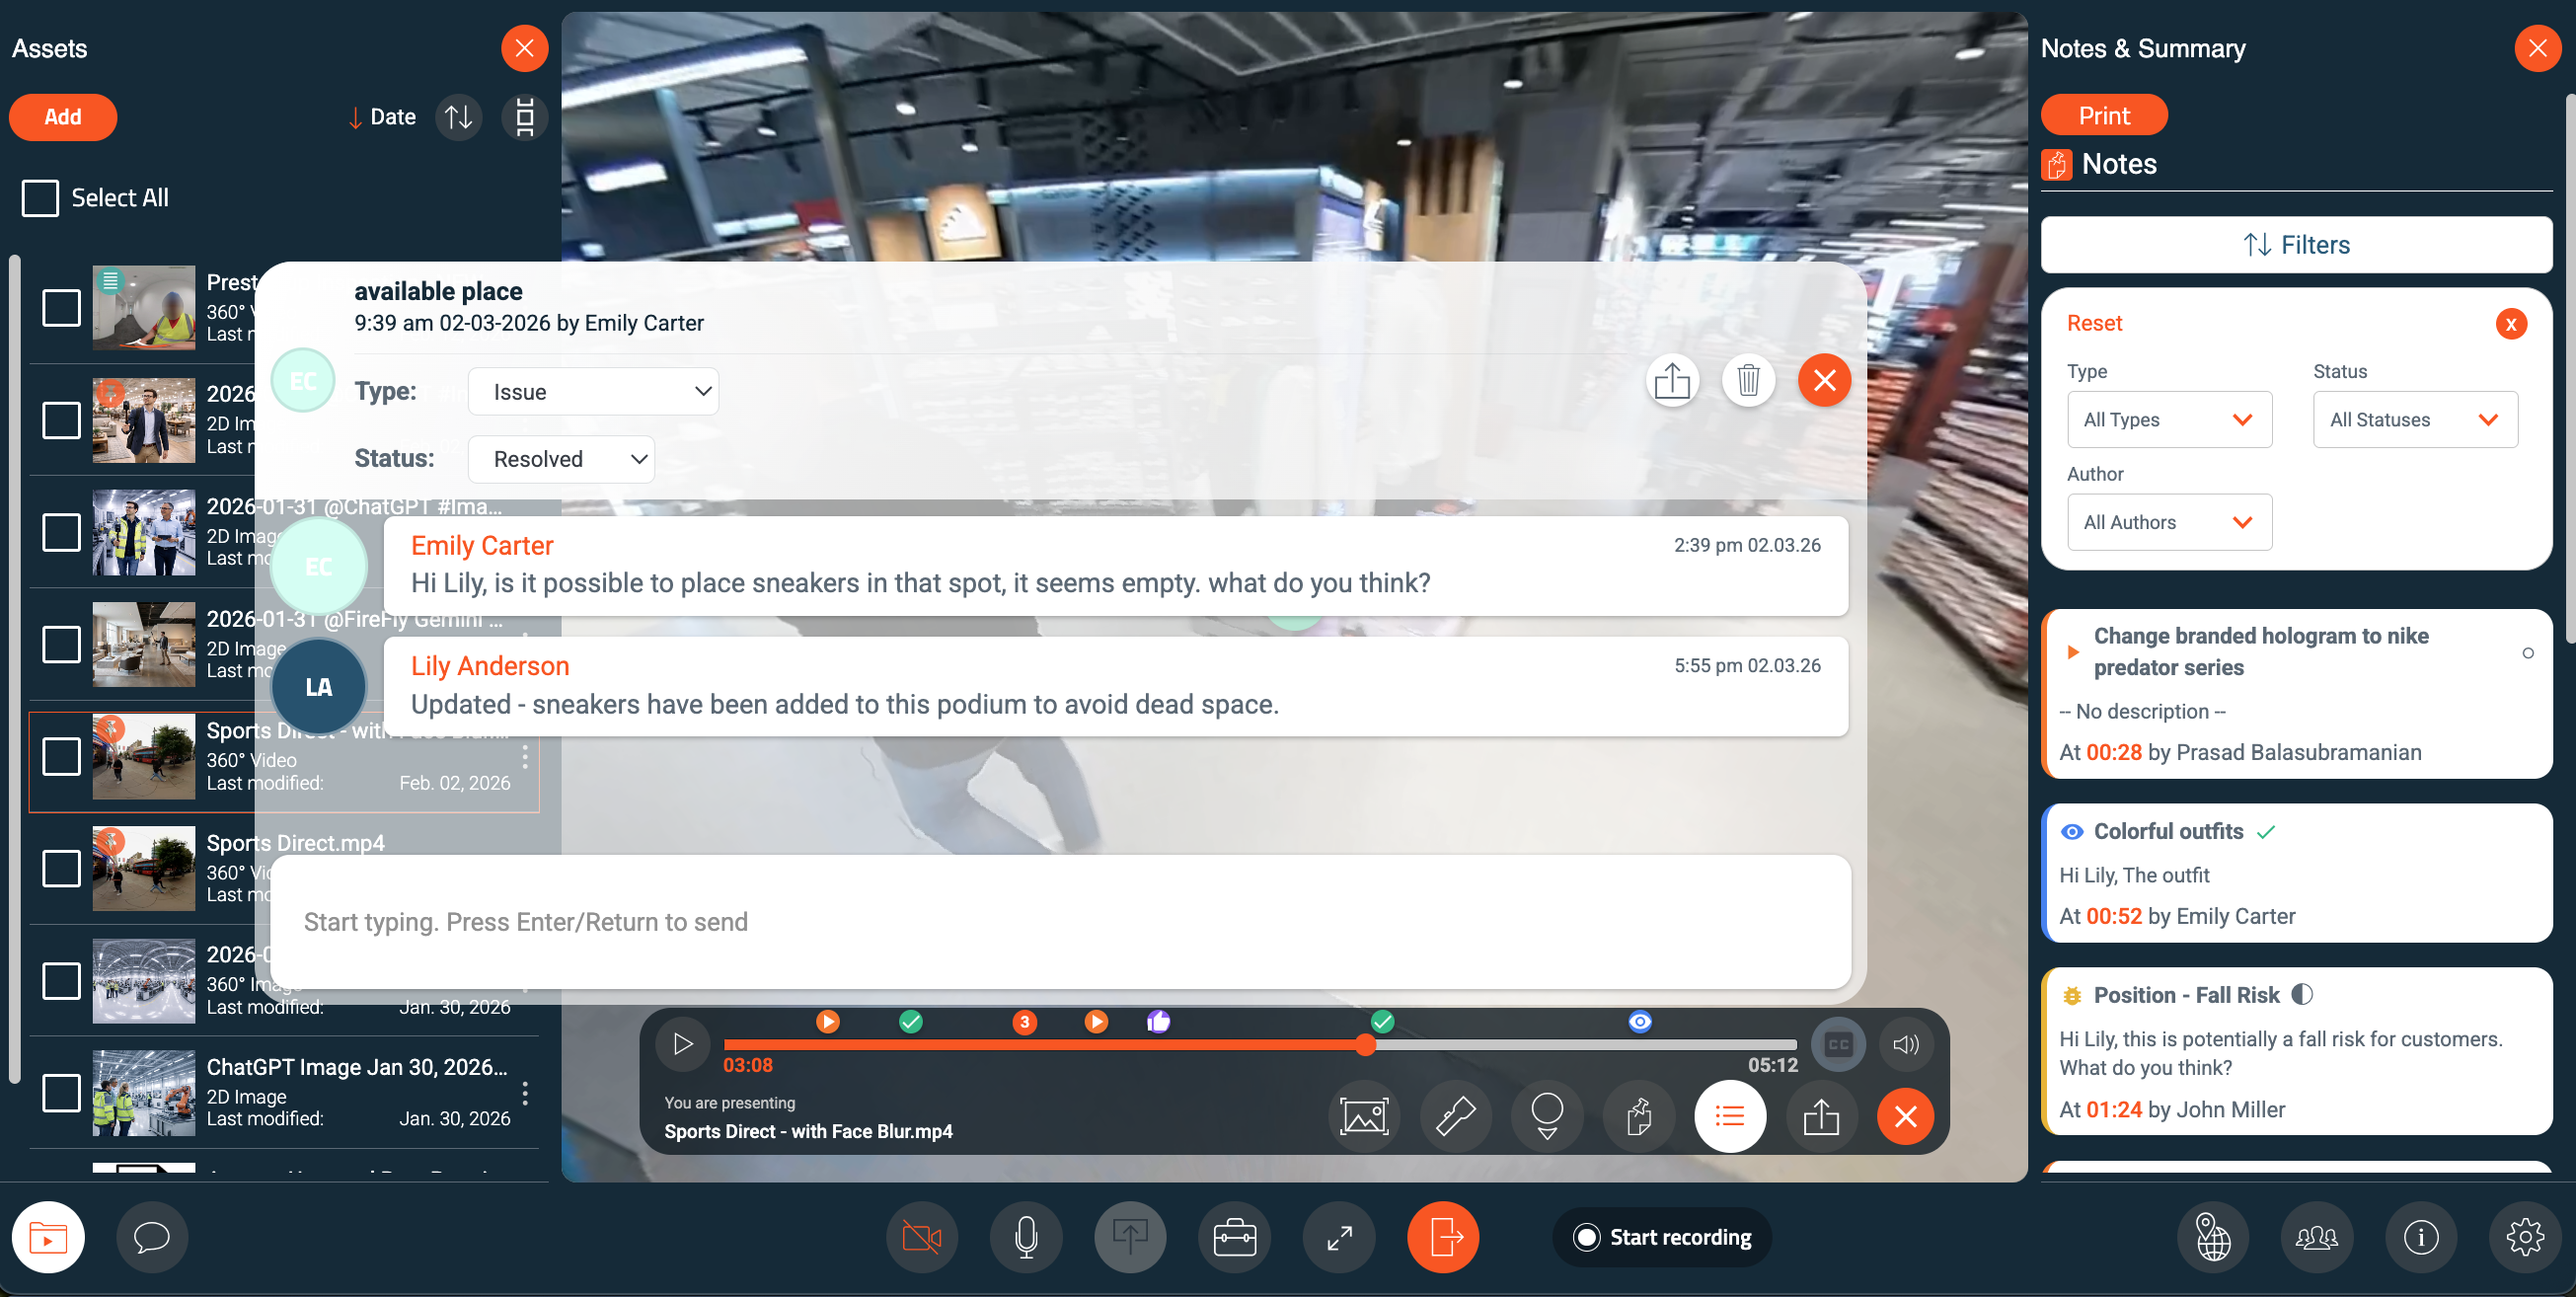 Avatour Note e filtri note
- Note dei comandi vocali – Si tratta di segnaposto generati automaticamente quando la registrazione rileva menzioni come "inserisci nota", "prendi nota" o "crea una nota". Queste note appaiono sulla timeline e devono essere posizionate e finalizzate dall'utente.
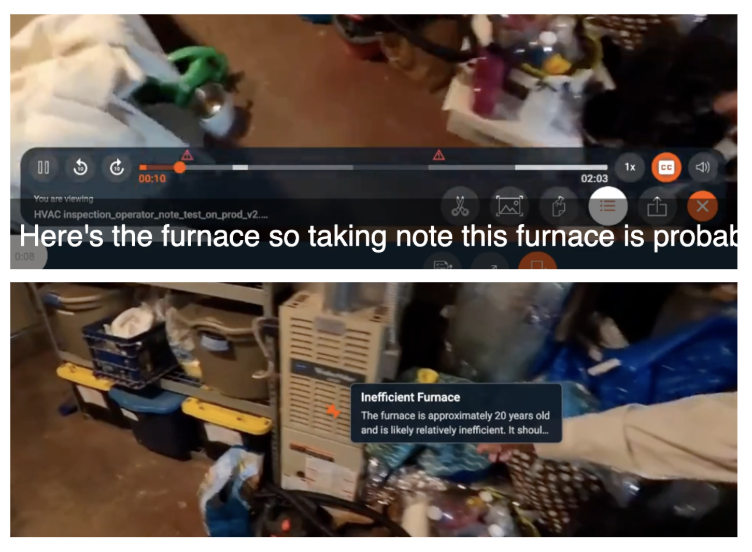 Note Avatour - Generate da comandi vocali
- Pannello Note e Riepilogo – Apre un pannello laterale che mostra tutte le note, gli argomenti chiave e un riepilogo esecutivo per la risorsa. Cliccando su un elemento si viene reindirizzati a quel momento nel video.
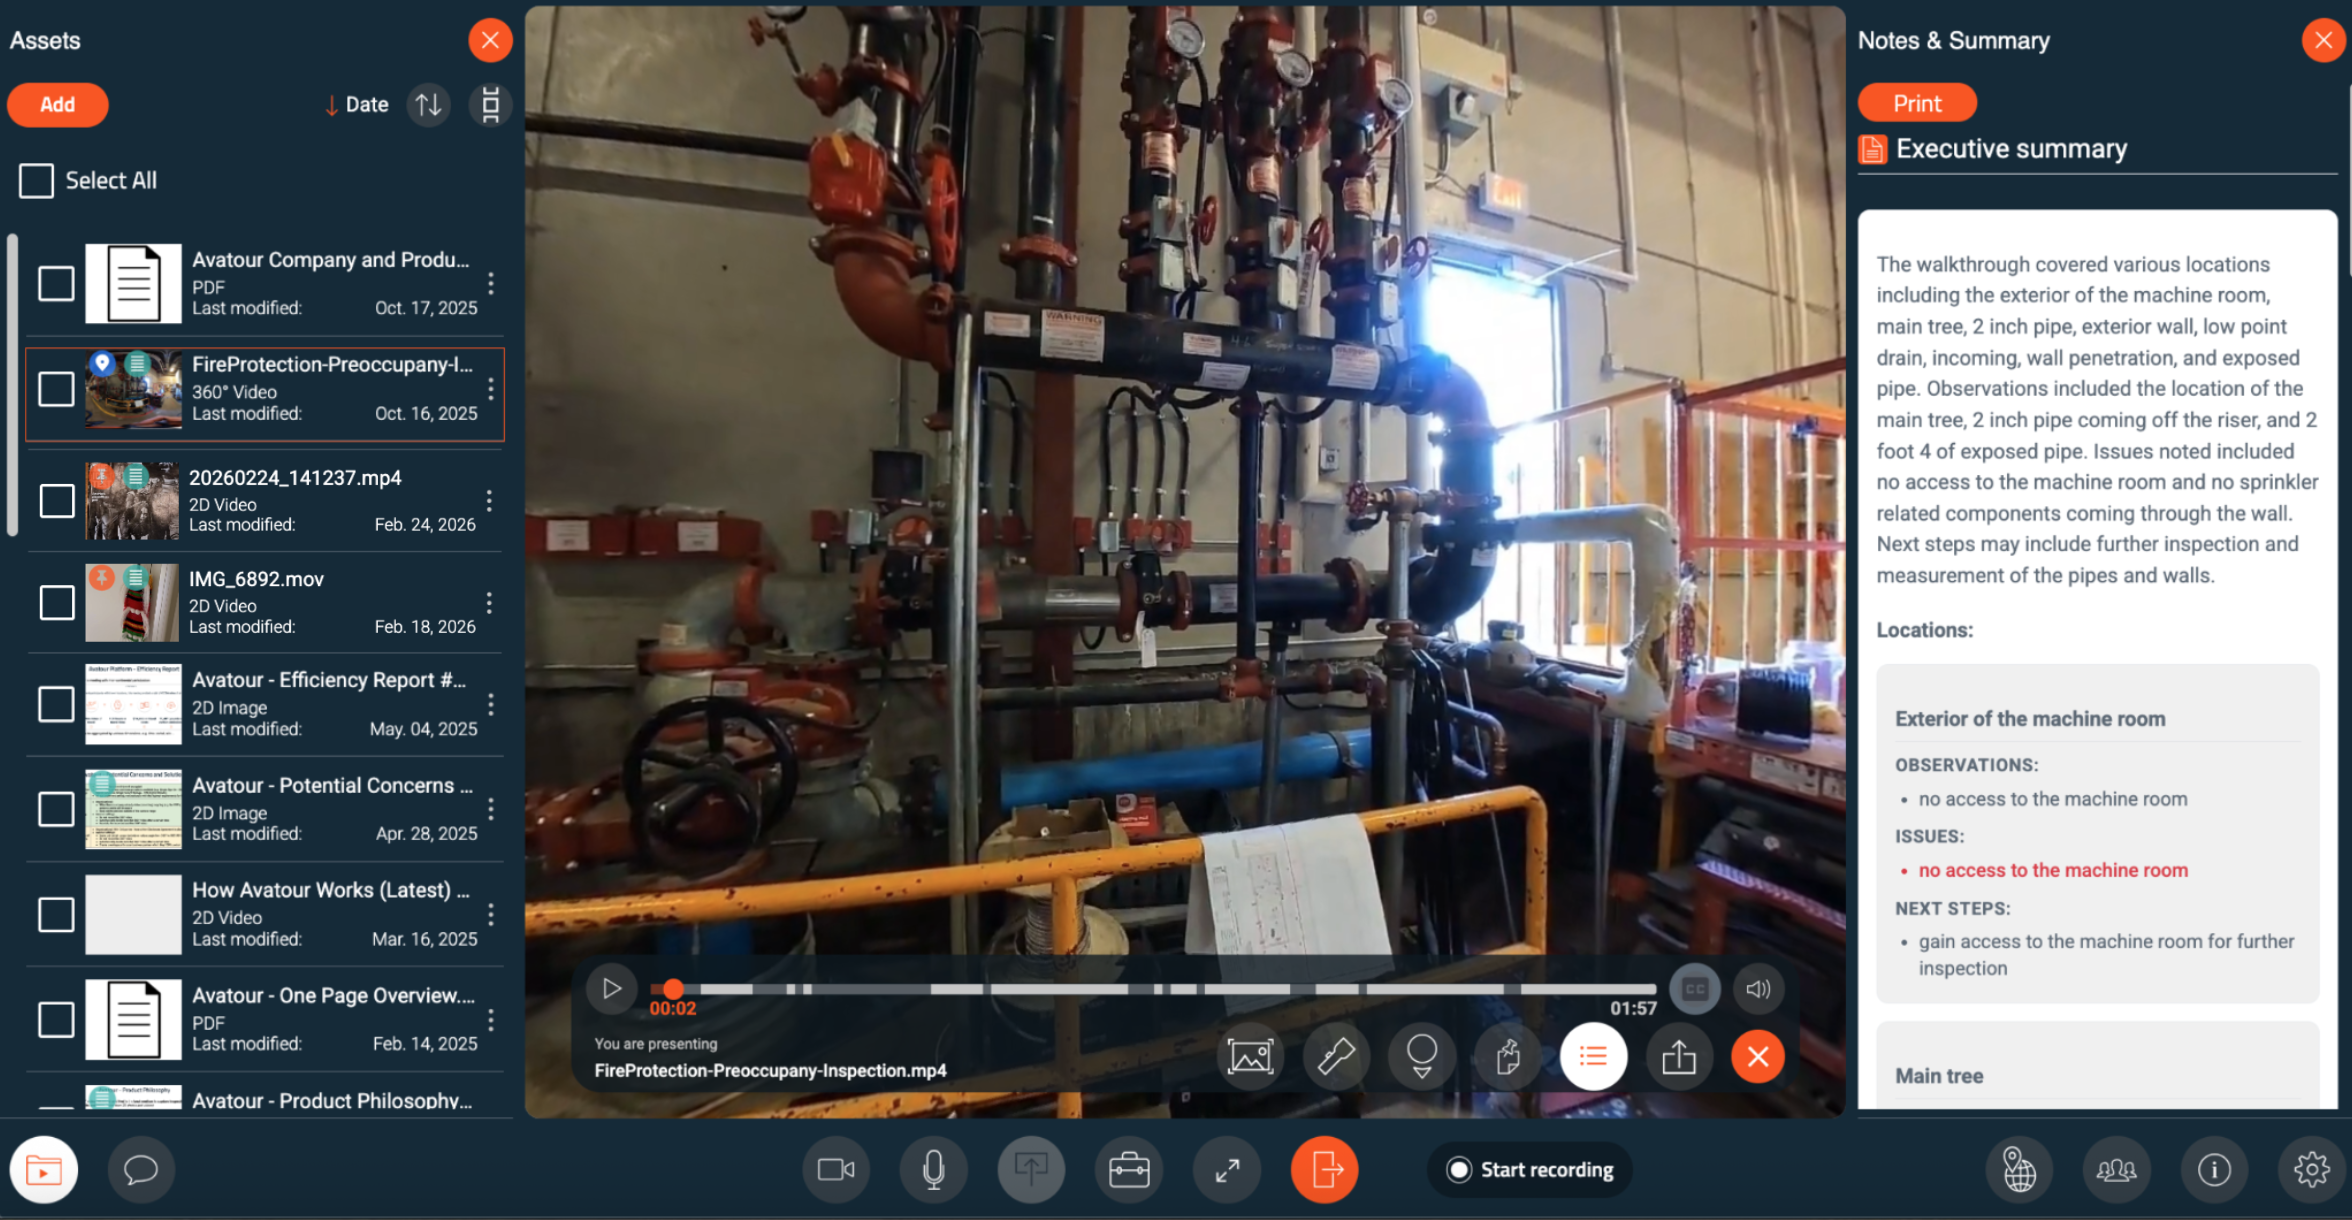 Sintesi esecutiva di Avatour durante la presentazione di una risorsa in una riunione
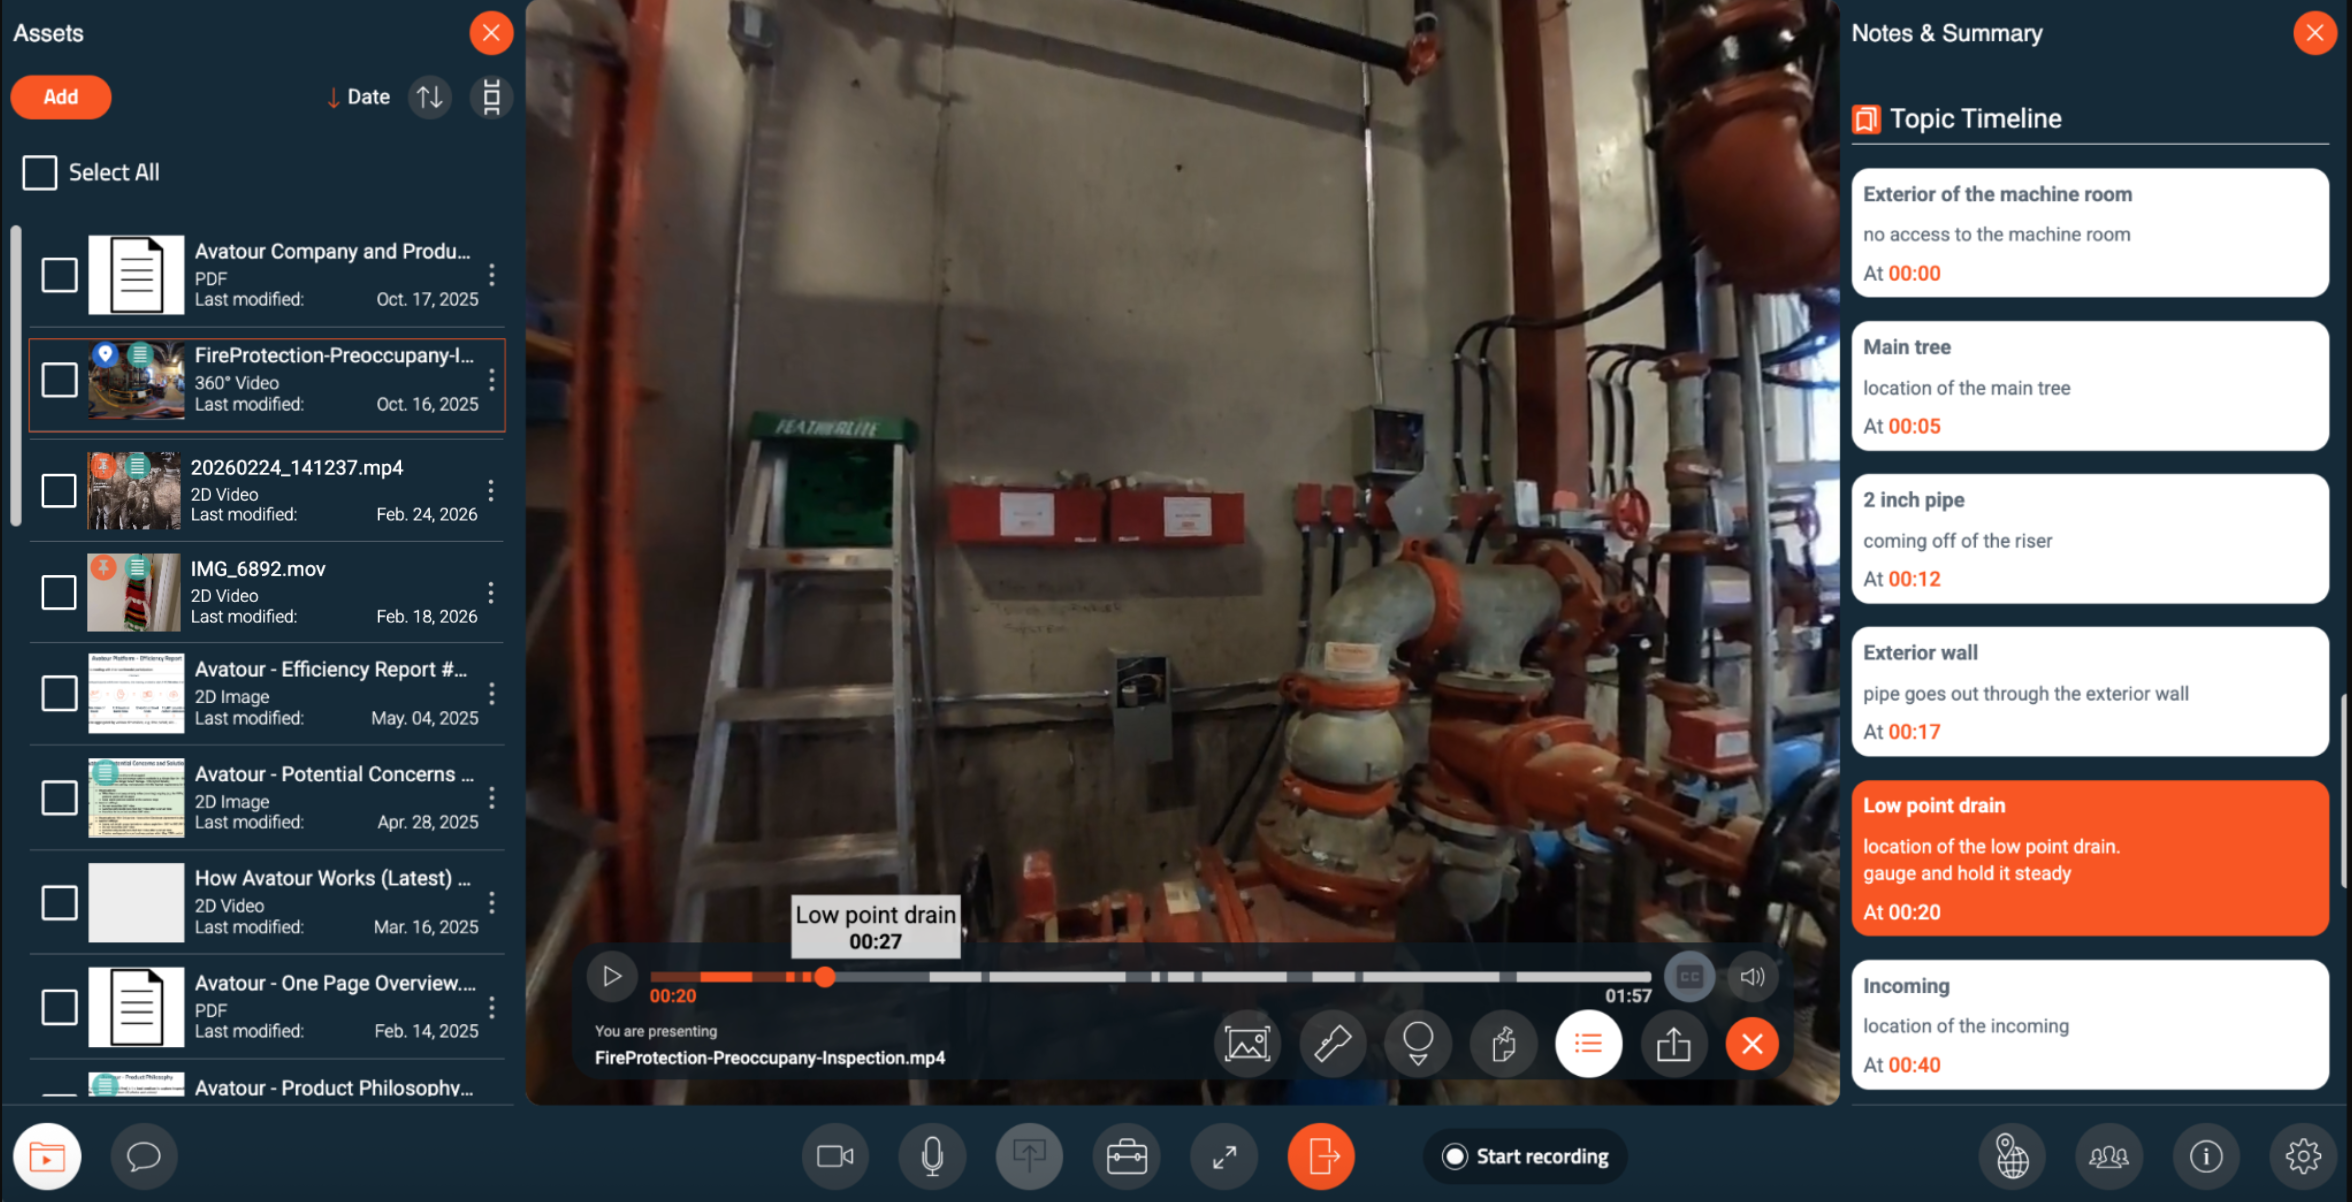 Argomenti di Avatour durante la presentazione di una risorsa in una riunione
Dal pannello laterale, puoi stampare un report sull'asset o scaricarlo in formato TXT o CSV. I report possono includere note, argomenti generati dall'IA e trascrizioni complete. È inoltre possibile scegliere quali elementi includere prima dell'esportazione.
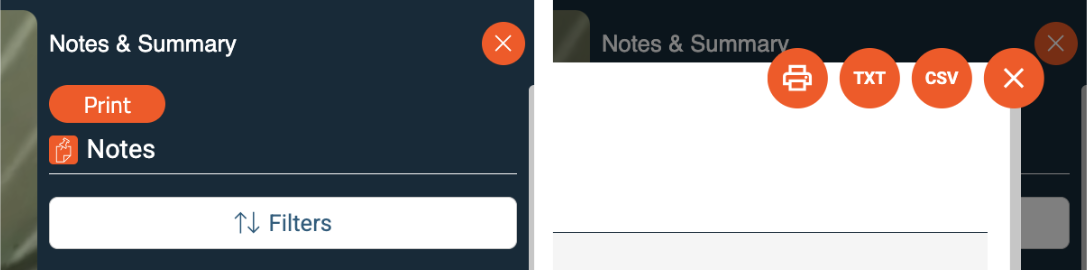
Menu di stampa/download del rapporto sulle risorse di Avatour

Menu di selezione degli elementi del rapporto sulle risorse di Avatour
- Condividi link – Condividi un link a una nota o a una scena specifica nella risorsa.
- Sottotitoli (CC) – Visualizza la trascrizione del testo sullo schermo durante la riproduzione del video.
Barra degli strumenti delle risorse (Area di lavoro)
Quando si esamina una risorsa in un'area di lavoro, la barra degli strumenti è simile ma ottimizzata per l'uso individuale:
 Menu Avatour durante la presentazione di una risorsa in un'area di lavoro
- Timeline video / Barra di avanzamento – Mostra l'avanzamento del video con note e argomenti chiave estratti dalla traccia audio. Clicca in un punto qualsiasi della timeline per scorrere il video. Clicca su una nota o un argomento per saltare a quel momento e aprire la nota. Include i controlli Riproduci / Pausa.
- Istantanea, Note, Pannello delle note e del riepilogo, Condividi link, Sottotitoli
- Non disponibili: Spotlight, POV (questi richiedono partecipanti in diretta)
- Controlli aggiuntivi:
- Intervalli di 10 secondi – Salta avanti/indietro
- Velocità di riproduzione – Regola la velocità (0,5×–2×)
- Taglia video – Taglia l'inizio o la fine dell'asset
4. Per utenti host e amministratori - Console web Avatour
Una volta effettuato l'accesso al tuo account utente Avatour, potrai accedere alla Console Web.
4.1 Console Web - Panoramica del menu principale
Sul lato sinistro vedrai le seguenti voci di menu:
 Console Web Avatour - Menu principale
- Aree di lavoro – Organizza i tuoi contenuti in modo efficiente. Ogni area di lavoro contiene Risorse, Collaboratori, Riunioni e Impostazioni.
- Risorse – Accedi e gestisci tutte le tue risorse (video, immagini, PDF). Gli amministratori possono visualizzare tutte le risorse dell'account, mentre le risorse condivise sono visibili a tutti gli utenti.
- Profilo – Gestisci la lingua e la password.
- Analisi – Tieni traccia dell'attività delle sessioni, dell'utilizzo degli spazi di lavoro e delle metriche di ROI.
- Impostazioni (Solo amministratori) – Configura le impostazioni predefinite per spazi di lavoro, riunioni e risorse a livello dell'organizzazione. Gli amministratori possono anche personalizzare il branding (logo, colori, sfondi).
- Account (solo amministratori) – Gestisci gli utenti registrati e le telecamere a 360°.
- Accesso dispositivo – Inserisci il codice visualizzato sulla tua telecamera a 360° per associarla al tuo account.
- Tutorial – Accedi ai tutorial guidati.
- Esci – Esci dalla console.
Sezioni come Profilo, Accesso dispositivo, Tutorial e Esci sono intuitive e non presentano sottosezioni dettagliate.
4.2 Console web - Dettagli per voce di menu (con immagini)
4.2.1 Spazi di lavoro
Gli spazi di lavoro sono unità organizzative flessibili che consentono di gestire risorse, collaboratori e riunioni in un unico posto. È possibile creare un nuovo spazio di lavoro utilizzando il pulsante Nuovo spazio di lavoro nell'angolo in alto a destra.
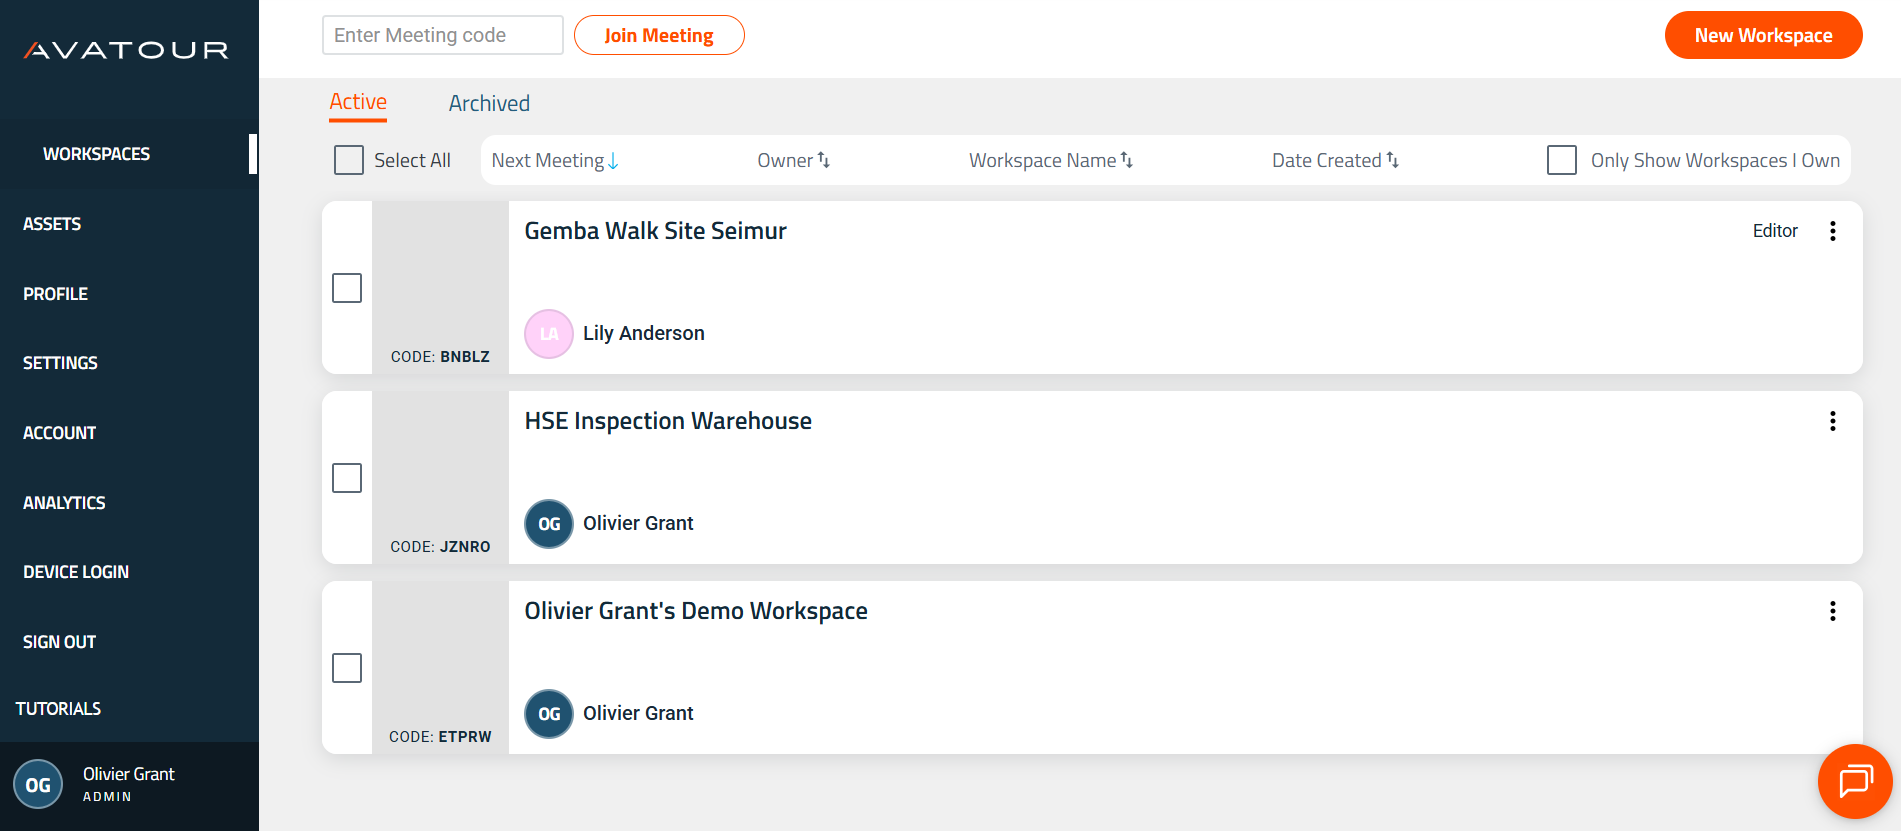 Console Web Avatour - Voce di menu principale Spazi di lavoro
Fare clic sull'icona a forma di campana per visualizzare un riepilogo dell'attività dello spazio di lavoro negli ultimi 7 giorni.
 Attività recenti dell'area di lavoro
All'interno di un'area di lavoro:
Area di lavoro con Risorse (a sinistra), Tela (al centro), Riunioni (a destra)
- Risorse – Gestisci i file assegnati a questo spazio di lavoro.
- Collaboratori –
Controlla l'accesso agli spazi di lavoro tramite
- Visualizzatore – Può visualizzare le risorse. L'invito crea un utente Ospite, se necessario.
- Editor – Controllo completo dell'area di lavoro, stessi diritti dell'Host. L'invito promuove l'utente a Host, se necessario.
Più utenti possono accedere contemporaneamente a un'area di lavoro senza una riunione. Le aree di lavoro pubbliche e le impostazioni di accesso alle riunioni offrono un accesso alternativo.
- Report – Genera un report utilizzando un modello di checklist sulle risorse dell'area di lavoro selezionate.
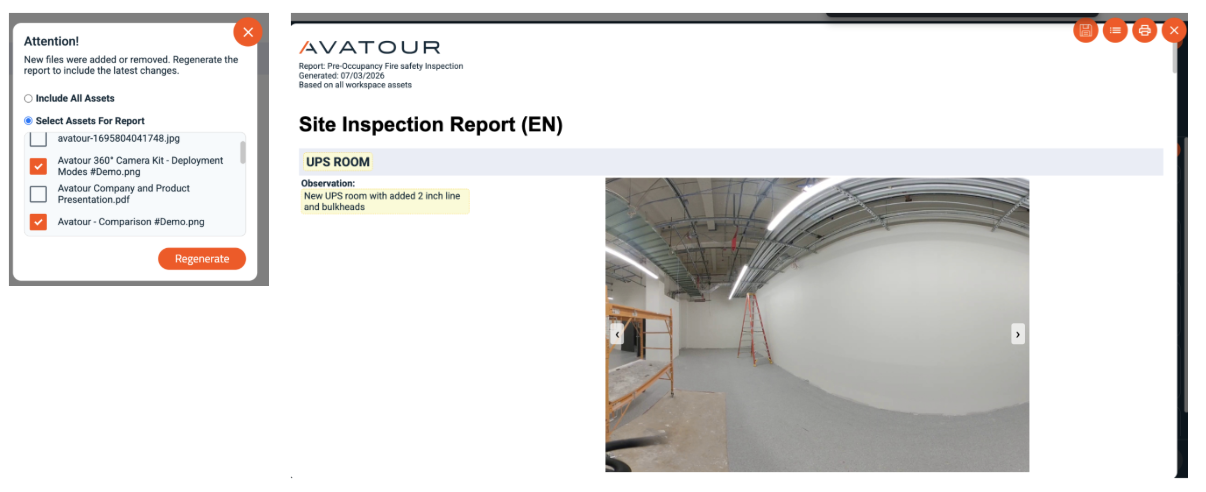 Rapporto sull'area di lavoro e selezione delle risorse
- Mappa – Visualizza le posizioni delle risorse con GPS su una mappa.
- Riunioni – Organizza riunioni nell'area di lavoro.
- Impostazioni – Configura le impostazioni predefinite dell'area di lavoro e delle riunioni:
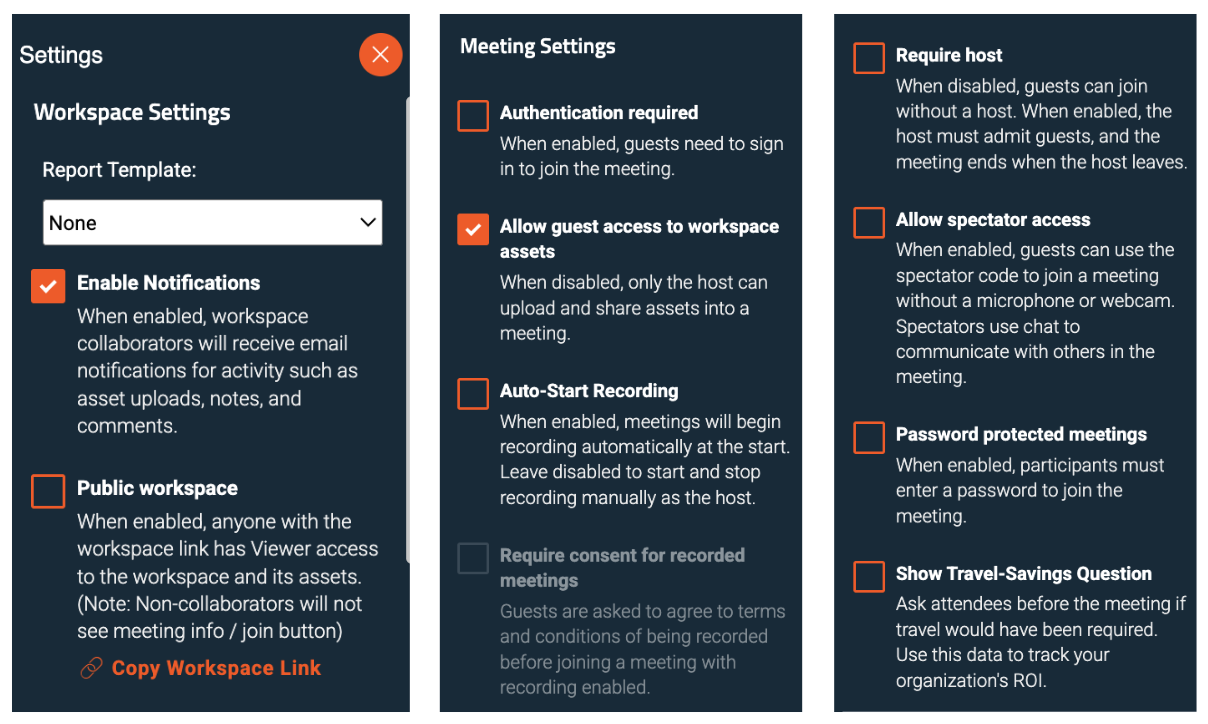 Impostazioni dell'area di lavoro
Impostazioni dell'area di lavoro
- Modello di report – Seleziona il modello di checklist per i report generati dall'IA.
- Abilita notifiche – E-mail di riepilogo giornaliere relative alle modifiche dello stato delle note.
 Esempio di notifiche via e-mail
- Area di lavoro pubblica – Chiunque disponga del link può visualizzare direttamente le risorse.
Impostazioni della riunione
- Autenticazione richiesta – I partecipanti devono effettuare l'accesso.
- Consenti accesso ospite – Consente agli utenti non registrati di visualizzare le risorse.
- Avvio automatico della registrazione / Avvio manuale – Scegli se le riunioni devono essere registrate automaticamente o avviate manualmente.
- Richiedi host – L'host deve ammettere i partecipanti; la riunione termina quando l'host esce.
- Consenti accesso spettatore – Partecipa senza microfono o videocamera; comunica tramite chat.
- Riunioni protette da password – Richiedi una password per partecipare.
- Mostra domanda sui risparmi di viaggio – Chiedi ai partecipanti se la riunione ha ridotto gli spostamenti.
Le impostazioni possono essere combinate (ad es. nessun host richiesto ma protezione con password).
4.2.2 Risorse
Gestisci tutti i video a 360°/2D, le immagini e i PDF. Carica/scarica risorse, assegnale agli spazi di lavoro, condividile con altri utenti, rinomina, stampa/scarica report, attiva la sfocatura dei volti e la sintesi AI.
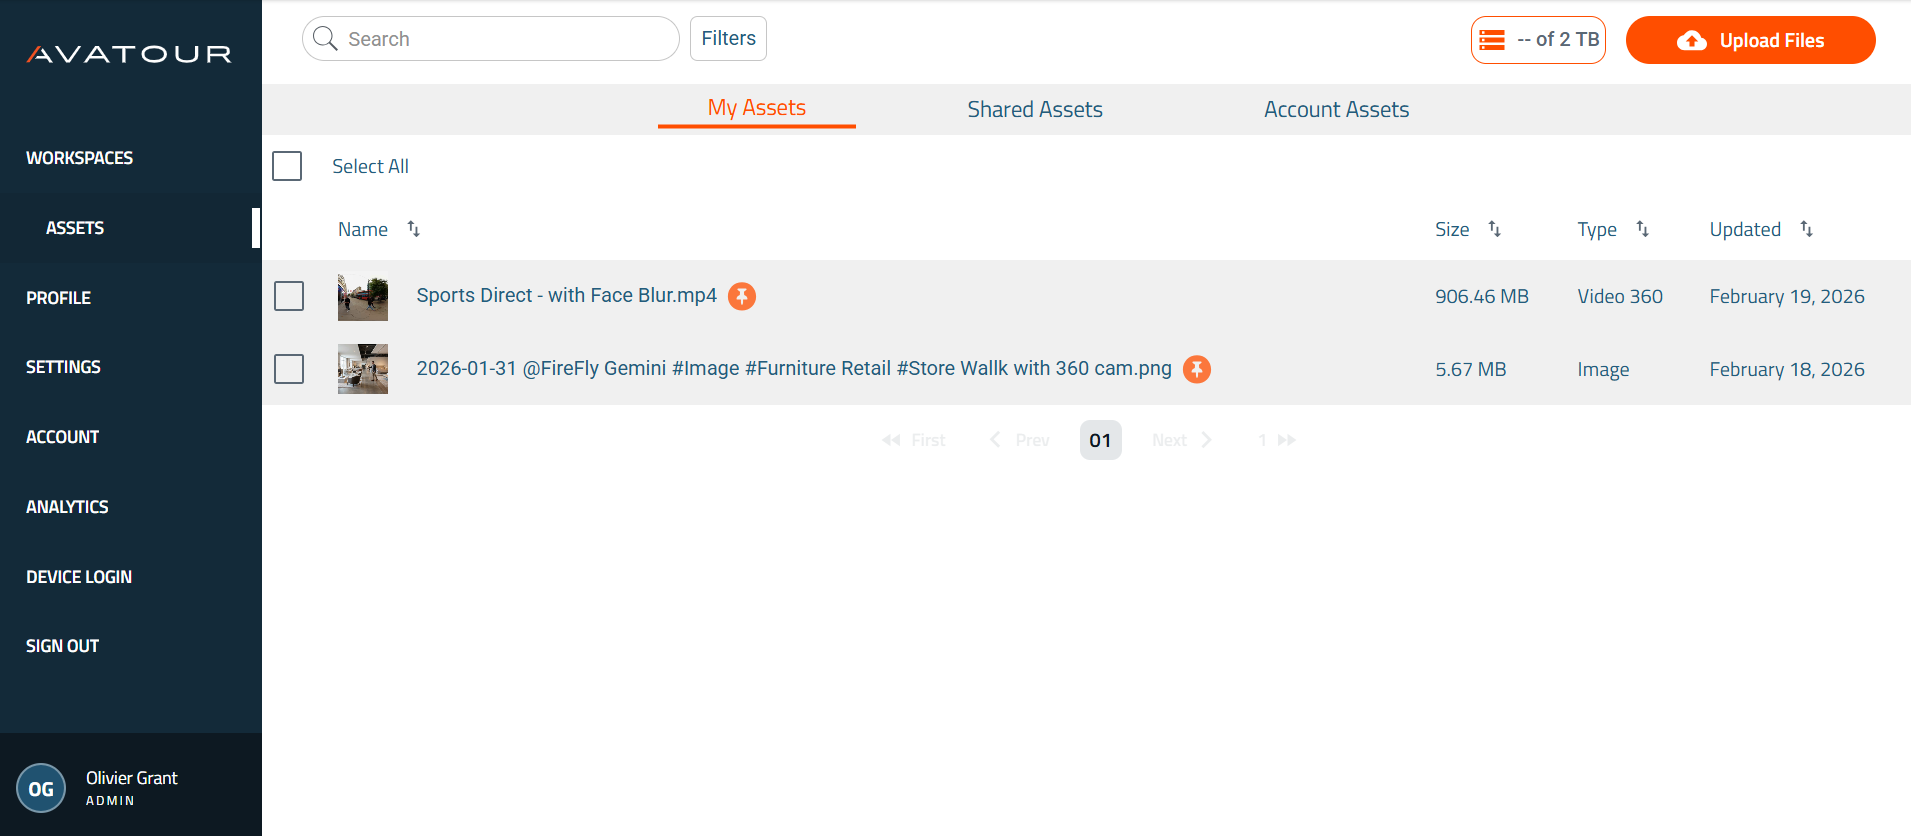 Voce del menu principale Risorse
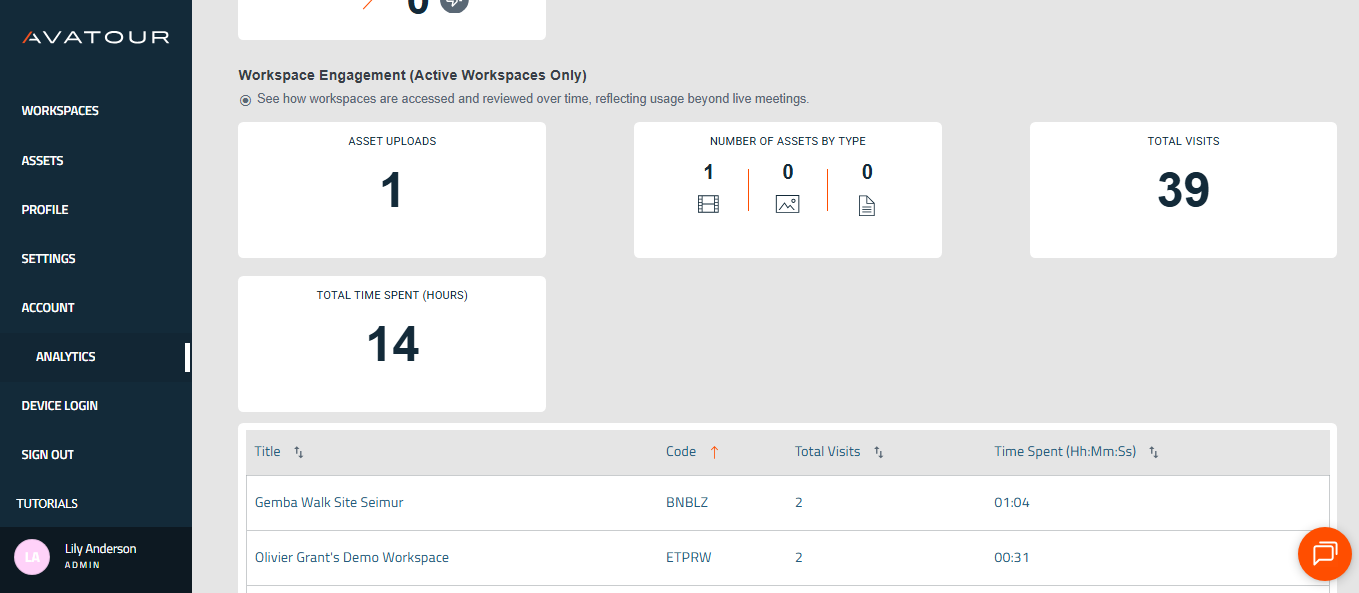
4.2.3 Analisi
Fornisce approfondimenti su riunioni, utilizzo degli spazi di lavoro e metriche del ROI.
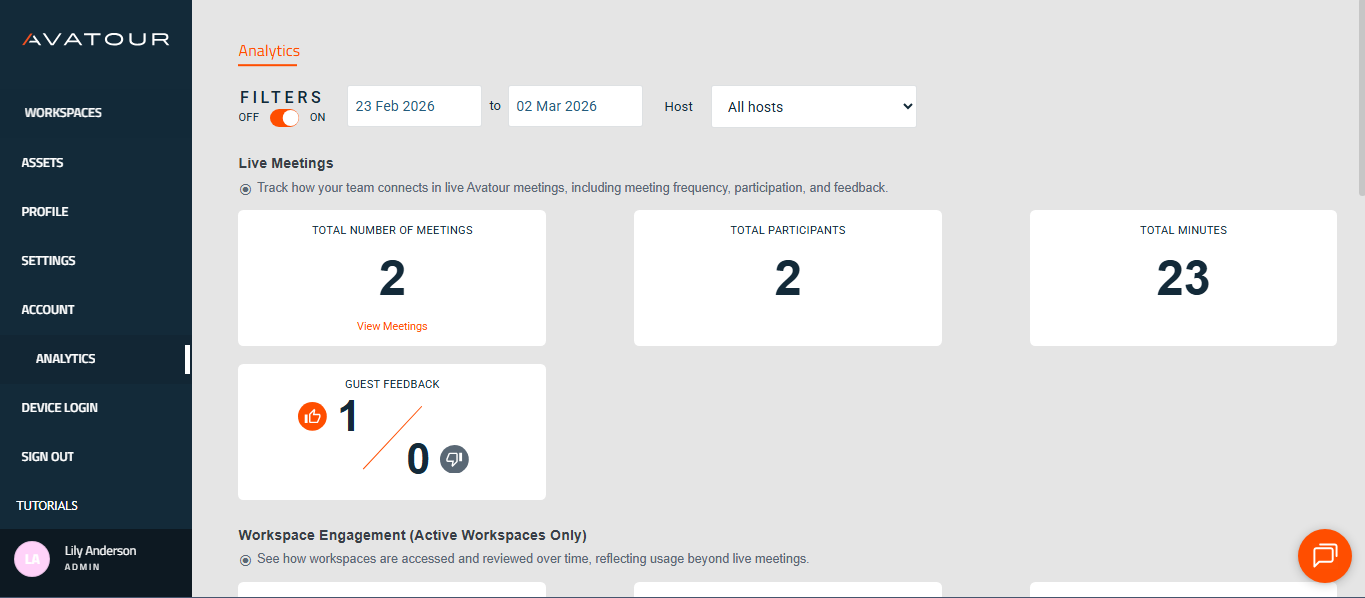 Panoramica delle analisi
 Attività delle riunioni e utilizzo dello spazio di lavoro
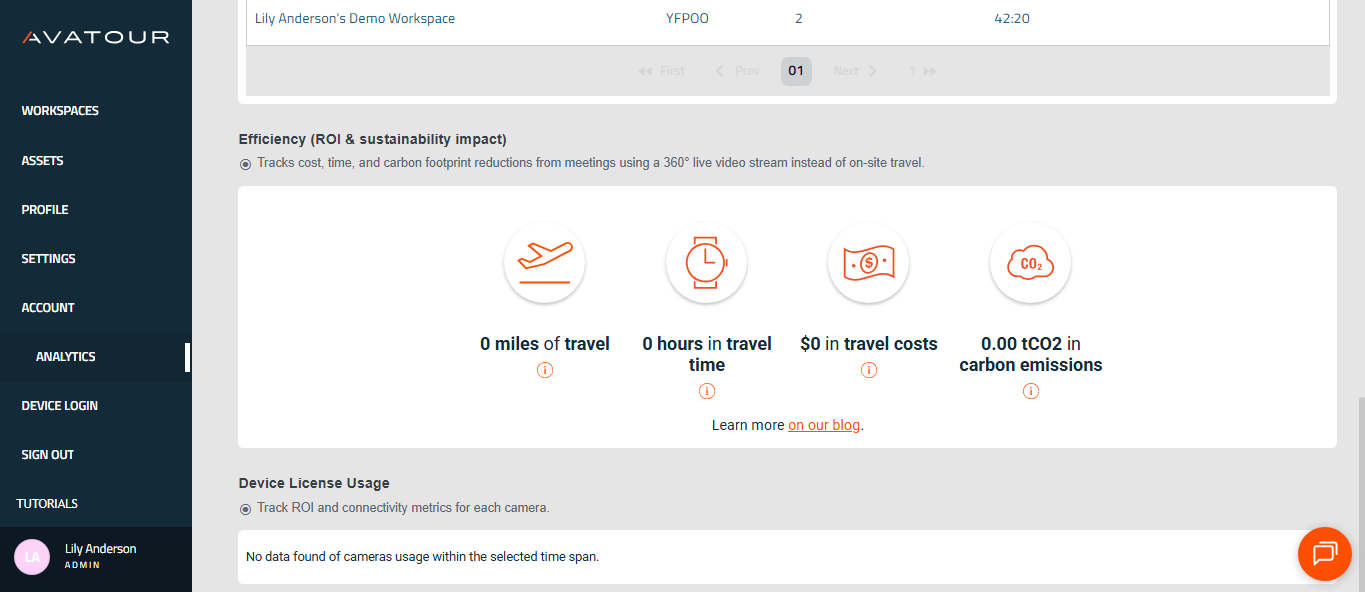 Utilizzo delle licenze dei dispositivi e ROI
5. In loco - Come utilizzare il kit chiavi in mano Avatour
5.1 Introduzione
Qui troverai una guida online molto completa per muovere i primi passi con il kit Avatour Turnkey: Guida rapida – Kit Avatour Turnkey 3.1 (Configurazione Pilot PanoX V2)
Ecco anche l'immagine con le istruzioni che troverai all'interno del coperchio della custodia del kit 3.1.
 Immagine all'interno del coperchio della custodia del kit Avatour
Seguite la guida e le istruzioni per disimballare, assemblare e accendere la vostra fotocamera.
5.2 Suggerimenti utili
Batteria esterna – Incontri più lunghi e migliori prestazioni termiche
-
Se il kit include una batteria Ulanzi: fissala tra la base del treppiede e l'asta estensibile, quindi collega la batteria alla fotocamera tramite USB-C.
-
Se il kit include un'asta con batteria Telesin: monta la fotocamera direttamente sull'asta estensibile con batteria Telesin e collegala tramite USB-C.
Utilizzo della batteria esterna:
- Estende la durata totale della batteria da ~40 minuti (solo batteria della videocamera) a ~3 ore.
- Aggiunge stabilità alla configurazione della videocamera.
- Aiuta a prevenire il potenziale surriscaldamento.
Si consiglia di utilizzare sempre la batteria esterna fin dall’inizio, specialmente per le riunioni in diretta.
Considerazioni sull’audio per riunioni in diretta e registrazioni
-
Ambienti rumorosi: Utilizza le cuffie Shokz incluse nel kit per una registrazione audio chiara.
- Accensione/spegnimento: Tieni premuto il pulsante “+” per 3 secondi (LED blu = acceso, LED rosso = spento).
- Modalità di accoppiamento Bluetooth: Mentre le cuffie sono spente, tieni premuto il pulsante “+” per 5 secondi (il LED lampeggia in blu/rosso).
- Volume: Utilizza i pulsanti “+” e “-”.
-
Ambienti più silenziosi / più partecipanti vicino alla telecamera: Utilizza l’altoparlante a clip NoxGear. Non offre la stessa fedeltà degli altoparlanti da conferenza (ad es. Jabra Speak), ma è facile da agganciare alla camicia e cattura efficacemente le voci vicine.
- Accensione/spegnimento: Tieni premuto il pulsante Play/Pausa per 2 secondi.
- Modalità di accoppiamento Bluetooth: Entra automaticamente in modalità di accoppiamento all'accensione (il LED lampeggia in blu/rosso; rimane blu fisso una volta accoppiato).
- Volume: Usa i pulsanti “+” e “-”.
-
Utilizzo del proprio dispositivo: se si preferisce un'alternativa (ad es. un altoparlante da conferenza o un auricolare personale), è possibile accoppiarlo tramite la videocamera: Impostazioni → Bluetooth.
Connettività, connettività, connettività
Prima di iniziare: assicurarsi della connessione a Internet tramite:
- WiFi locale (preferibile)
- Rete mobile (se fuori dalla portata del WiFi)
Larghezza di banda consigliata: 10 Mbps in upload/download per lo streaming a 360° completo (~5 Mbps). Una larghezza di banda inferiore (1–2 Mbps) funziona solo se si rimane fermi.
Testare la velocità di rete
- Test in un'unica posizione: qualsiasi strumento di verifica della velocità che usi normalmente (ad es. Speedtest) per verificare sia la larghezza di banda in upload che in download.
- Test camminando per il sito: Dalla fotocamera: Impostazioni → Rete → Test di connessione. Cammina attraverso l'intero spazio per confermare la copertura e la larghezza di banda.
WiFi locale
- Altamente raccomandato per connessioni stabili.
- Se il reparto IT richiede l'inserimento in whitelist, trova l'indirizzo MAC: Impostazioni → Informazioni → Indirizzo WiFi.
Rete mobile
Opzione A: hotspot e SIM forniti nel kit
- Collega l'hotspot GlocalMe alla batteria portatile Telesin (magnete).
- Assicura l'assenza di interferenze e mantiene la connessione se ci si allontana dalla telecamera.
- Risoluzione dei problemi:
- Verifica la SIM preinstallata (non la Cloud SIM).
- Abilita il 5G in Gestione scheda SIM.
- Verifica l'APN corretto per la tua regione (Guida alla configurazione APN).
Opzione B: Hotspot personale / SIM - Utilizza il tuo smartphone o un hotspot dedicato.
Nota importante:
Tieni l'hotspot disattivato mentre sei connesso al WiFi; abilitalo solo quando sei fuori portata. Il sistema operativo della telecamera passa dinamicamente da una rete WiFi all'altra in base alla potenza del segnale e potrebbe passare inavvertitamente all'hotspot anche quando il WiFi è disponibile.
Le reti mobili potrebbero limitare la larghezza di banda in modo imprevisto. Verifica con il tuo operatore i limiti del piano dati o contatta l'assistenza Avatour se utilizzi il nostro hotspot e la nostra SIM.
Situazioni di bassa larghezza di banda
- Registra in anticipo i video della posizione per riprodurli in un secondo momento (guida alla registrazione).
- Condividi lo streaming della fotocamera dello smartphone per integrare le aree a bassa larghezza di banda (0,1–0,3 Mbps in upload).
Assenza di connettività
- È possibile utilizzare solo video preregistrati (guida alla registrazione).
Altri partecipanti in loco – Best practice
Quando più partecipanti si uniscono a una riunione Avatour in diretta dalla stessa posizione della telecamera a 360°, è fondamentale gestire con attenzione l'audio e la larghezza di banda:
- Ogni smartphone, tablet o laptop connesso in loco consuma larghezza di banda di rete e può influire negativamente sul feed della telecamera a 360°.
- La presenza di più microfoni e altoparlanti nello stesso spazio può causare feedback audio, rendendo l'esperienza della riunione sgradevole per tutti i partecipanti.
Altri partecipanti in loco – Best practice
Quando più partecipanti si uniscono a una riunione Avatour in diretta dalla stessa posizione della telecamera a 360°, è fondamentale gestire con attenzione l'audio e la larghezza di banda:
- Ogni smartphone, tablet o laptop connesso in loco consuma larghezza di banda di rete e può influire negativamente sul feed della telecamera a 360°.
- La presenza di più microfoni e altoparlanti nello stesso spazio può causare un feedback audio, rendendo l'esperienza della riunione sgradevole per tutti i partecipanti.
Per affrontare queste sfide, segui queste migliori pratiche:
- Usa cuffie con cavo o wireless: preferibilmente con cancellazione del rumore per prevenire eco e feedback.
- Modalità In loco: partecipa alla riunione in modalità In loco quando sei fisicamente presente vicino alla telecamera a 360°.
- Questa modalità è ottimizzata per l'uso in loco:
- Disattiva di default il microfono e l'altoparlante del partecipante.
- Questa modalità è ottimizzata per l'uso in loco:
- Non invia il feed della videocamera del partecipante.
- Non visualizza il feed della videocamera a 360° nel browser del partecipante.
- Risparmia la larghezza di banda di rete, garantendo che la videocamera a 360° disponga della massima larghezza di banda in upload disponibile per lo streaming live.
- Utile quando un utente desidera condividere dettagli specifici; è possibile condividere a sua volta la propria videocamera per visualizzazioni mirate. - Disattivare l'audio quando non si sta parlando attivamente: previene feedback audio indesiderati e distrazioni.
- Utilizzare una rete separata, se possibile: collegare lo smartphone a una rete diversa da quella della videocamera per ridurre le interferenze.
Seguire queste linee guida garantisce un tour in diretta fluido e di alta qualità sia per i partecipanti in loco che per quelli remoti.
5.3 App Avatour Camera
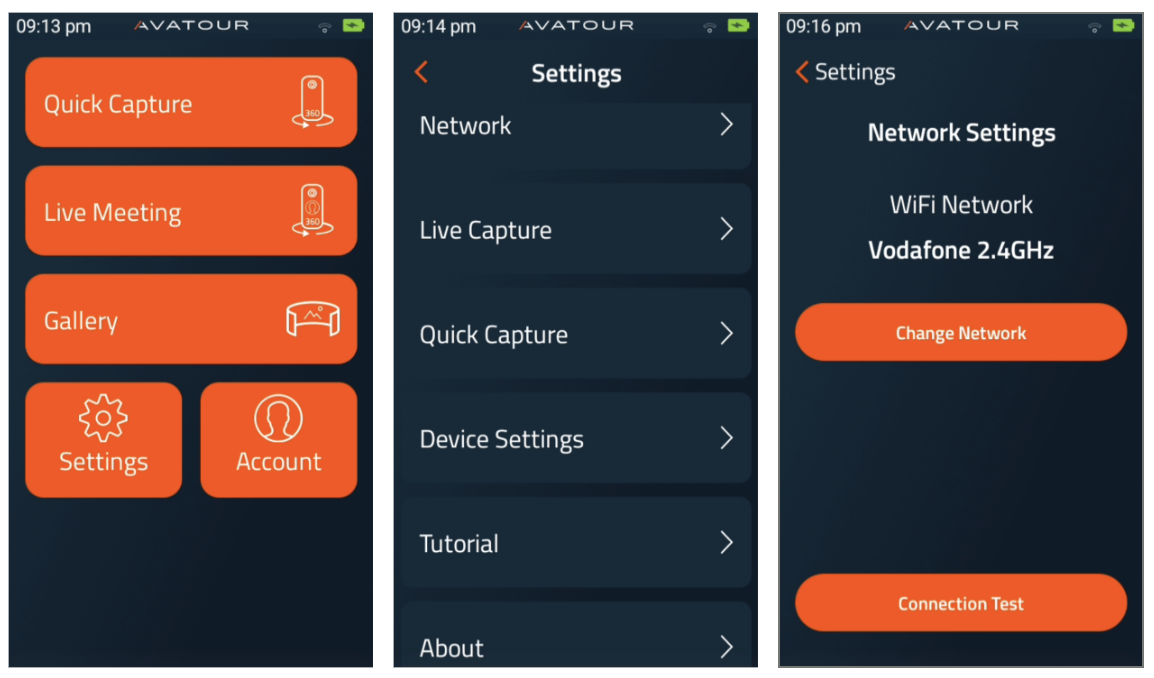
Ecco (1) il menu principale, (2) le impostazioni e (3) Impostazioni di rete.
 App Avatour 360° Camera - 3 menu
Acquisizione rapida - Per la registrazione di video a 360° offline. - Per una descrizione dettagliata, consultare Come si registrano e si caricano video a 360° con l'app Avatour?. Si consiglia di utilizzare un dispositivo audio esterno (collegato tramite Bluetooth). N.B. È possibile anche realizzare video e foto standard in 2D: basta cambiare la modalità tra 360° e 2D nell'angolo in basso a destra una volta nella schermata di acquisizione rapida.
Riunione in diretta - Per videoconferenze a 360° in diretta. Vedrete i vostri spazi di lavoro e cliccando su uno di essi avvierete lo streaming video in diretta dalla telecamera a 360°. Prima di poter partecipare alla riunione con la tua telecamera a 360°, devi collegare un dispositivo audio tramite Bluetooth. Per una descrizione dettagliata, consulta Come avviare una riunione Live Capture con la tua telecamera Pilot?
Quando si ospita una riunione Live Capture con la propria telecamera a 360°, si avranno a disposizione strumenti di riunione simili a quelli dell'esperienza web. Ecco un link al nostro articolo della Knowledge Base che spiega questi strumenti in modo più dettagliato: Strumenti dell'app operatore
Galleria - Qui troverai tutti i tuoi video e le tue immagini a 360° da caricare sulla console web di Avatour.
Impostazioni - All'interno delle Impostazioni, hai le seguenti opzioni:
- Rete: questa opzione ti permette di cambiare la rete Wi-Fi a cui è connessa la fotocamera o di eseguire un test di connessione di rete per visualizzare la velocità di streaming
-
Acquisizione live: regola le impostazioni di acquisizione live in base alla larghezza di banda disponibile, alla sensibilità VR dell'ospite o all'eventuale presenza delle lenti protettive della tua telecamera:
- Frequenza fotogrammi target: regola la frequenza fotogrammi per il tuo video in acquisizione live tra 15 fps, 24 fps e 30 fps. Frequenze fotogrammi più elevate producono un video più fluido, ma richiedono una maggiore larghezza di banda in upload. Impostazione predefinita: 15 fps
- Bitrate target: consente di aumentare o diminuire il bitrate massimo di streaming per la Live Capture. È possibile impostare il bitrate target tra 1 Mbps e 10 Mbps. Bitrate più elevati determineranno una risoluzione video più alta, ma richiederanno una maggiore larghezza di banda in upload. Impostazione predefinita: 5 Mbps
- Ottimizza movimento: Questa opzione riduce la frequenza dei fotogrammi del video, generando un carico minore sulla larghezza di banda in upload della tua rete e aumentando il bitrate di streaming. Inoltre, questa opzione aiuta a ridurre la cinetosi per i partecipanti in VR. Impostazione predefinita: Disattivato
- Lenti protettive: questa opzione influisce sul modo in cui il video a 360° viene unito, a seconda che siano state installate lenti protettive sulla tua videocamera. Se non disponi di lenti protettive, imposta questa opzione su “No”. Se hai ricevuto un Kit 3.0, hai le lenti protettive già installate e dovresti impostare questa opzione su “Sì”. Impostazione predefinita: Sì
-
Acquisizione rapida: Regola le impostazioni di Acquisizione rapida in base alla frequenza dei fotogrammi video che preferisci, alla larghezza di banda disponibile per il caricamento dei video registrati o alla presenza delle lenti protettive sulla tua fotocamera. L’Acquisizione rapida ha una risoluzione predefinita di 4k che di solito offre un buon equilibrio tra qualità video e dimensione del file. (Per risoluzioni più elevate puoi utilizzare le app native della fotocamera, anche su PanoX V2; per i dettagli, consulta Come si registrano e si caricano video a 360° con l’app Avatour?):
- Frequenza fotogrammi target: Regola la frequenza fotogrammi per le tue registrazioni video Quick Capture tra 15 fps, 24 fps e 30 fps. Frequenze fotogrammi più elevate producono un video più fluido, ma aumenteranno le dimensioni del file video e il tempo di caricamento. Consigliato: 30 fps
- Bitrate target: imposta il bitrate target per i caricamenti Quick Capture tra 5 Mbps e 20 Mbps. Bitrate più bassi aumentano la velocità di caricamento, ma riducono la qualità del video. Consigliato: 20 Mbps
- Lenti protettive: Vedi la sezione Lenti protettive per Live Capture sopra
Consulta anche il nostro Calcolatore delle dimensioni dei file video Avatour 360° per ulteriori consigli sulle impostazioni di cui sopra e sulle dimensioni dei file video.
- Informazioni: Visualizza il numero di serie del dispositivo e la versione del software
Account - Per effettuare l'accesso con il tuo account host o amministratore Avatour.
6. Consigli sulle migliori pratiche
6.1 Primi utilizzi (informali) e familiarizzazione
Per i primi utilizzi e per familiarizzare con la console web di Avatour e il kit Avatour Turnkey, consigliamo di seguire questi passaggi:
- Porta il kit a casa e provalo con familiari e amici utilizzando la tua connessione Internet domestica.
- Porta il kit in ufficio e collegati alla rete aziendale (potrebbero sorgere alcune questioni relative all'azienda, ad esempio i firewall aziendali, ma dal primo passo sai già che Avatour funziona e che questo è un argomento che il tuo team IT dovrà risolvere con l'aiuto di Avatour).
- Iniziate a utilizzare Avatour in loco (fuori dal vostro ufficio) nel luogo dell’incontro verso cui i partecipanti remoti dovrebbero normalmente recarsi. Potrebbero emergere ulteriori questioni relative alla connettività. Avatour vi aiuterà in collaborazione con il vostro team IT.
- Iniziate a utilizzarlo con partecipanti remoti interni ed esterni.
6.2 Prima di una riunione live con video a 360°
- Se il tempo lo consente, vi consigliamo di effettuare un tour video a 360° registrato prima di qualsiasi tour dal vivo per tre motivi: (1) avere una soluzione di riserva per il tour dal vivo, (2) disporre di materiale per la documentazione e la revisione successiva (oltre al tour dal vivo registrato) e (3) iniziare a creare una libreria di video a 360° di tutte le vostre sedi, che può essere utile per molti casi d’uso.
- Caricare tutti i componenti del kit per almeno 90 minuti prima della riunione live. Raccomandiamo comunque di tenere tutti i dispositivi in carica continua quando non sono in uso. In questo modo tutti i dispositivi saranno sempre pronti, anche per riunioni ad hoc non pianificate.
-
Assicurarsi che il kit sia completamente assemblato (1. base del treppiede + 2. batteria Ulanzi + 3. asta estensibile + 4. videocamera a 360°).
-
Verifica che sia stato creato uno Spazio di lavoro per ospitare una riunione in diretta e includi tutte le risorse pertinenti.
-
Invita tutti i partecipanti alla riunione tramite il tuo Spazio di lavoro. In questo modo verrà creato un invito sui calendari di tutti i partecipanti, che includerà il link di invito alla riunione.
-
Accoppia e collega alla videocamera le cuffie o l'altoparlante Bluetooth che intendi utilizzare per il tour.
-
Tutti gli utenti di smartphone in loco devono connettersi da una rete diversa da quella della telecamera. Ciò ridurrà il carico sulla larghezza di banda della rete della telecamera.
-
Se sei l'unico operatore di ripresa, porta con te uno smartphone nel caso in cui desideri condividere le immagini della fotocamera dello smartphone e mostrare i dettagli più piccoli.
-
Verifica che la telecamera a 360° possa connettersi al tuo WiFi locale.
-
Prima di una riunione Avatour, pianifica il percorso che seguirai all'interno della struttura. Esegui una riunione Avatour di prova con la telecamera e verifica che tutte le aree abbiano una larghezza di banda superiore a 1 Mbps. Questo dato è visibile sullo schermo della telecamera stessa oppure, per i partecipanti remoti, andando su Impostazioni e attivando Mostra bitrate.
-
Se noti che alcune aree hanno una larghezza di banda scarsa o assente, è meglio scattare delle foto o effettuare una registrazione. Questi possono poi essere presentati durante la riunione affinché i partecipanti remoti possano esaminarli. Puoi seguire la guida qui che spiega la nostra funzione Quick Capture per la registrazione e il caricamento di video/immagini: Come si registrano e si caricano video a 360° con l'app Avatour?
-
Se alla riunione partecipano persone da remoto che non hanno mai usato Avatour prima, dai loro una breve panoramica della piattaforma, delle sue funzionalità (video live a 360°, risorse, istantanee, annotazioni, spotlight) e degli strumenti per la riunione.
-
Puoi iniziare con un'altra soluzione di videoconferenza (ad es. Teams, Zoom, Google Meet), ma prima di passare ad Avatour, chiudi completamente l'altra applicazione di videoconferenza. In alcuni casi, queste altre applicazioni daranno la priorità al microfono/agli altoparlanti/alla webcam del tuo dispositivo, causandone la disattivazione per Avatour. Inoltre, NON eseguire Avatour E un'altra videoconferenza contemporaneamente, poiché ciò ridurrà la larghezza di banda disponibile.
-
Se si prevede di utilizzare la fotocamera a 360° in un ambiente ad alta temperatura, si consiglia di utilizzare il modulo di raffreddamento (solo Pilot Pano). Ciò contribuirà a ridurre il rischio che la fotocamera si surriscaldi e si spenga automaticamente.
6.3 Quando si utilizza la fotocamera in loco per una riunione video live a 360°
-
Durante l'utilizzo della telecamera, assicurati di camminare lentamente e di fermarti spesso appoggiando la telecamera sul treppiede. Questo aiuta (1) la qualità video, poiché si producono meno dati video evitando di muovere la telecamera inutilmente, e (2) riduce eventuali interruzioni video quando la connessione di rete della telecamera passa da un punto di accesso Wi-Fi all'altro.
-
Tenete la telecamera davanti a voi, sopra il livello degli occhi. Ciò consente a tutti i partecipanti in remoto di vedere la maggior parte dell'area circostante.
-
Nei casi in cui la telecamera debba rimanere stabile, utilizzate il treppiede e regolate l'altezza della telecamera, preferibilmente all'altezza degli occhi.
-
Collegare sempre la telecamera alla rete Wi-Fi locale, ove possibile. Nelle aree prive di accesso Wi-Fi, utilizzare l'hotspot in dotazione. L'hotspot è dotato di una scheda SIM che si connetterà a una rete cellulare affidabile nelle vicinanze. Tenere sempre l'hotspot spento quando non è in uso in ambienti interni, poiché altrimenti la telecamera a 360° potrebbe connettersi all'hotspot, cosa che non è auspicabile in ambienti interni. Quando ci si trova all'aperto, tenere l'hotspot vicino alla telecamera a 360°.
-
Quando la velocità di trasmissione della telecamera inizia a scendere sotto i 2 Mbps, cammina più lentamente o fermati completamente finché il segnale non si stabilizza di nuovo. Questo di solito succede quando passi da un punto di accesso Wi-Fi a un altro.
-
Se sai che la connessione e il video si interromperanno quando ti sposti in un luogo specifico (ad esempio: passando da un'area di produzione interna a un'area esterna), avvisa in anticipo i partecipanti remoti.
-
Se devi mostrare qualcosa con un alto livello di dettaglio o con caratteri piccoli, usa il tuo smartphone o quello di un partecipante in loco per collegarti alla riunione e mostrare la fotocamera (posteriore) del tuo/loro telefono.
-
Se possibile, ti consigliamo di avere una persona in più in loco per aiutarti con la condivisione della fotocamera dello smartphone descritta sopra, poiché spesso si rivela utile o necessaria.
-
Idealmente, gli utenti di smartphone in loco dovrebbero partecipare alla riunione (1) in modalità in loco e (2) su una rete diversa da quella utilizzata dalla fotocamera, per non sottrarre larghezza di banda di upload fondamentale alla fotocamera a 360°.
-
Tutti i partecipanti in loco che si collegano dal proprio smartphone dovrebbero avere l'audio disattivato, a meno che non stiano parlando attivamente.