Guía del Usuario y Mejores Prácticas de Avatour
1. Para todos los usuarios de Avatour
Si eres nuevo en Avatour, los siguientes recursos te ofrecen una introducción útil a la plataforma y sus funciones:
- Vídeo «Cómo funciona Avatour»
Una breve descripción general de las principales funciones de Avatour y de cómo la plataforma permite una colaboración remota inmersiva. - Preguntas frecuentes
Respuestas a las preguntas más habituales. - Glosario
Definiciones de los términos y conceptos clave de Avatour que se utilizan con frecuencia. - Sitio web
Echa un vistazo especialmente a Funciones de Avatour, junto con las secciones dedicadas a Casos de uso y Sectores, para descubrir cómo Avatour puede satisfacer tus necesidades específicas.
2. Tipos de usuarios de Avatour
2.1 Participantes en la reunión (no se requiere cuenta)
Los usuarios pueden unirse a la reunión sin necesidad de registrarse para obtener una cuenta de Avatour. Excepción: si el anfitrión ha restringido la reunión a usuarios registrados —por ejemplo, para permitir que solo los empleados internos se unan mediante el inicio de sesión único (SSO)—, la invitación del calendario indicará que los participantes deben iniciar sesión para autenticarse.
Los usuarios acceden a la reunión de la siguiente manera:
- Reciben una invitación de calendario del anfitrión.
- Utilizan el enlace de la reunión que figura en la invitación para unirse.
- Introducen una contraseña de la reunión si el anfitrión ha habilitado una.
- Los participantes pueden unirse sin una cuenta de Avatour, a menos que la reunión esté restringida y requiera iniciar sesión para autenticarse.
2.1.1 Participante
- Puede unirse e interactuar plenamente (cámara web, micrófono, chat y función de presentación).
- Máximo de 20 participantes interactivos por reunión.
2.1.2 Espectador
- Puede ver la reunión y participar únicamente a través del chat.
- No puede compartir vídeo, utilizar el micrófono, realizar presentaciones, reproducir/pausar activos ni capturar instantáneas.
- Máximo de 10 espectadores por reunión.
- Junto con los participantes, una reunión puede acoger hasta 30 asistentes.
2.2 Usuarios registrados
Los usuarios registrados tienen una cuenta de Avatour. Las cuentas se crean de una de las siguientes maneras:
- Invitados por el administrador: Durante la incorporación, Avatour configura un tenant dedicado para la organización y crea una o más cuentas de administrador. A continuación, los administradores pueden invitar a usuarios dentro de la organización y asignarlos a grupos, que definen su rol en la plataforma (invitado, anfitrión o administrador). Los usuarios invitados reciben un enlace de registro para completar la configuración de la cuenta y establecer una contraseña.
- Invitados por el anfitrión: Los anfitriones pueden añadir usuarios como colaboradores editores a un espacio de trabajo. Esto consume una licencia de anfitrión y garantiza que el usuario tenga acceso de nivel de anfitrión.
- Aprovisionamiento automático de SSO (solo en los planes Enterprise/Business): El IdP puede crear cuentas automáticamente. De forma predeterminada, las cuentas aprovisionadas mediante SSO se añaden al grupo de invitados, a menos que se anule mediante asignaciones de grupos SAML. Los administradores pueden seguir invitando a usuarios y asignándoles la pertenencia a grupos directamente, incluso cuando el SSO está habilitado.
Resumen:
Los usuarios registrados y su pertenencia a grupos se pueden gestionar de varias formas:
- Gestión por parte del administrador: Un administrador en la consola de Avatour puede crear usuarios y asignarlos a grupos, lo que define su rol en la plataforma (Invitado, Anfitrión o Administrador).
- Aprovisionamiento SSO: Para los clientes de los planes Enterprise o Business con SSO habilitado, el IdP puede aprovisionar automáticamente cuentas y asignar la pertenencia a grupos, lo que define el rol del usuario en la plataforma.
- Usuarios invitados por el anfitrión: Los anfitriones pueden invitar a otros usuarios como colaboradores con rol de Editor a espacios de trabajo específicos. La asignación del rol de colaborador Editor consume una licencia de anfitrión.
Práctica recomendada (clientes Enterprise):
Para las organizaciones que esperan un gran número de usuarios que necesiten acceder a Avatour, se recomienda integrar el inicio de sesión único (SSO) y gestionar los usuarios y las pertenencias a grupos desde el IdP. Este enfoque agiliza el aprovisionamiento de cuentas, la asignación de grupos y la gestión de licencias, lo que reduce la carga administrativa y garantiza un control de acceso coherente.
2.2.1 Usuarios invitados
- Añadidos al grupo Invitado.
- Pueden ver activos dentro de los espacios de trabajo en los que se les ha añadido como colaboradores de visualización.
- No pueden crear espacios de trabajo, organizar reuniones ni subir contenido.
- Las cuentas de invitado aprovisionadas mediante SSO se autentican a través del IdP; no se requiere ninguna contraseña gestionada por Avatour.
2.2.2 Usuarios con licencia (acceso a la consola web)
Usuarios anfitriones (Grupo: Anfitrión)
- Pueden crear/gestionar espacios de trabajo, invitar a colaboradores a un espacio de trabajo, organizar reuniones en directo y subir capturas rápidas.
- Tienen acceso al panel de control del anfitrión y a la aplicación del operador en las cámaras de 360° compatibles.
Usuarios administradores (Grupo: Admin)
- Incluyen todas las capacidades de los anfitriones, además de la administración completa de cuentas.
Los privilegios de administrador adicionales incluyen:
Gestión de cuentas
- Crear nuevos usuarios y asignarlos a grupos.
- Restablecer contraseñas cuando la gestión corre a cargo de Avatour (no aplicable cuando el SSO está habilitado).
- Ascender a los usuarios invitados a Anfitrión.
- Desactivar usuarios (las cuentas de administrador deben convertirse primero en Anfitrión antes de su eliminación).
- Transferir activos de un usuario Anfitrión a otro durante la eliminación.
Configuración
- Configurar los ajustes de seguridad para toda la organización para los activos, los espacios de trabajo y las reuniones alojadas en la plataforma (por ejemplo, si un Anfitrión debe estar presente para iniciar una reunión, si se deben difuminar los rostros en todos los vídeos subidos a la plataforma).
- Activar o desactivar funciones de IA o grabación.
- Aplicar la imagen de marca de la empresa de forma coherente en toda la plataforma si se ha configurado un dominio personalizado.
Recursos y análisis
- Ver todos los recursos subidos por cualquier usuario de la organización.
- Revisar el uso de la plataforma en toda la organización.
2.2.3 Permisos de colaborador del espacio de trabajo
Los permisos del espacio de trabajo definen lo que un usuario puede hacer dentro de un espacio de trabajo específico. Estos son independientes de la pertenencia a grupos a nivel de plataforma (Invitado, Anfitrión, Administrador).
-
Colaborador editor: Los usuarios con este permiso pueden:
- Gestionar activos (subir, eliminar, difuminar rostros, generar resúmenes)
- Gestionar la configuración de las reuniones (activar/desactivar la grabación, admitir o eliminar participantes)
- Programar y organizar reuniones en directo
- Generar informes basados en plantillas predefinidas
- Añadir o eliminar colaboradores del espacio de trabajo
-
Colaborador con permiso de visualización: Los usuarios con este permiso tienen acceso de solo lectura a los activos del espacio de trabajo. No pueden modificar activos, gestionar reuniones ni gestionar colaboradores, pero pueden crear notas sobre los activos.
3. Para los participantes en reuniones a distancia y los visitantes del espacio de trabajo
Avatour permite a los usuarios colaborar de dos formas principales:
-
Unirse a una reunión de Avatour (colaboración sincrónica):
Es posible que recibas una invitación de calendario para unirte a una reunión de Avatour. Durante la reunión, los participantes pueden realizar una visita remota en directo o revisar juntos los activos de forma sincrónica. -
Visitar un espacio de trabajo (colaboración asincrónica):
También puede recibir una invitación como colaborador de un espacio de trabajo para revisar activos de forma asincrónica (según su propio horario).
3.1 Cómo unirse a una reunión de Avatour y visitar un espacio de trabajo de Avatour
3.1.1 Cualquier dispositivo de «pantalla plana» con un navegador web
Puede unirse a una reunión de Avatour desde cualquier ordenador de sobremesa o portátil, smartphone o tableta utilizando un navegador web.
Unirse a una reunión de Avatour
Nota: Para unirse a una reunión de Avatour es necesario que conceda permisos al micrófono. Acepte cualquier solicitud de permiso que le aparezca en su navegador.
-
A través de una invitación de calendario (recomendado): - Normalmente recibirá una invitación de calendario con un enlace de acceso directo (por ejemplo:
https://avatour.live/join?s=xxxxx). - Al hacer clic en el enlace, se completará automáticamente el código de reunión de 5 caracteres y se le redirigirá a la reunión.- Autenticación requerida: Algunas reuniones están restringidas a usuarios registrados. En este caso, la invitación indicará que debe iniciar sesión para acceder a la reunión.
- Reuniones protegidas con contraseña: Algunas reuniones pueden requerir una contraseña. En ese caso, la invitación incluirá la contraseña que debe introducir para unirse.
-
A través del código de reunión: - Si el anfitrión comparte un código de reunión de 5 caracteres por separado, ve a https://avatour.live/join, introduce tu nombre y el código de reunión, y únete a la reunión. - Si la reunión está protegida con contraseña, introduce la contraseña proporcionada por el anfitrión.
- Si la reunión requiere autenticación, tendrás que iniciar sesión con tu cuenta de Avatour antes de unirte.
Consejo 1: Si tu cámara o micrófono no funcionan, es posible que estén siendo utilizados por otra aplicación (por ejemplo, Microsoft Teams o Zoom). Cierra cualquier aplicación que pueda estar utilizando tu cámara o micrófono y, a continuación, sal y vuelve a unirte a la reunión de Avatour.
Consejo 2: Si sigues sin poder unirte a la reunión, realiza esta prueba: https://avatour.live/test.
La prueba puede identificar si tu firewall corporativo o red está bloqueando el acceso, y te proporcionará información para orientar las conversaciones con tu equipo de TI.Consejo 3: No utilices las aplicaciones de Avatour para iOS o Android para unirte a las reuniones. Estas aplicaciones solo son necesarias cuando se transmite una reunión en directo desde una cámara Insta360, ya que dichas cámaras no pueden ejecutar el software Avatour 360° directamente y requieren un smartphone como ayuda.
Visitar un espacio de trabajo de Avatour (sin unirte a una reunión de Avatour)
Puedes acceder a un espacio de trabajo de las siguientes maneras:
-
Espacio de trabajo público:
Si el espacio de trabajo es público, se puede acceder al enlace directamente, sin necesidad de iniciar sesión. -
Espacio de trabajo restringido:
Si el espacio de trabajo es restringido, debes ser añadido como colaborador con permisos de editor o visor.- Cuando se le añada como colaborador, recibirá una notificación por correo electrónico con un enlace al espacio de trabajo.
- Haga clic en el enlace del correo electrónico para abrir el espacio de trabajo. Si aún no ha iniciado sesión, se le pedirá que inicie sesión o complete el registro.
- Una vez que haya iniciado sesión, el espacio de trabajo se abrirá automáticamente.
También puedes iniciar sesión en https://avatour.live/login y acceder al espacio de trabajo desde tu lista de espacios de trabajo.
3.1.2 Casco de realidad virtual
Puedes unirte a una reunión y visitar un espacio de trabajo desde una amplia gama de cascos compatibles de Meta y Pico. Para ello:
- Instala nuestra aplicación Avatour desde tu tienda de aplicaciones de realidad virtual correspondiente: Cómo instalar la aplicación Avatour VR
- Abre nuestra aplicación e introduce el código de la reunión o selecciona un espacio de trabajo para unirte a una reunión. Para obtener más información sobre cómo utilizar nuestra aplicación de RV, consulta nuestro artículo de la Base de conocimientos aquí.
3.2 Herramientas de colaboración para reuniones y espacios de trabajo
Avatour permite la colaboración en dos contextos principales:
- Reuniones (sincrónicas): Colabora en tiempo real con otros participantes, incluyendo visitas en directo a las instalaciones o la revisión conjunta de activos grabados.
- Espacios de trabajo (asincrónicos): Revisa e interactúa con los activos según tu propio horario, las 24 horas del día, los 7 días de la semana.
Las herramientas de colaboración son en su mayoría similares entre reuniones y espacios de trabajo, con algunas diferencias debidas al contexto sincrónico frente al asincrónico.
3.2.1 Diseño de la interfaz
La interfaz de Avatour se organiza en torno a tres áreas principales:
- Panel izquierdo: recursos del espacio de trabajo y herramientas de apoyo
- Lienzo central: área de visualización principal para vídeo en directo o recursos
- Panel derecho: información contextual, como participantes, reuniones o chat
La mayoría de las interacciones se inician desde el menú inferior.
Al hacer clic en una opción del menú se abre un panel lateral en el lado izquierdo o derecho de la pantalla, mientras que el lienzo central sigue siendo el área de visualización principal.
3.2.2 Ejemplo de vista de reunión
A continuación se muestra un ejemplo de una vista en una reunión de Avatour:

Reunión de Avatour con panel de recursos (izquierda), lienzo (centro) y panel de participantes (derecha)
3.2.3 Ejemplo de vista del espacio de trabajo
A continuación se muestra un ejemplo de una vista del espacio de trabajo:

Espacio de trabajo de Avatour con el panel de activos (izquierda), el lienzo (centro) y el panel de reuniones (derecha)
3.2.4 Descripción general del menú inferior
El menú inferior permite acceder a los controles y paneles principales de la interfaz:
Menú inferior de la reunión

Menú inferior de la reunión de Avatour
- Recursos: revisa los archivos del espacio de trabajo, incluidos vídeos grabados, imágenes, capturas de pantalla y archivos PDF.
- Chat: envía mensajes a todos los participantes de la reunión.
- Cámara: activa o desactiva tu cámara web.
- Micrófono: silencia o desactiva el silencio de tu micrófono.
- Presentar: presenta un recurso, el escritorio o la transmisión de la cámara web (consulta la sección «Presentar» más abajo).
- Herramientas del anfitrión (solo para anfitriones):
- Bloquear enfoque: bloquea la vista para todos los participantes.
- Silenciar a todos: silencia a todos los participantes.
- Activar pantalla completa: muestra la pestaña de la reunión en pantalla completa.
- Salir de la reunión: abandona la reunión.
- Iniciar grabación: utiliza este botón para iniciar y detener la grabación manualmente durante una reunión. Alternativamente, las reuniones se pueden grabar automáticamente si se habilita la grabación automática en la configuración del espacio de trabajo. En ambos casos, las grabaciones se guardan en los activos del espacio de trabajo.
- Mapa: abre o cierra el panel del mapa para los activos con un registro GPS. Al hacer clic en una ubicación, se salta al punto exacto del vídeo. El mapa se actualiza en tiempo real a medida que se reproduce el vídeo.
- Participantes: abre o cierra el panel de participantes.
- Información de la reunión: ve el código de la reunión, el enlace de invitación y accede a tutoriales relacionados.
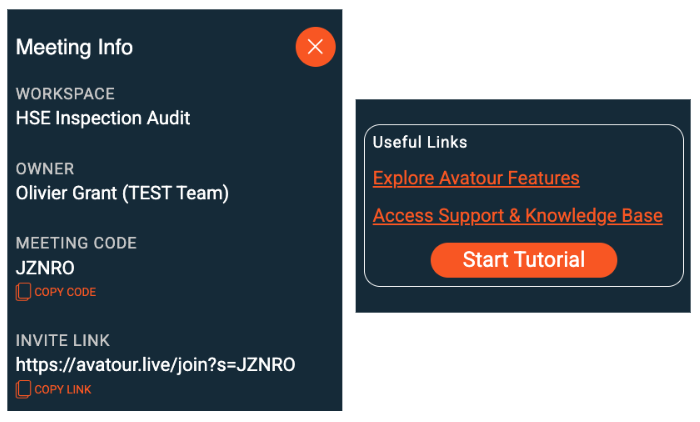
Panel lateral de información de la reunión de Avatour
- Configuración: ajusta la configuración de idioma, audio y vídeo. Para reuniones de vídeo en directo en 360°, utiliza Mostrar velocidad de bits para supervisar las estadísticas de conectividad.
Consejo: envía el enlace de la reunión o añádelo a una entrada del calendario para invitar a los participantes.
Menú Presentar
La opción Presentar del menú inferior de la reunión te permite compartir contenido con todos los participantes.
- Cámara: comparte la cámara de tu smartphone o tableta. Esto también se puede utilizar durante una reunión de vídeo en directo a 360° para superponer una vista secundaria con primeros planos o detalles específicos.
- Escritorio: comparte la pantalla de tu escritorio con todos los participantes.
- Recurso: presenta un recurso desde el espacio de trabajo. Al seleccionar un activo se abre la barra de herramientas de activos, que ofrece controles de reproducción y herramientas de colaboración específicas para el activo que se está presentando.
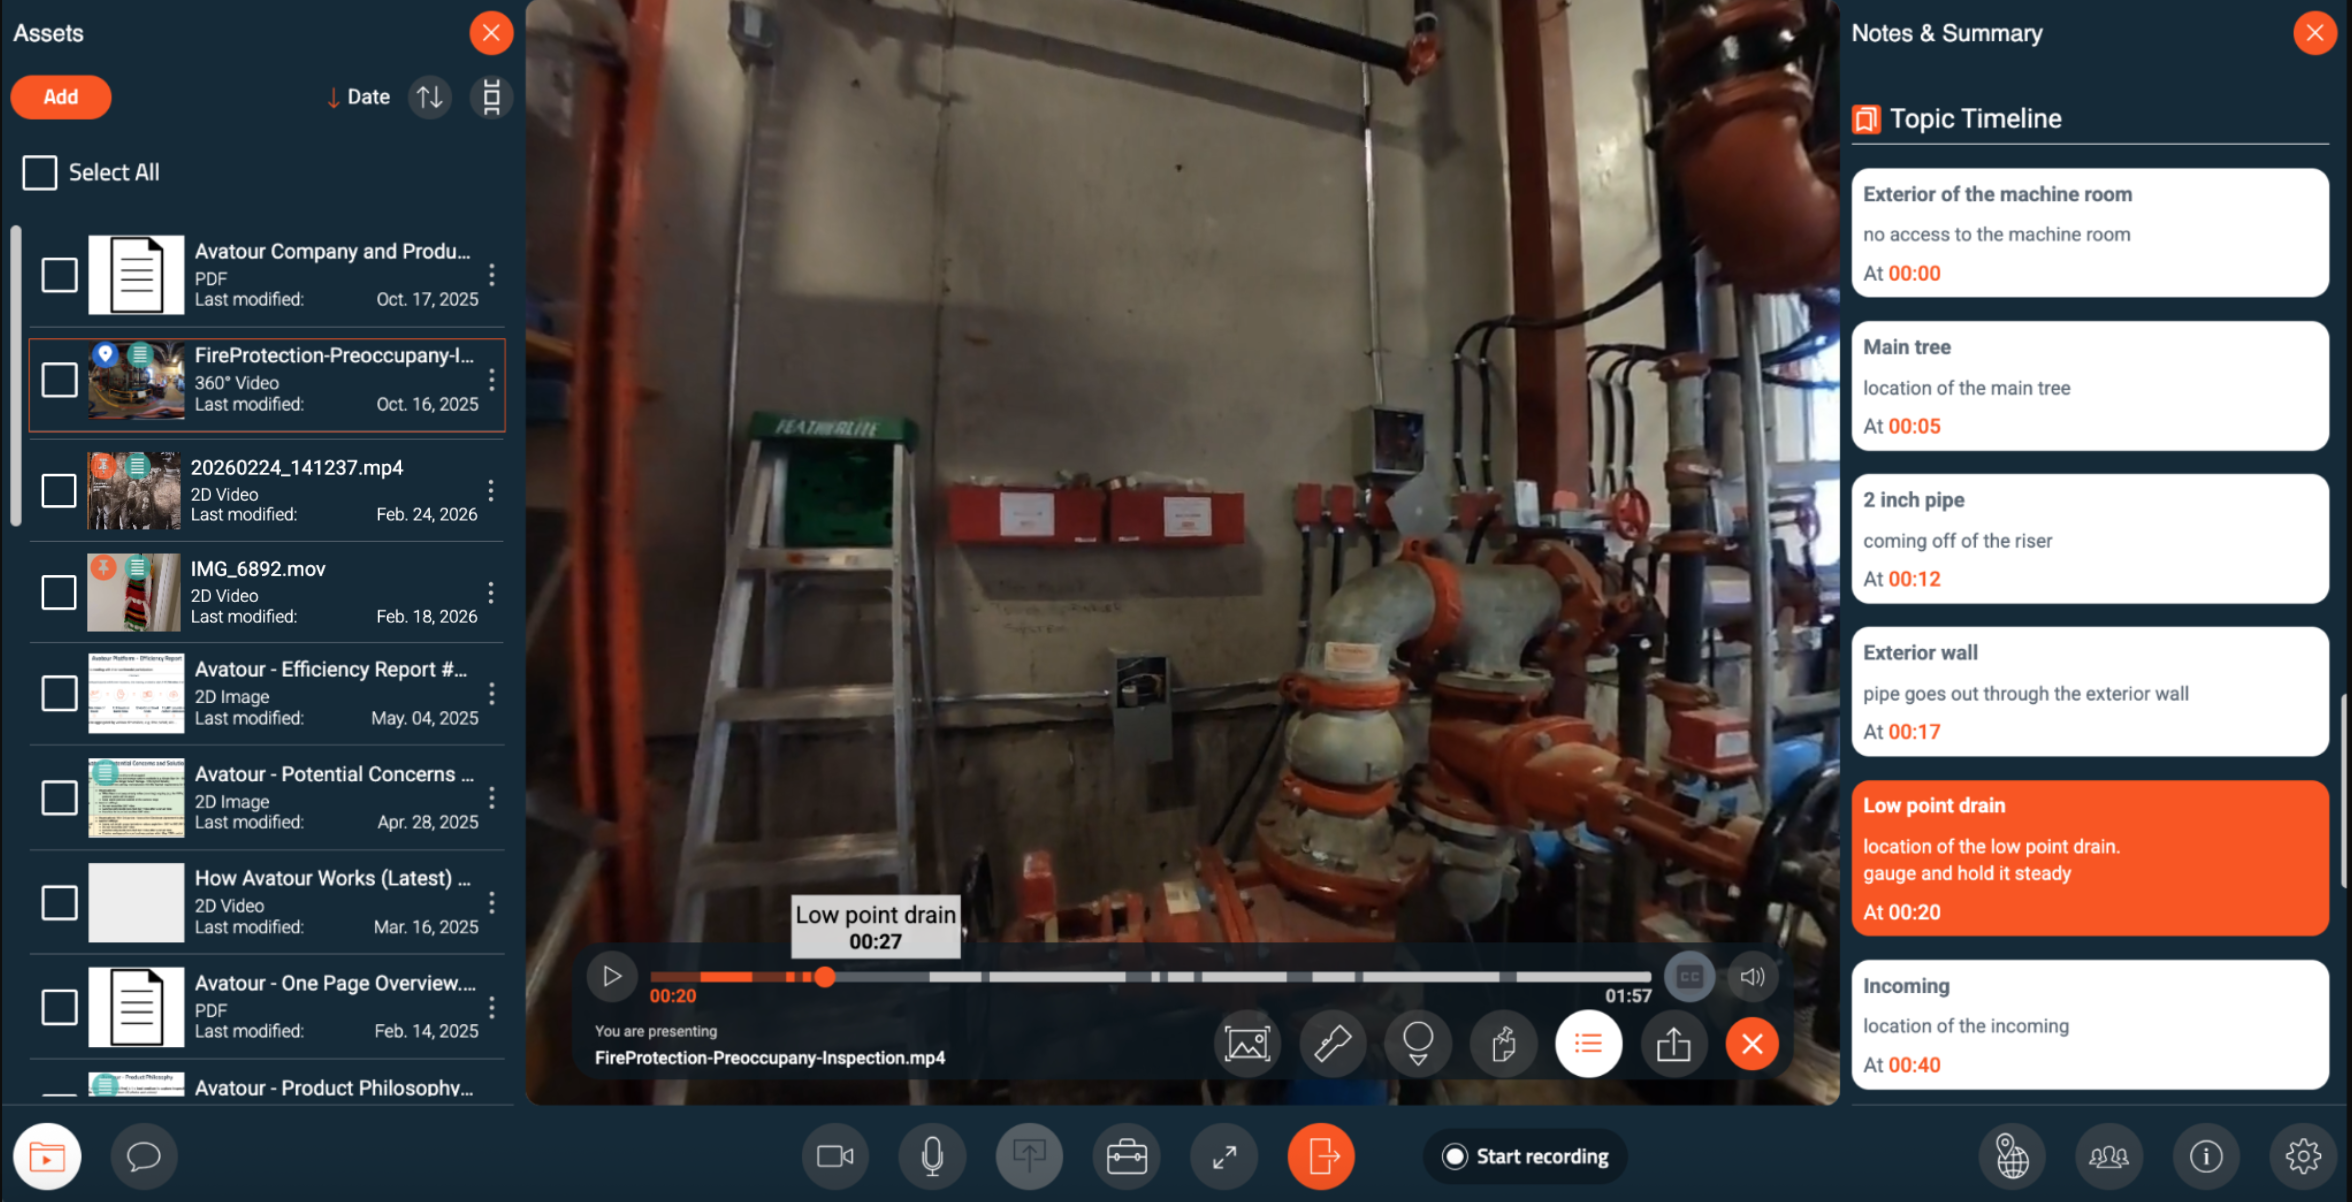
Barra de herramientas de activos (reunión)
Al presentar un activo en una reunión, la barra de herramientas de activos aparece sobre el lienzo. Estas son las herramientas y los elementos del menú disponibles al presentar un activo en una reunión - explicados de izquierda a derecha.
 Menú de Avatour al presentar un activo en una reunión
- Línea de tiempo del vídeo / Barra de progreso – Muestra el progreso del vídeo con notas y temas clave extraídos del audio. Haga clic en una nota o tema para saltar a ese momento y abrir la nota. Incluye controles de Reproducir / Pausar.
- Instantánea: captura una imagen de 360° o 2D del activo.
- Foco: resalta un área específica para todos los participantes durante las sesiones en directo.
- Mostrar/ocultar punto de vista (POV): muestra hacia dónde mira cada participante en el vídeo de 360°.
- Notas: crea notas vinculadas a momentos específicos del recurso. Las notas se pueden clasificar (Observación, Problema, Acción, Recomendación), seguir por estado (Abierto → En curso → Resuelto) y compartir mediante enlaces directos.
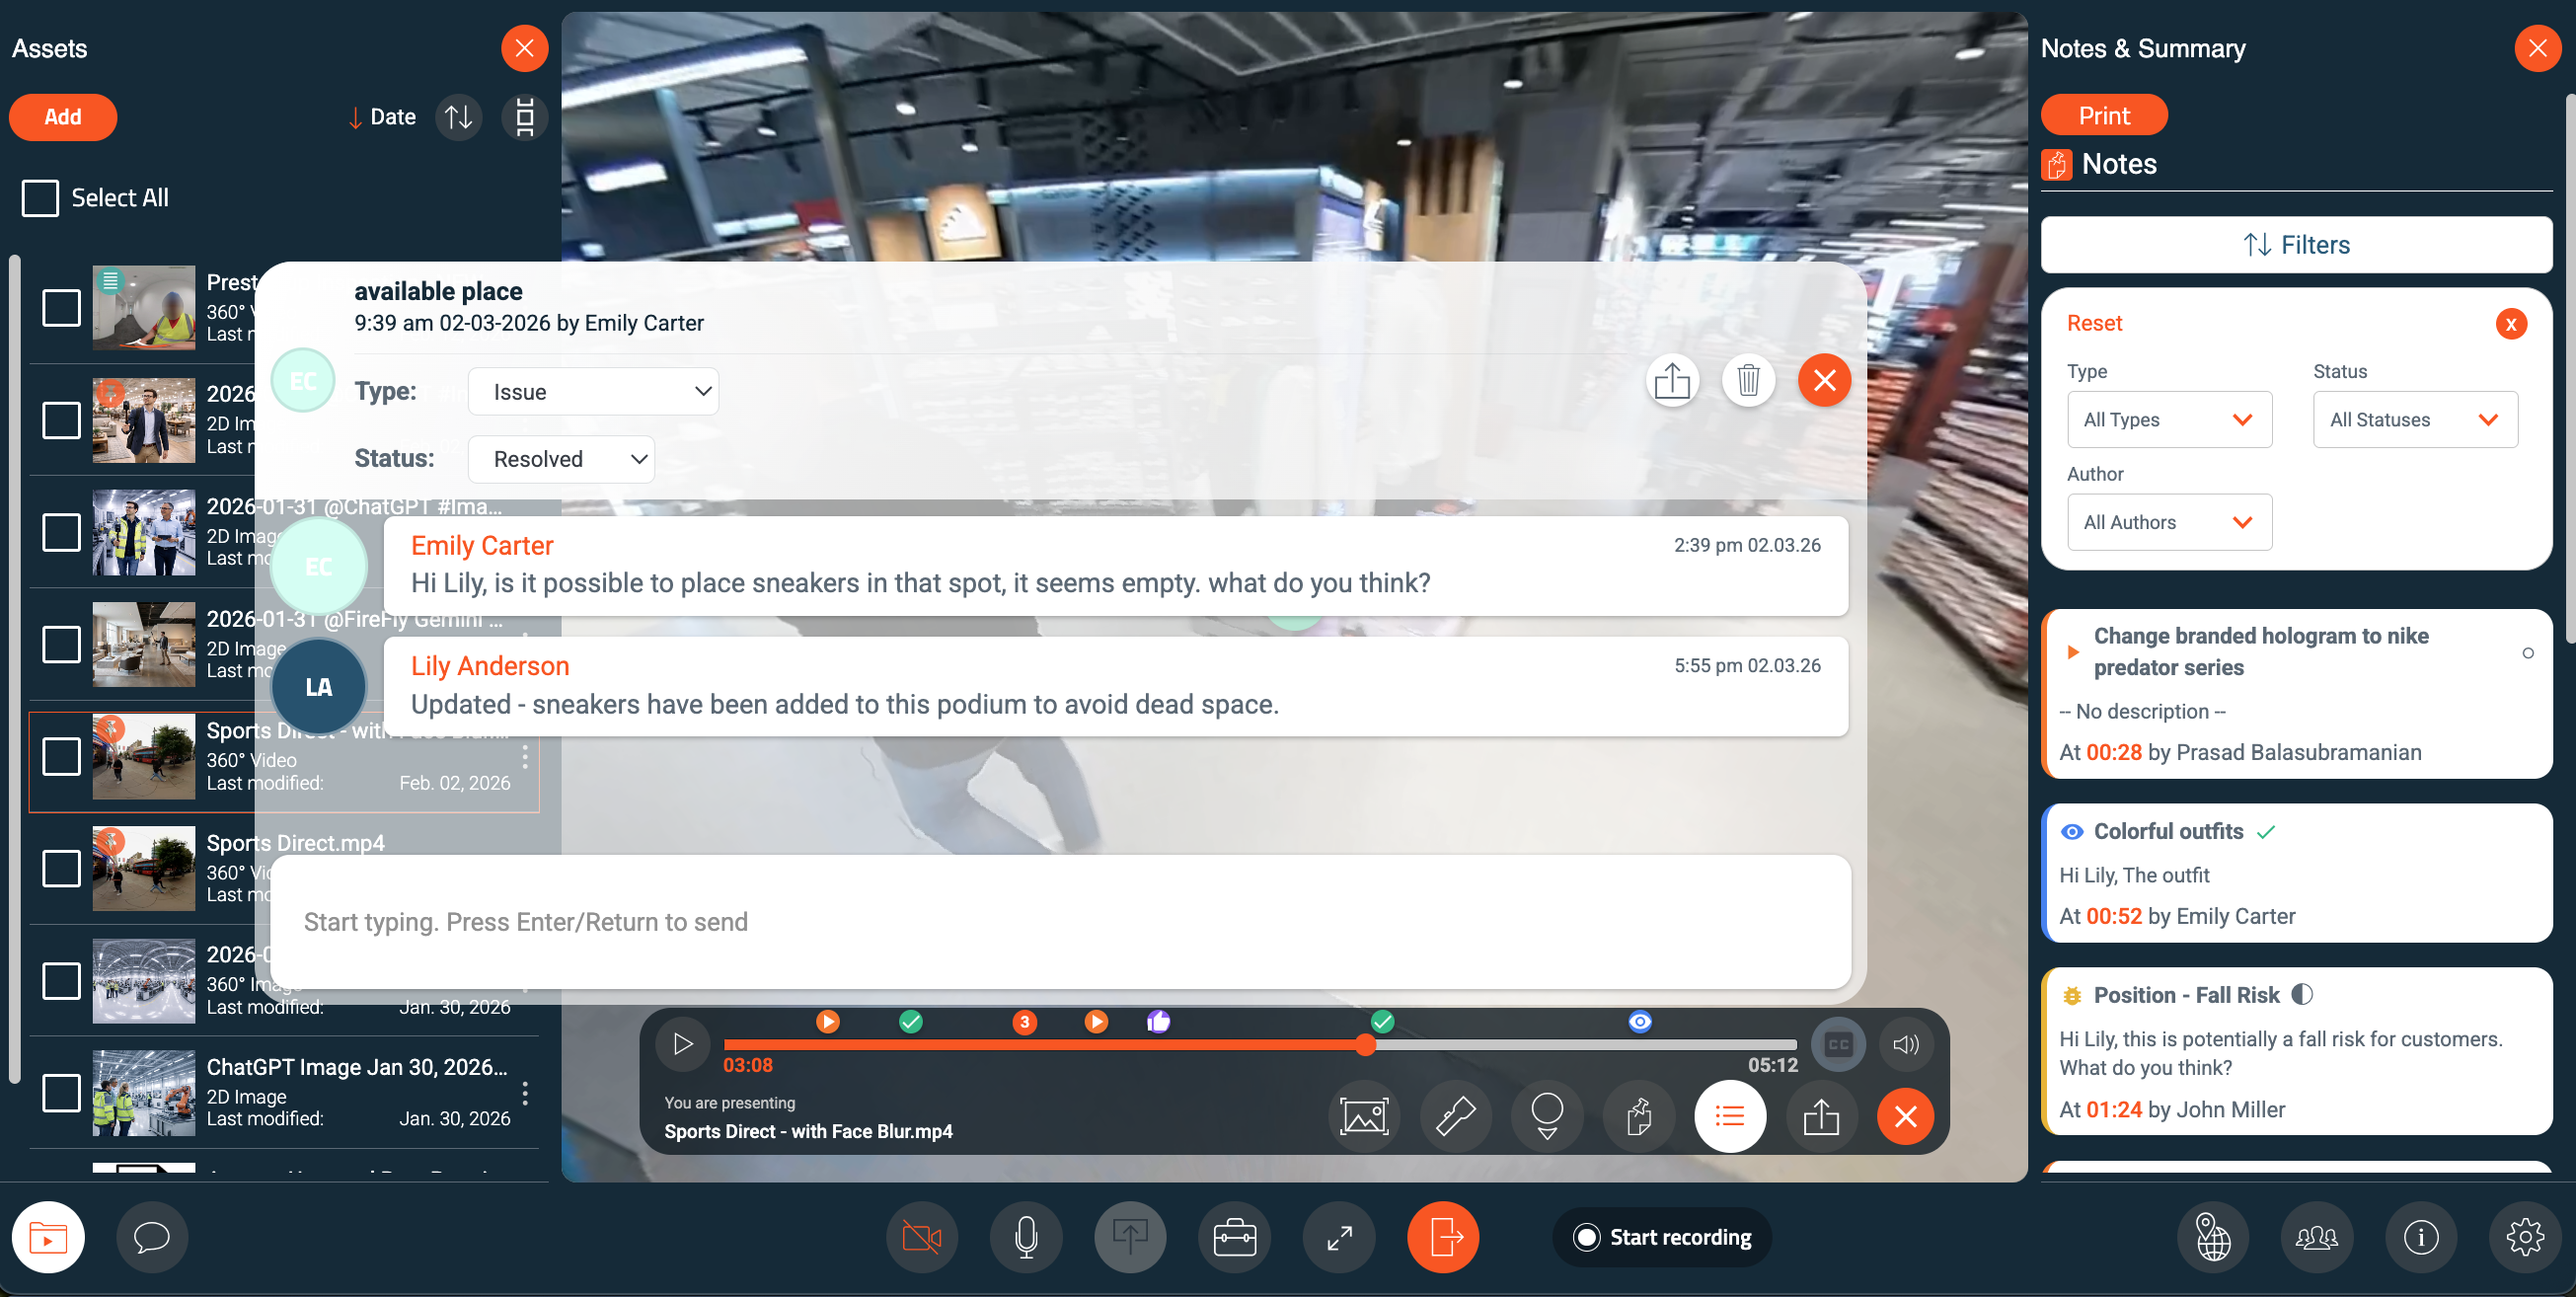 Nota de Avatour y filtros de notas
- Notas de comando de voz: son marcadores de posición generados automáticamente cuando la grabación detecta menciones como «insertar nota», «tomar una nota» o «hacer una nota». Estas notas aparecen en la línea de tiempo y el usuario debe colocarlas y finalizarlas.
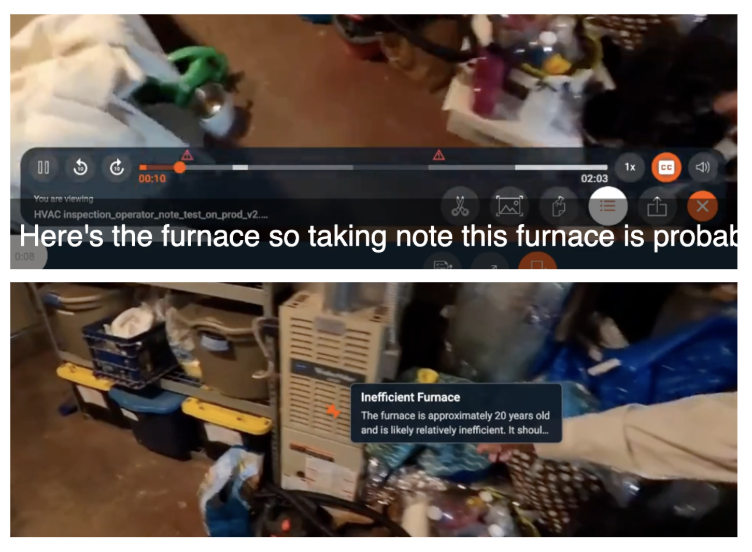 Notas de Avatour: generadas por comando de voz
- Panel de notas y resumen: abre un panel lateral que muestra todas las notas, los temas clave y un resumen ejecutivo del activo. Al hacer clic en un elemento, se accede a ese momento del vídeo.
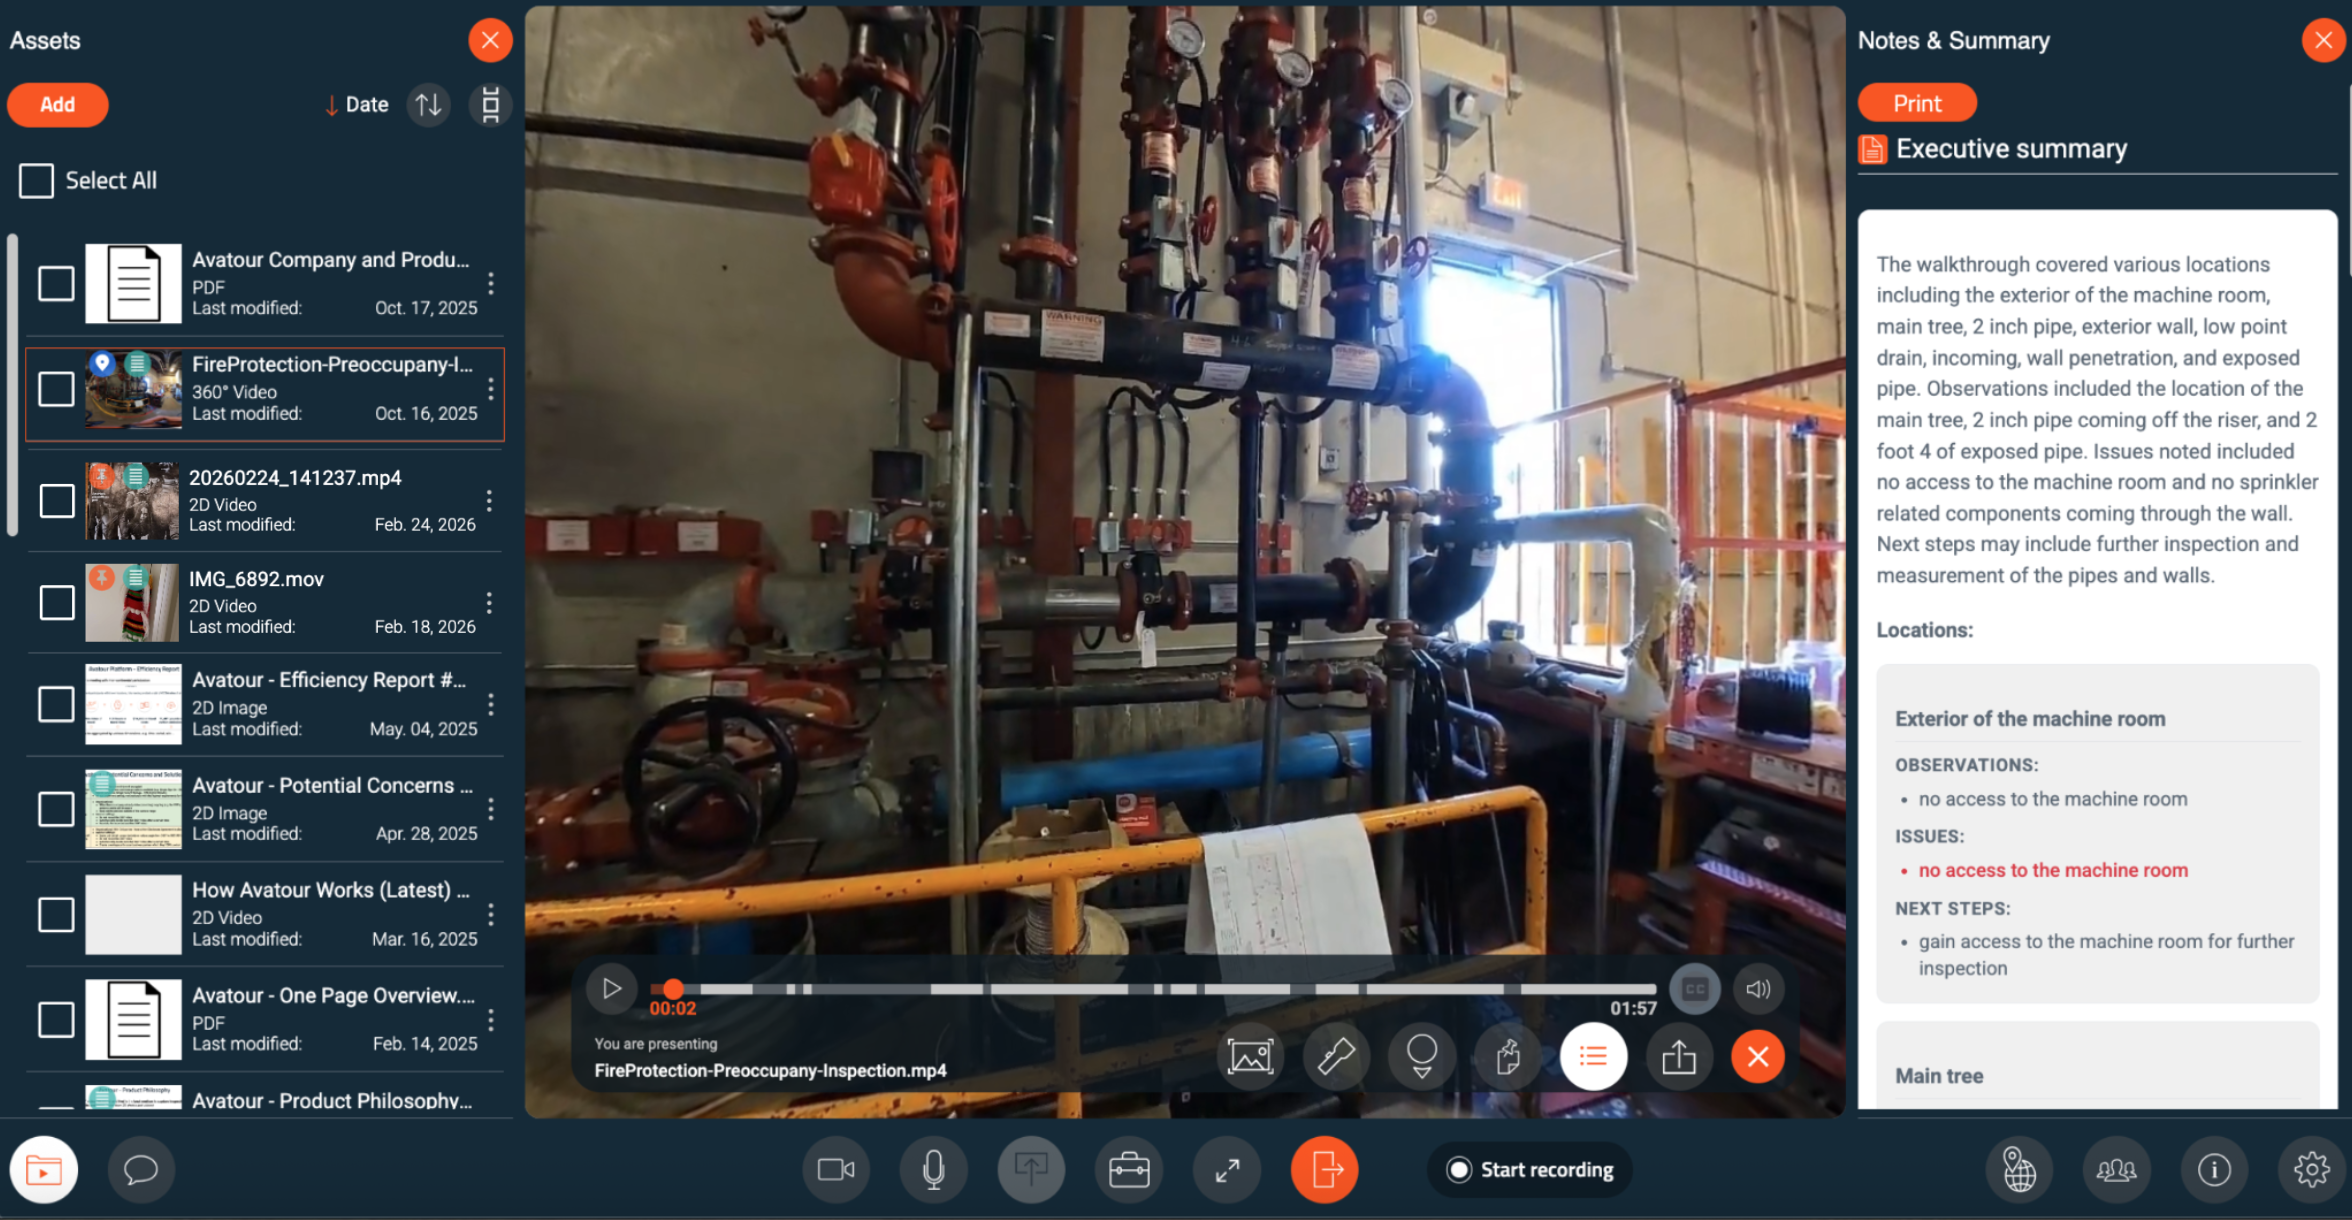 Resumen ejecutivo de Avatour durante la presentación de un activo en una reunión
 Temas de Avatour durante la presentación de un activo en una reunión
Desde el panel lateral, puedes imprimir un informe del activo o descargarlo en formato TXT o CSV. Los informes pueden incluir notas, temas generados por IA y transcripciones completas. También puedes elegir qué elementos incluir antes de exportar.
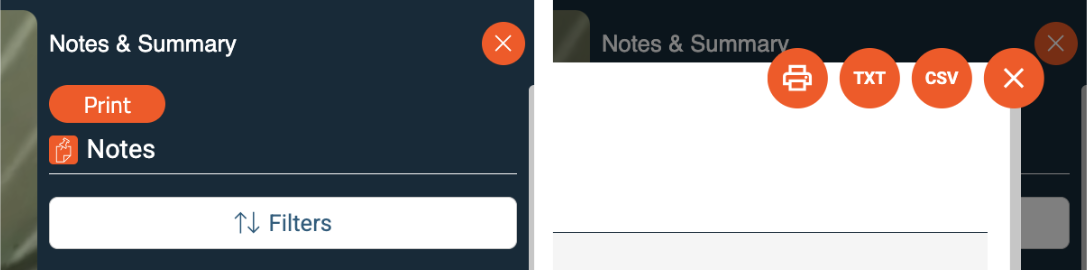
Menús de impresión/descarga del informe de activos de Avatour

Menú de selección de elementos del informe de activos de Avatour
- Compartir enlace: comparte un enlace a una nota o escena específica del activo.
- Subtítulos (CC): muestra la transcripción del texto en pantalla durante la reproducción del vídeo.
Barra de herramientas del activo (espacio de trabajo)
Al revisar un activo en un espacio de trabajo, la barra de herramientas es similar, pero está optimizada para uso individual:
 Menú de Avatour al presentar un activo en un espacio de trabajo
- Línea de tiempo del vídeo / Barra de progreso: muestra el progreso del vídeo con notas y temas clave extraídos de la pista de audio. Haga clic en cualquier punto de la línea de tiempo para desplazarse por el vídeo. Haga clic en una nota o un tema para saltar a ese momento y abrir la nota. Incluye controles de Reproducir / Pausar.
- Instantánea, Notas, Panel de notas y resumen, Compartir enlace, Subtítulos
- No disponible: Spotlight, POV (estas funciones requieren participantes en directo)
- Controles adicionales:
- Pasos de 10 segundos: avanzar o retroceder
- Velocidad de reproducción: ajustar la velocidad (0,5×–2×)
- Recortar vídeo: recortar el principio o el final del recurso
4. Para usuarios de tipo «Host» y «Admin»: Consola web de Avatour
Al iniciar sesión en tu cuenta de usuario de Avatour, accederás a la Consola web.
4.1 Consola web: descripción general del menú principal
En el lado izquierdo, verás los siguientes elementos del menú:
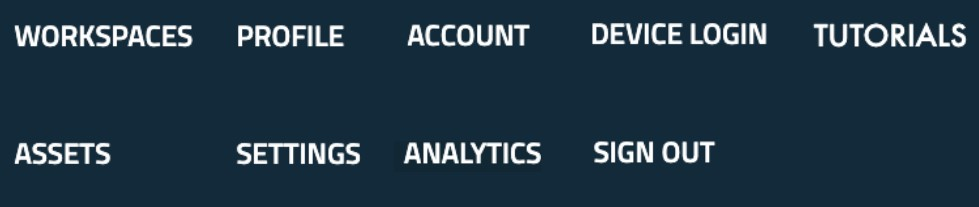 Consola web de Avatour - Menú principal
- Espacios de trabajo: organiza tu contenido de forma eficiente. Cada espacio de trabajo contiene Recursos, Colaboradores, Reuniones y Configuración.
- Recursos: accede y gestiona todos tus recursos (vídeos, imágenes, PDF). Los administradores pueden ver todos los recursos de la cuenta, y los recursos compartidos son visibles para todos los usuarios.
- Perfil – Gestiona tu idioma y contraseña.
- Analítica – Realiza un seguimiento de la actividad de las sesiones, el uso del espacio de trabajo y las métricas de ROI.
- Configuración (solo para administradores) – Configura los valores predeterminados del espacio de trabajo, las reuniones y los activos en toda la organización. Los administradores también pueden personalizar la imagen de marca (logotipo, colores, fondos).
- Cuenta (solo para administradores): gestiona los usuarios registrados y las cámaras de 360°.
- Inicio de sesión en el dispositivo: introduce el código que aparece en tu cámara de 360° para emparejarla con tu cuenta.
- Tutoriales: accede a tutoriales guiados.
- Cerrar sesión: cierra sesión en la consola.
Secciones como Perfil, Inicio de sesión en el dispositivo, Tutoriales y Cerrar sesión se explican por sí mismas y no tienen subsecciones detalladas.
4.2 Consola web: detalles por elemento del menú (con imágenes)
4.2.1 Espacios de trabajo
Los espacios de trabajo son unidades organizativas flexibles que te permiten gestionar activos, colaboradores y reuniones en un solo lugar. Puedes crear un nuevo espacio de trabajo con el botón Nuevo espacio de trabajo situado en la esquina superior derecha.
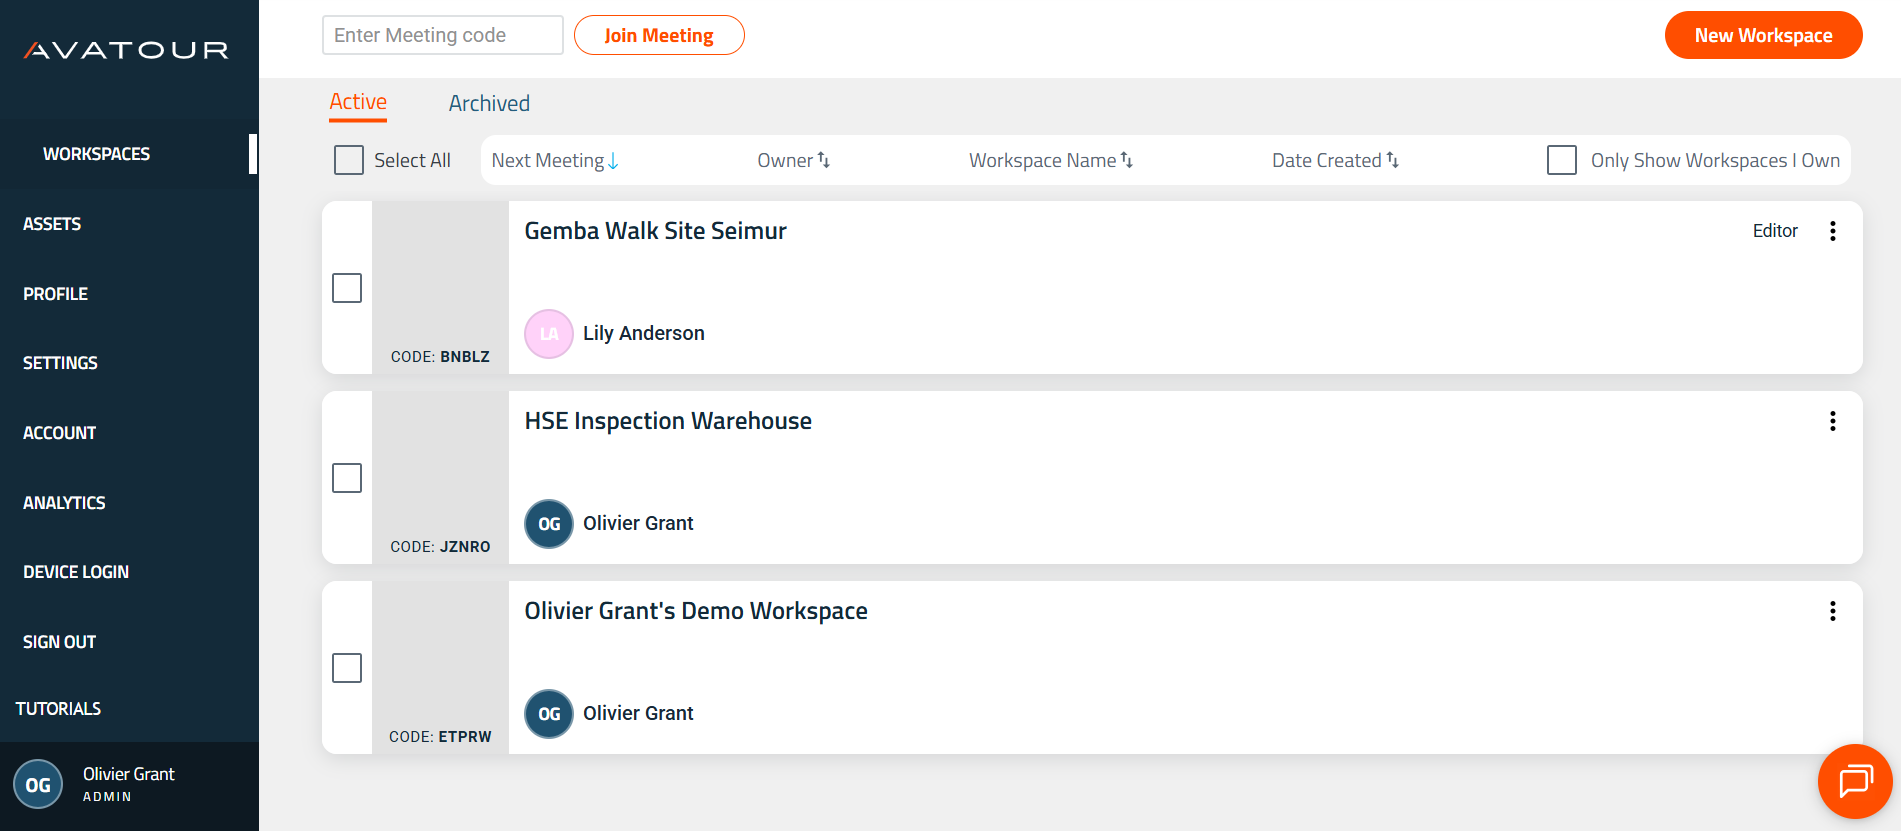 Consola web de Avatour - Elemento del menú principal «Espacios de trabajo»
Haga clic en el icono de la campana para ver un resumen de la actividad del espacio de trabajo durante los últimos 7 días.
 Actividades recientes del espacio de trabajo
Dentro de un espacio de trabajo:
Espacio de trabajo con activos (izquierda), lienzo (centro) y reuniones (derecha)
- Recursos: gestiona los archivos asignados a este espacio de trabajo.
- Colaboradores:
controla el acceso a los espacios de trabajo mediante
- Visor: puede ver los recursos. La invitación crea un usuario invitado si es necesario.
- Editor: control total del espacio de trabajo, mismos derechos que el anfitrión. La invitación eleva al usuario a anfitrión si es necesario.
Varios usuarios pueden acceder a un espacio de trabajo simultáneamente sin necesidad de una reunión. Los espacios de trabajo públicos y la configuración de acceso a las reuniones ofrecen opciones de acceso alternativas.
- Informe: genera un informe utilizando una plantilla de lista de verificación sobre los activos seleccionados del espacio de trabajo.
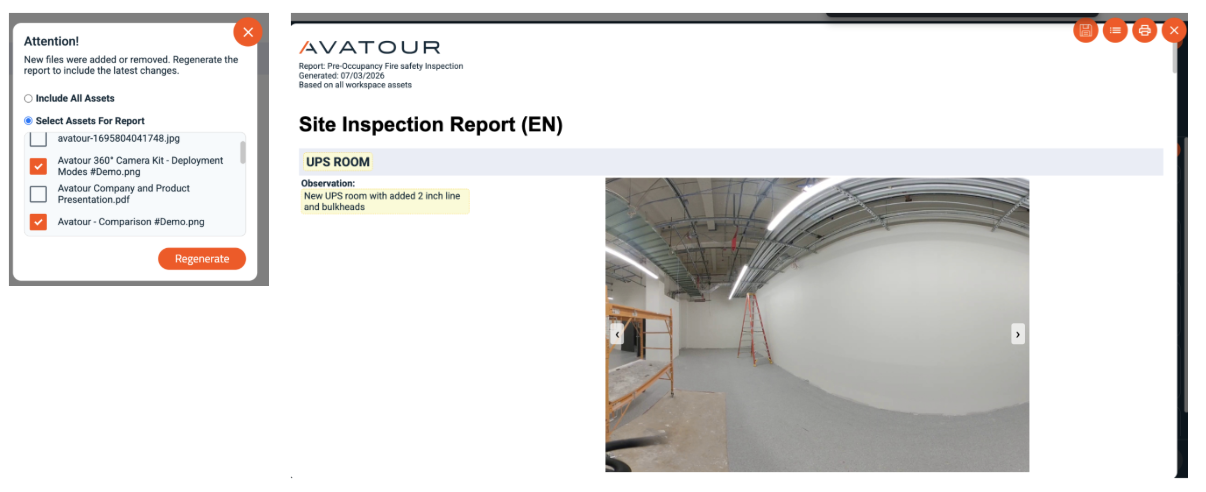 Informe del espacio de trabajo y selección de activos
- Mapa: muestra las ubicaciones de los activos con GPS en un mapa.
- Reuniones – Organiza reuniones en el espacio de trabajo.
- Configuración – Configura los valores predeterminados del espacio de trabajo y las reuniones:
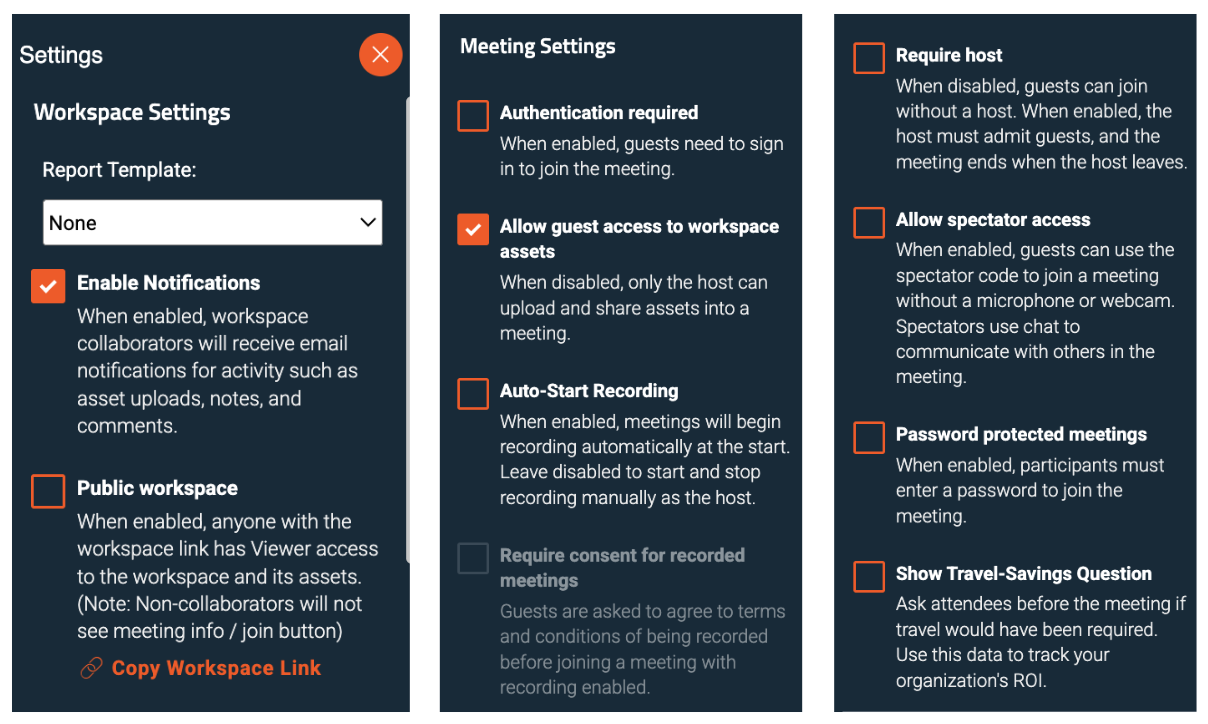 Configuración del espacio de trabajo
Configuración del espacio de trabajo
- Plantilla de informe – Selecciona una plantilla de lista de verificación para los informes de IA.
- Habilitar notificaciones – Correos electrónicos diarios con un resumen de los cambios en el estado de las notas.
 Ejemplo de notificaciones por correo electrónico
- Espacio de trabajo público – Cualquier persona que tenga el enlace puede ver los activos directamente.
Configuración de la reunión
- Se requiere autenticación: los participantes deben iniciar sesión.
- Permitir acceso de invitados: permite a los usuarios no registrados ver los recursos.
- Inicio automático de la grabación / Inicio manual: elige si las reuniones se graban automáticamente o se inician manualmente.
- Requerir anfitrión: el anfitrión debe admitir a los participantes; la reunión finaliza cuando el anfitrión se marcha.
- Permitir acceso de espectadores: unirse sin micrófono ni cámara; comunicarse a través del chat.
- Reuniones protegidas con contraseña: se requiere una contraseña para unirse.
- Mostrar pregunta sobre ahorro en desplazamientos: preguntar a los participantes si la reunión ha reducido los desplazamientos.
Las opciones se pueden combinar (por ejemplo, no se requiere anfitrión pero sí protección con contraseña).
4.2.2 Recursos
Gestiona todos los vídeos en 360°/2D, imágenes y archivos PDF. Sube/descarga recursos, asígnalos a espacios de trabajo, compártelos con otros usuarios, renómbralos, imprime/descarga informes, activa el desenfoque facial y el resumen con IA.
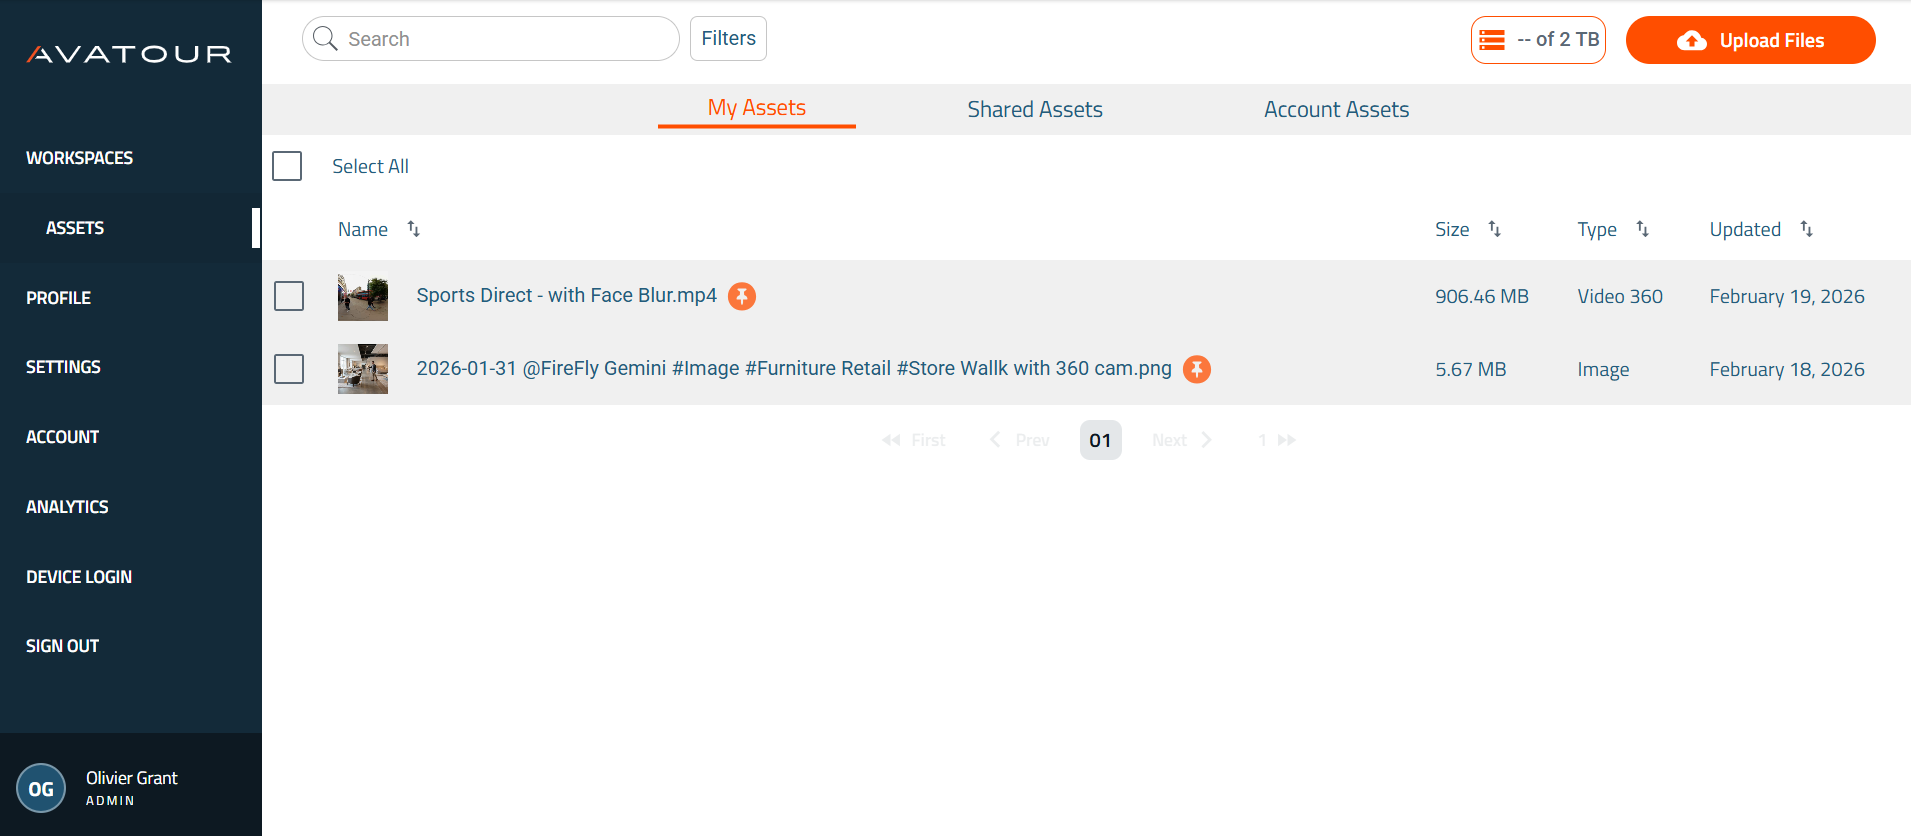 Elemento del menú principal «Recursos»
4.2.3 Análisis
Proporciona información sobre las reuniones, el uso de los espacios de trabajo y las métricas de ROI.
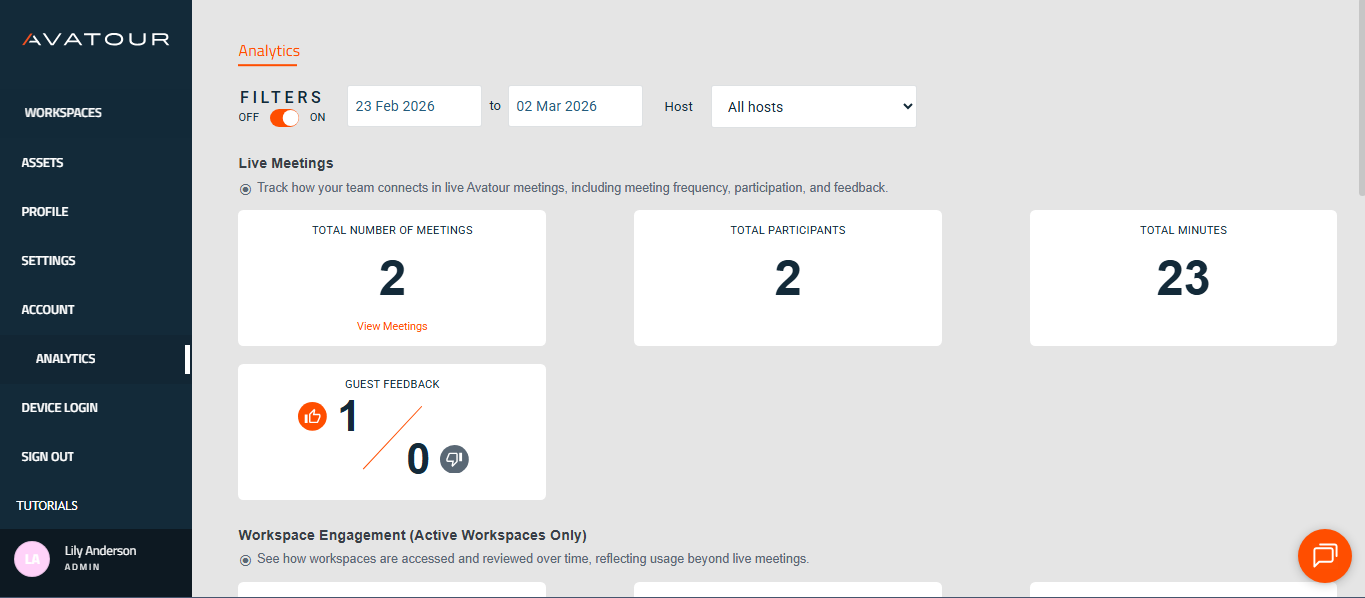 Resumen de analítica
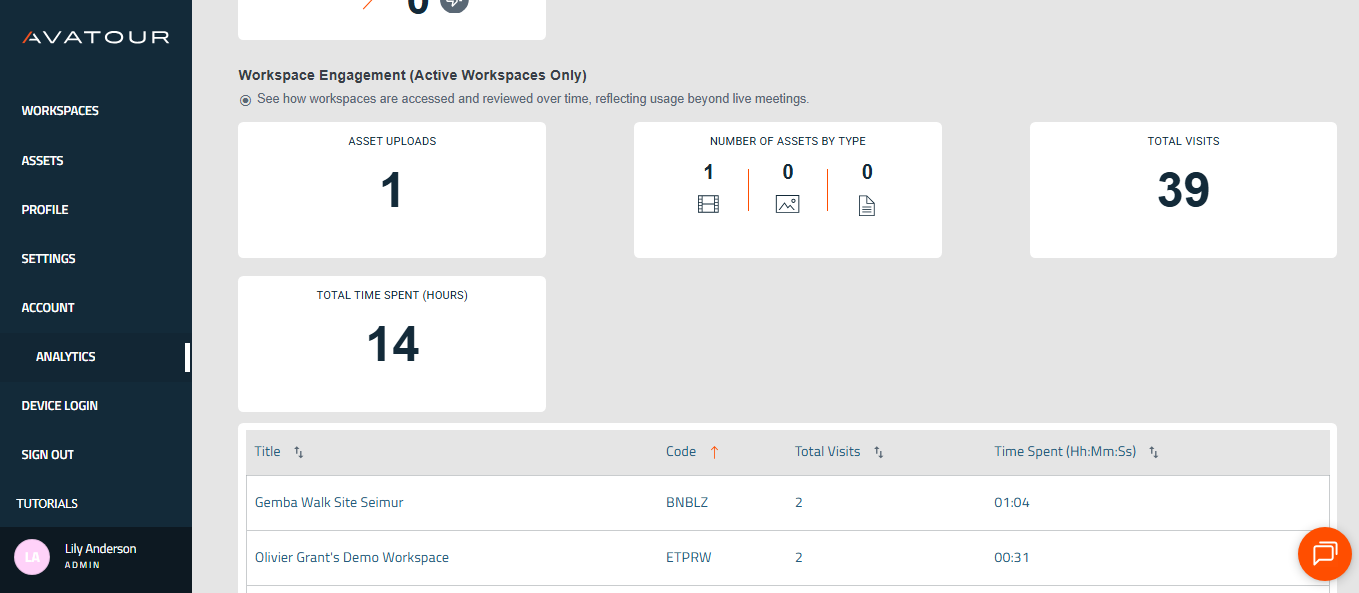 Actividad de las reuniones y uso del espacio de trabajo
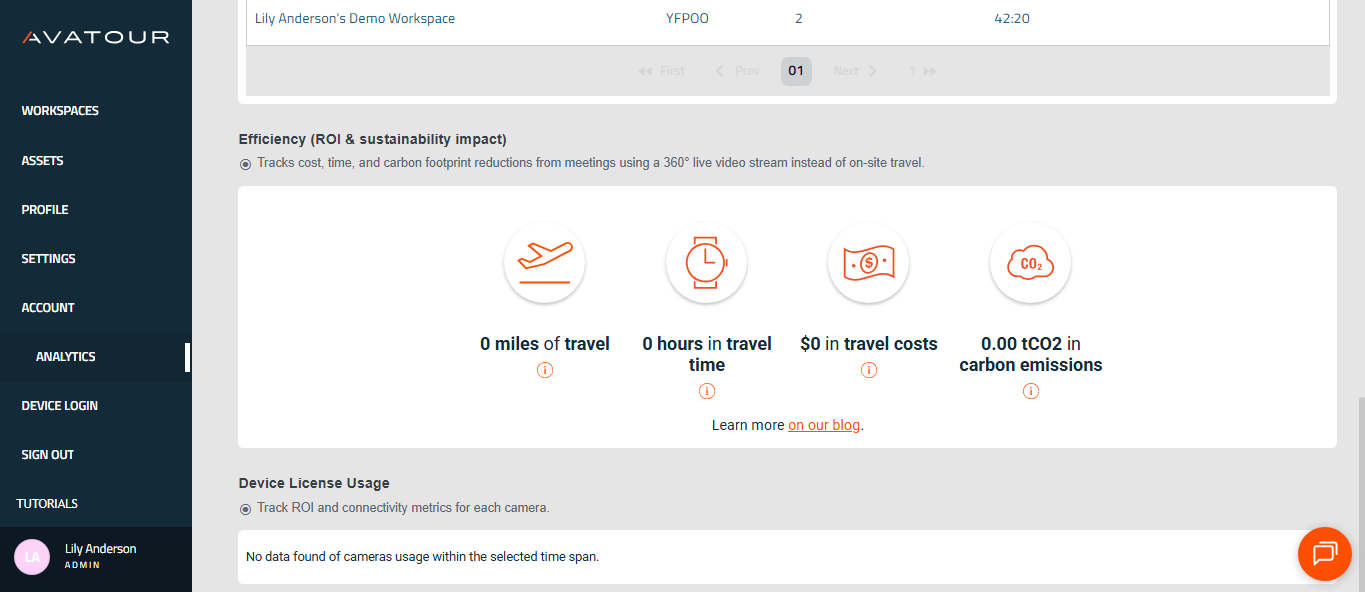 Uso de licencias de dispositivos y ROI
5. In situ: cómo utilizar el kit llave en mano de Avatour
5.1 Primeros pasos
Aquí encontrarás una guía en línea muy completa para dar tus primeros pasos con el kit llave en mano Avatour: Guía de inicio rápido – Kit llave en mano Avatour 3.1 (Configuración de Pilot PanoX V2)
Y aquí también tienes la imagen con las instrucciones que encontrarás en el interior de la tapa del estuche del kit 3.1.
 Imagen del interior de la tapa del estuche del kit Avatour
Sigue la guía y las instrucciones para desembalar, montar y encender tu cámara.
5.2 Consejos útiles
Batería externa: reuniones más largas y mejor rendimiento térmico
-
Si su kit incluye una batería Ulanzi: Colóquela entre la base del trípode y el palo extensible, y luego conecte la batería a la cámara mediante USB-C.
-
Si su kit incluye un palo con batería Telesin: Monte la cámara directamente en el palo extensible con batería Telesin y conéctela mediante USB-C.
Uso de la batería externa:
- Aumenta la duración total de la batería de unos 40 minutos (solo con la batería de la cámara) a unas 3 horas.
- Aporta estabilidad a la configuración de la cámara.
- Ayuda a prevenir un posible sobrecalentamiento.
Recomendamos utilizar siempre la batería externa desde el principio, especialmente para reuniones en directo.
Consideraciones de audio para reuniones en directo y grabaciones
-
Entornos ruidosos: Utilice los auriculares Shokz incluidos en el kit para una captura de audio nítida.
- Encendido/apagado: Mantenga pulsado el botón «+» durante 3 segundos (LED azul = encendido, LED rojo = apagado).
- Modo de emparejamiento Bluetooth: Con los auriculares apagados, mantenga pulsado el botón «+» durante 5 segundos (el LED parpadea en azul/rojo).
- Volumen: Utilice los botones «+» y «-».
-
Entornos más silenciosos / varios participantes cerca de la cámara: Utilice el altavoz con clip NoxGear. No ofrece la misma fidelidad que los altavoces de conferencia (por ejemplo, Jabra Speak), pero es fácil de enganchar a la camisa y capta eficazmente las voces cercanas.
- Encendido/apagado: Mantén pulsado el botón Reproducir/Pausa durante 2 segundos.
- Modo de emparejamiento Bluetooth: Entra automáticamente en modo de emparejamiento al encenderse (el LED parpadea en azul/rojo; azul fijo cuando está emparejado).
- Volumen: Utiliza los botones «+» y «-».
-
Uso de tu propio dispositivo: Si prefieres una alternativa (por ejemplo, un altavoz de conferencia o unos auriculares personales), puedes emparejarlo a través de la cámara: Ajustes → Bluetooth.
Conectividad, conectividad, conectividad
Antes de empezar: Asegúrate de tener conexión a Internet a través de:
- WiFi local (preferible)
- Red móvil (si estás fuera del alcance del WiFi)
Ancho de banda recomendado: 10 Mbps de subida/descarga para una transmisión completa en 360° (~5 Mbps). Un ancho de banda inferior (1–2 Mbps) solo funciona si te mantienes quieto.
Comprueba la velocidad de la red
- Prueba en una sola ubicación: Utilice cualquier comprobador de velocidad que utilice habitualmente (por ejemplo, Speedtest) para verificar tanto el ancho de banda de subida como el de bajada.
- Prueba caminando por el recinto: Desde la cámara: Ajustes → Red → Prueba de conexión. Recorra todo el espacio para confirmar la cobertura y el ancho de banda.
WiFi local
- Muy recomendable para conexiones estables.
- Si el departamento de TI requiere una lista blanca, busca la dirección MAC: Ajustes → Acerca de → Dirección WiFi.
Red móvil
Opción A: punto de acceso y SIM incluidos en el kit
- Conecta el punto de acceso GlocalMe al stick de batería Telesin (imán).
- Garantiza que no haya interferencias y mantiene la conexión si te alejas de la cámara.
- Solución de problemas:
- Comprueba que la SIM esté preinstalada (no una SIM en la nube).
- Activa el 5G en el Administrador de tarjetas SIM.
- Verifica que el APN sea el correcto para tu región (Guía de configuración de APN).
Opción B: Punto de acceso personal / SIM - Utilice su propio smartphone o un punto de acceso dedicado.
Nota importante:
Mantenga el punto de acceso desactivado mientras esté conectado a una red WiFi; actívelo solo cuando esté fuera de cobertura. El sistema operativo de la cámara cambia dinámicamente entre redes WiFi en función de la intensidad de la señal y puede cambiar inadvertidamente al punto de acceso incluso cuando haya WiFi disponible.
Las redes móviles pueden limitar el ancho de banda de forma inesperada. Consulte con su operador los límites de su plan de datos o póngase en contacto con el servicio de asistencia de Avatour si utiliza nuestro punto de acceso y nuestra tarjeta SIM.
Situaciones de bajo ancho de banda
- Grabe vídeos de la ubicación con antelación para reproducirlos más tarde (guía de grabación).
- Comparte la transmisión de la cámara de un smartphone para complementar las zonas con poco ancho de banda (0,1-0,3 Mbps de subida).
Sin conectividad
- Solo se pueden utilizar vídeos pregrabados (guía de grabación).
Otros participantes in situ: prácticas recomendadas
Cuando varios participantes se unen a una reunión en directo de Avatour desde la misma ubicación que la cámara de 360°, es fundamental gestionar cuidadosamente el audio y el ancho de banda:
- Cada smartphone, tableta u ordenador portátil conectado in situ consume ancho de banda de la red y puede afectar negativamente a la transmisión de la cámara de 360°.
- La presencia de varios micrófonos y altavoces en el mismo espacio puede provocar retroalimentación de audio, lo que hace que la experiencia de la reunión resulte desagradable para todos los participantes.
Para hacer frente a estos retos, siga estas prácticas recomendadas:
- Utilice auriculares con cable o inalámbricos: preferiblemente con cancelación de ruido para evitar el eco y la retroalimentación.
- Modo in situ: únase a la reunión en modo in situ cuando se encuentre físicamente cerca de la cámara de 360°.
- Este modo está optimizado para su uso in situ:
- Silencia el micrófono y el altavoz del participante de forma predeterminada.
- Este modo está optimizado para su uso in situ:
- No envía la señal de la cámara del participante.
- No muestra la señal de la cámara de 360° en el navegador del participante.
- Ahorra ancho de banda de red, lo que garantiza que la cámara de 360° disponga del máximo ancho de banda de subida disponible para la transmisión en directo.
- Útil cuando un usuario desea compartir detalles específicos; puede compartir su cámara para ofrecer vistas específicas. - Silenciar cuando no se esté hablando activamente: Evita la retroalimentación de audio no deseada y las distracciones.
- Utilizar una red independiente si es posible: Conecte su smartphone a una red diferente a la de la cámara para reducir las interferencias.
Seguir estas directrices garantiza una visita en directo fluida y de alta calidad tanto para los participantes in situ como para los que se conectan de forma remota.
5.3 Aplicación de la cámara Avatour
Aquí se muestran los menús (1) de nivel superior, (2) de ajustes y (3) de configuración de red.
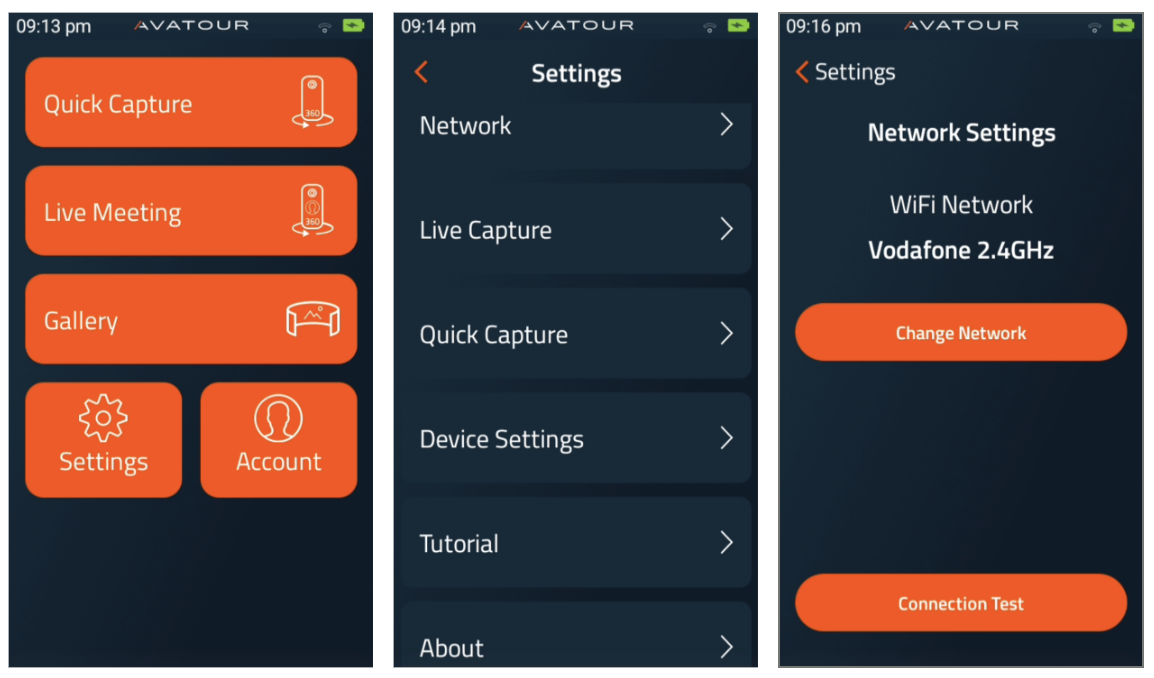 Aplicación Avatour 360° Camera - 3 menús
Captura rápida: para grabar vídeos de 360° sin conexión. Para obtener una descripción detallada, consulta ¿Cómo se graban y suben vídeos de 360° con la aplicación Avatour?. Recomendamos utilizar un dispositivo de audio externo (conectado vía Bluetooth). Nota: También puede grabar vídeos y tomar fotos estándar en 2D; simplemente cambie el modo entre 360° y 2D en la esquina inferior derecha una vez que esté en la pantalla de captura rápida.
Reunión en directo: para videoconferencias en directo a 360°. Verás tus espacios de trabajo y, al hacer clic en uno de ellos, se iniciará la transmisión de vídeo en directo desde la cámara de 360°. Antes de poder unirte a la reunión con tu cámara de 360°, debes conectar un dispositivo de audio a través de Bluetooth. Para obtener una descripción detallada, consulta ¿Cómo iniciar una reunión de Live Capture con tu cámara Pilot?
Al organizar una reunión de Live Capture con tu cámara de 360°, tendrás a tu disposición herramientas de reunión similares que reflejan la experiencia web. Aquí tienes un enlace a nuestro artículo de la Base de conocimientos que explica estas herramientas con más detalle: Herramientas de la aplicación del operador
Galería: aquí encontrarás todos tus vídeos e imágenes de 360° para subirlos a la consola web de Avatour.
Configuración: en Configuración, dispone de las siguientes opciones:
- Red: esta opción le permite cambiar la red WiFi a la que está conectada la cámara o realizar una prueba de conexión de red para ver su ancho de banda de transmisión
-
Captura en directo: ajuste la configuración de Captura en directo en función del ancho de banda disponible, la sensibilidad de realidad virtual del invitado o si las lentes protectoras de la cámara están instaladas:
- Frecuencia de fotogramas objetivo: Ajusta la frecuencia de fotogramas de tu vídeo de captura en directo entre 15 fps, 24 fps y 30 fps. Las frecuencias de fotogramas más altas producen un vídeo más fluido, pero requerirán más ancho de banda de subida. Predeterminado: 15 fps
- Velocidad de bits objetivo: Te permite aumentar o disminuir la velocidad de bits máxima de transmisión para tu captura en directo. Puedes establecer la velocidad de bits objetivo entre 1 Mbps y 10 Mbps. Las velocidades de bits más altas darán como resultado una mayor resolución de vídeo, pero requerirán más ancho de banda de subida. Predeterminado: 5 Mbps
- Optimizar movimiento: Esto reducirá la velocidad de fotogramas del vídeo, generando menos carga en el ancho de banda de subida de tu red, y aumentará la velocidad de bits de transmisión. Además, esta opción ayuda a reducir el mareo por movimiento en los participantes de realidad virtual. Predeterminado: Desactivado
- Lentes protectoras: Esto afectará a cómo se une el vídeo de 360° dependiendo de si se han instalado lentes protectoras en su cámara. Si no tiene lentes protectoras, establezca esto en «No». Si ha recibido un Kit 3.0, tiene lentes protectoras preinstaladas y debe establecer esto en «Sí». Predeterminado: Sí
-
Captura rápida: Ajusta la configuración de Captura rápida en función de la velocidad de fotogramas de vídeo que prefieras, el ancho de banda disponible para la subida de vídeos grabados o si las lentes protectoras de tu cámara están instaladas. La Captura rápida tiene una resolución fija de 4K, lo que suele ofrecer un buen equilibrio entre la calidad del vídeo y el tamaño del archivo. (Para resoluciones más altas, puede utilizar las aplicaciones nativas de la cámara, también en la PanoX V2; para más detalles, consulte ¿Cómo se graban y suben vídeos de 360º con la aplicación Avatour?):
- Velocidad de fotogramas objetivo: Ajusta la velocidad de fotogramas para tus grabaciones de vídeo de Captura rápida entre 15 fps, 24 fps y 30 fps. Las velocidades de fotogramas más altas producen un vídeo más fluido, pero aumentarán el tamaño del archivo de vídeo y el tiempo de subida. Recomendado: 30 fps
- Velocidad de bits objetivo: Establece la velocidad de bits objetivo para las subidas de Captura rápida entre 5 Mbps y 20 Mbps. Las velocidades de bits más bajas aumentan la velocidad de subida, pero reducen la calidad del vídeo. Recomendado: 20 Mbps
- Lentes protectoras: Consulta la sección Lentes protectoras para Captura en directo más arriba
Consulte también nuestra Calculadora de tamaño de archivos de vídeo Avatour 360° para obtener más consejos sobre los ajustes anteriores y los tamaños de los archivos de vídeo.
- Acerca de: Ver el número de serie del dispositivo y la versión del software
Cuenta: Para iniciar sesión con tu cuenta de administrador o de host de Avatour.
6. Recomendaciones sobre buenas prácticas
6.1 Primeros usos (informales) y familiarización
Para tus primeros usos y para familiarizarte con la consola web de Avatour y el kit llave en mano de Avatour, te recomendamos seguir estos pasos:
- Llévate el kit a casa y pruébalo con tu familia y amigos utilizando tu conexión a Internet doméstica.
- Lleve el kit a la oficina y conéctese a la red corporativa (pueden surgir cuestiones corporativas, como los cortafuegos de la empresa, pero ya sabe por el primer paso que Avatour funciona y que este es un tema que debe resolver su equipo de TI con la ayuda de Avatour).
- Empiece a utilizar Avatour in situ (fuera de su oficina) en el lugar de la reunión al que los participantes remotos tendrían que desplazarse normalmente. Pueden surgir más cuestiones relacionadas con la conectividad. Avatour le ayudará en colaboración con su equipo de TI.
- Empiece a utilizarlo con participantes remotos internos y externos.
6.2 Antes de una reunión en directo con vídeo de 360°
- Recomendamos realizar un recorrido en vídeo de 360° grabado antes de cualquier recorrido en directo, si el tiempo lo permite, por tres razones: (1) Disponer de una solución alternativa para el recorrido en directo, (2) tener material para la documentación y su revisión posterior (además del recorrido en directo grabado) y (3) empezar a crear una biblioteca de vídeos de 360° de todas sus instalaciones, lo cual puede resultar útil para muchos casos de uso.
- Cargue todos los componentes del kit durante al menos 90 minutos antes de la reunión en directo. De todos modos, recomendamos mantener todos los dispositivos en carga continua cuando no se utilicen. De este modo, todos los dispositivos estarán siempre listos, incluso para reuniones improvisadas no planificadas.
-
Tenga el kit completamente montado (1. base del trípode + 2. batería Ulanzi + 3. palo extensible + 4. cámara de 360°).
-
Confirma que se ha creado un espacio de trabajo para organizar una reunión en directo e incluye todos los recursos relevantes.
-
Invita a todos los participantes a la reunión a través de tu espacio de trabajo. Esto crea una invitación en los calendarios de todos los participantes e incluye el enlace de invitación a la reunión.
-
Empareja y conecta a la cámara los auriculares o altavoces Bluetooth que tengas previsto utilizar para tu visita.
-
Todos los usuarios de teléfonos inteligentes presentes en el lugar deben conectarse desde una red diferente a la de la cámara. Esto reducirá la carga sobre el ancho de banda de la red de la cámara.
-
Si eres el único operador de cámara, lleva contigo un teléfono inteligente por si quieres compartir la cámara del teléfono y mostrar detalles precisos.
-
Confirma que la cámara 360° puede conectarse a tu red WiFi local.
-
Antes de una reunión de Avatour, planifica la ruta que seguirás por las instalaciones. Realiza una reunión de prueba de Avatour con la cámara y comprueba que todas las zonas tengan velocidades de bits superiores a 1 Mbps de ancho de banda. Esto se puede ver en la propia pantalla de la cámara o, como participante remoto, yendo a Ajustes y activando Mostrar velocidad de bits.
-
Si observas que algunas zonas tienen poco o ningún ancho de banda, lo mejor es tomar imágenes o realizar una grabación. Estas pueden presentarse durante la reunión para que los participantes remotos las revisen. Puede seguir la guía que se incluye aquí, donde se explica nuestra función «Captura rápida» para grabar y subir vídeos e imágenes: ¿Cómo se graban y suben vídeos 360º con la aplicación Avatour?
-
Si hay participantes remotos que se unen a la reunión y que no han utilizado Avatour anteriormente, ofrézcales un breve resumen de la plataforma, sus funcionalidades (vídeo en directo en 360°, recursos, instantáneas, anotaciones, foco de atención) y las herramientas de la reunión.
-
Puede comenzar en otra solución de videoconferencia (por ejemplo, Teams, Zoom, Google Meet), pero antes de pasar a Avatour, cierre completamente la otra aplicación de videoconferencia. En algunos casos, estas otras aplicaciones darán prioridad al micrófono, los altavoces o la cámara web de su dispositivo, lo que provocará que se desactiven para Avatour. Además, NO ejecute Avatour Y otra videoconferencia al mismo tiempo, ya que esto reducirá el ancho de banda disponible.
-
Si tiene previsto utilizar la cámara 360 en un entorno con altas temperaturas, se recomienda utilizar el módulo de refrigeración (solo Pilot Pano). Esto ayudará a reducir las posibilidades de que la cámara se sobrecaliente y se apague automáticamente.
6.3 Al manejar la cámara in situ para una reunión en directo con vídeo de 360°
-
Al manejar la cámara, asegúrate de caminar despacio y detenerte con frecuencia para colocar la cámara sobre su trípode. Esto contribuye a (1) mejorar la calidad del vídeo, ya que se generan menos datos de vídeo al no mover la cámara innecesariamente, y (2) reducir cualquier posible interrupción del vídeo cuando la conexión de red de la cámara cambia entre puntos de acceso WiFi.
-
Sostenga la cámara frente a usted, por encima del nivel de los ojos. Esto permite que todos los participantes remotos vean la mayor parte de su entorno.
-
En los casos en que la cámara deba permanecer estable, utilice el trípode y ajuste la altura de la cámara a la altura adecuada, preferiblemente a la altura de los ojos.
-
Conecta siempre la cámara a tu red WiFi local siempre que sea posible. En zonas sin acceso a WiFi, utiliza el punto de acceso (hotspot) proporcionado. El punto de acceso cuenta con una tarjeta SIM que se conectará a una red móvil fiable cercana. Mantén siempre el punto de acceso apagado cuando no lo utilices en interiores, ya que, de lo contrario, la cámara de 360° podría conectarse al punto de acceso, algo que no deseamos en interiores. Cuando estés al aire libre, mantén el punto de acceso cerca de la cámara de 360°.
-
Cuando la velocidad de bits de la cámara comience a caer por debajo de 2 Mbps, camine más despacio o deténgase por completo hasta que la señal se estabilice de nuevo. Esto suele ocurrir al cambiar de un punto de acceso WiFi a otro.
-
Si sabe que la conectividad y el vídeo se interrumpirán al desplazarse a una ubicación específica (por ejemplo, al pasar de una zona de producción interior a una zona exterior), avise a los participantes remotos con antelación.
-
Si necesitas mostrar algo con gran detalle o con letra pequeña, utiliza tu propio smartphone o el de un participante presente en el lugar para unirte a la reunión y mostrar la cámara (trasera) de tu teléfono o del suyo.
-
Si es posible, recomendamos que haya una persona adicional presente en el lugar para ayudar con el uso compartido de la cámara del smartphone descrito anteriormente, ya que a menudo resulta útil o necesario.
-
Lo ideal es que los usuarios de teléfonos inteligentes que se encuentren en el lugar se unan a la reunión (1) en modo presencial y (2) a través de una red diferente a la que utiliza la cámara, para no restar ancho de banda de subida crucial a la cámara de 360°.
-
Todos los participantes que se encuentren en el lugar y se unan desde su teléfono inteligente deben tener el micrófono silenciado, a menos que estén hablando activamente.